I work out of two Anarchist’s Tool Chests (ATC) of two different ages – but for two different types of work. In 2012, I built the one I have at home in my old second-floor home shop and in Chris’s old basement shop. For a long time, it held an almost-complete second set of hand tools for building furniture. After I left PopWood (PW) in 2017, I sold the majority of my doubles (had to pay the mortgage somehow!), so my chest at home is now mostly for tools I use for working on stuff around the house. It does still have a few of the same tools as at work (I need chisels and a block plane at both places), and it has some stuff I never use but can’t (yet) bear to get rid of. And there are a few similar items in my chest at work. I’m not terribly sentimental…but I’m not nearly as ruthless as Chris when it comes to divesting myself of things I don’t truly need.
My chest at work is almost five years old; it’s the one I built in the first ATC class I taught in our shop after leaving PW (I believe in February 2018).
There are a few items that travel back and forth now, but for the most part, my furniture-making tools are at the Lost Art Press shop. While there’s plenty of room in my newer basement shop and I have two benches there, I’m spoiled by the light coming in the windows at work – so whenever possible, I prefer to work where I can better see…and where I can more readily ask for a hand in lifting heavy stuff (thank you, Chris).
My inventory has mostly remained the same for the last decade, but when I began teaching a lot more (in 2018), I began acquiring extras of stuff that students tend to borrow (either because they don’t own that tool or because they bought theirs where they shouldn’t). Teaching is why my tools have blue dots on them and/or blue gaffer’s tape – for quick identification. As Chris did with his inventory, I’ll work my way down through the tills, then to the racks and chest floor. But my pictured groupings aren’t as particular – to some extent, I just squeezed together what fit on top of my chest. And as with his, some of these are tools that:
• I have had for years and that I am happy with. “It is mine, I tell you. My own. My precious. Yes, my precious.” (No need to try another…unless it is blue or cat-shaped)
• Were made by a friend/someone I admire
• Were given to me by a friend/someone I admire
• I have no idea why I have this particular tool
I also have a few other tools mixed in with the student tools, on the shelves near my desk and on the tool wall. (Ones that simply take up too much room in my chest vs. how often I need them.)

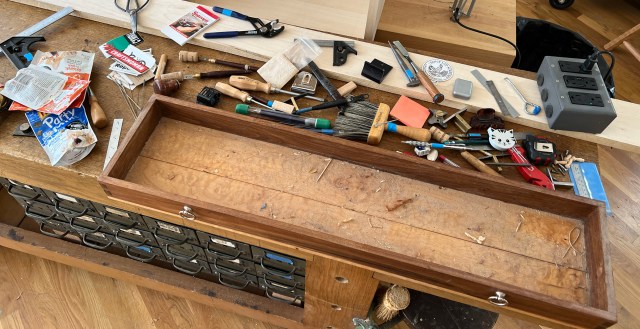
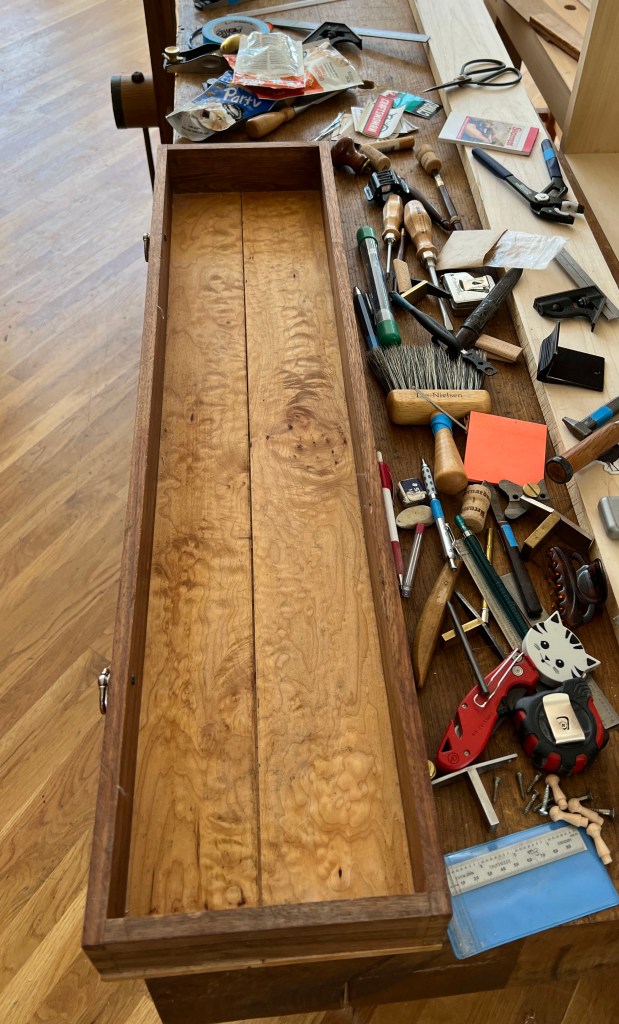
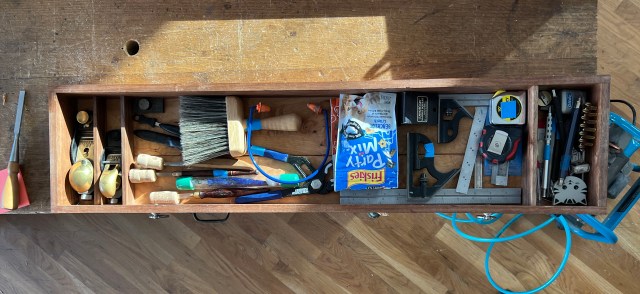
The Top Till
My top till holds the stuff I reach for the most – both in classes and in my own work, along with a few small things that don’t fit elsewhere.

Block Planes & Weird Bollocks
The Lie-Nielsen block planes (a No. 60-1/2 and No. 102) finally have their own cubbies as of last week (I’ve been meaning to do that for a while, of course). In the cubby with my No. 102 is where I now keep the straight and Phillips hex tips for my Element’ary driver (because that’s where they fit nicely and won’t get lost). Also in the top till are the Torx tips for the same. I keep my soft-jaw pliers close at hand because I’ve a touch of arthritis in both hands now, so it comes in handy for tightening fences on various tools (and getting things loose). I use the Lie-Nielsen brush to remove sawdust from all my tools before I wipe them with my woobie (which hangs on my bench light) and stow them back in my chest. The (slightly gross – sorry) hearing protection is of course necessary for using power tools, but also while six students are chopping dovetails (hand-tool woodworking isn’t always quiet). The Working Hands cream gets dipped into at least four to five times every day – more in winter (oh, for a better and lasting solution for my dry skin). And I reach for the cat treats even more times than that….

Dovetail Marking/Checking Tools
Yes, of course I use marking knives for things other than dovetailing – but I do cut a lot of dovetails. The one on the far left is my long-time favorite – a Blue Spruce spear-point knife made by Dave Jeske. The rest (from left: a Veritas “Workshop Striking Knife,” A Czeck Edge Tools “Kerf Cadet II” and another of Dave’s knives…that I bought because it’s blue) are knives I loan to students. The Lufkin No. 137C is the small square I use to check dovetails and that I’ll let students use. (It is rare that any but the narrow blade is in the tool, though on occasion I’ll use the 2-1/2″ rule. The miter blades came with it, so I’ve kept them (they don’t take up much room in the box). Above the Lufkin square are three dovetail templates. At top is the Woodjoy tools version I’ve had since about 2006, then a Woodjoy that was given to me (I haven’t forgotten I owe the donor a Dutch Tool Chest book when I finish it…just in case he’s reading!) from an updated design with a longer stock (to fit across two 3/4″-thick tailboards for marking gang cuts). At the bottom is the first-one-off-the-production-line Crucible Tools Dovetail Template that is based on the Woodjoy version (with permission and royalties paid to the designer). To the right of those is the R. Murphy Hand Carving and Dental Knife I inherited from my grandfather; I use it most often for relief cuts on the back of tails. At far right is the small square I don’t loan to students for checking dovetails: a Vesper Tools Precision Dovetail Square (and its various rules). I lost a similar Starrett square in a class – I’m pretty sure it was inadvertently swept off a bench into a trash can. So I bought the Lufkin to replace that one. I can’t afford to replace the Vesper. The boxes themselves are basically cubbies to protect and corral their contents – lazy cubbies, but they fit and they work!

Measuring Tools
I’ve had both the large and small Starrett combination squares since almost the day I decided to learn how to make furniture. I love the 12″; I need a new old-stock 6″ (mine slips)…but I’ve been saying that for at least five years, so it’ll probably never happen. Then there’s an array of 6″ rules – mostly for loaning out. My favorite is the Starrett at bottom left; it’s the easiest for me to read. The 4″ Starrett at bottom right was just too cute to resist during a long-ago visit to Colonial Homestead. And I have two tape measures because I always seem to be missing one or the other. If they’re both where they ought to be, I typically reach for the red one; its wider blade has better standout.

Pencil (etc.) Corral
This far-right cubby is also new, and already I love it. It’s so much easier now to find my .5mm pencils (all those at bottom left). (If you’ve ever taken a dovetailing class with me, you know how I feel about these!) Alongside said pencils is a paper knife given to me by Eric Brown (thank you, Eric!) – I keep trying to find the perfect woodworking use for it. I haven’t yet, but in the meantime, it doesn’t take up much space. At top left is dental floss (used for working glue into splits, or into miscuts while dovetailing to hide the mistake…I’d like to claim it’s only needed for students). My most-used safety equipment is that hair clip. I catch a lot of crap for having my hair down in pictures – but I promise you that if I’m using any tool or machine that poses a danger of scalping (or worse) my hair is up. I have two lumber-marking pencils. I ought to find a new home for the blue one (I much prefer my “Unturned Pencil“); under those is shopmark stamp from Infinity Stamps. Under them is my paint can opener; I use a lot of paint. In the middle is a planing stop that fits into a 3/4” dog hole. Adam Cherubini left it on a bench at Woodworking in America, circa 2013. I’m waiting for him to walk through the door so I can return it to him. Below that is an M+R pencil sharpener that Chris gave me. (I do have wooden pencils for which to use it; they’re on my desk…which is where this sharpener really should be.) Then there’s my Japanese nail set (at just $12, I think everyone should have this handy tool). Alongside that is a ceramic pencil with white “lead” (and some extra “lead”), and two bits of eraser. I don’t know what that knob goes to (though I think it’s a Veritas knurling pattern), so I’m afraid to pitch it. I also keep a small notebook in that cubby, and my new cat-head tape measure. (I love it…but it’s not so great for woodworking – but it’s great for keeping track of my expanding waistline.)

The Middle Till
The middle holds the tools I use somewhat often – but not quite so often as those in the top till…or that I don’t use often, but just ended up there due to their size and my available space (I’m talking about you, metal spokeshaves).

Hitty Things
At far left is a crappy hammer that is terribly uncomfortable. (My good one is at home.) Chris bought this atrocity for me because he was tired of my borrowing his Platonic Ideal Hammer from his tool chest. I still borrow it. (And I put this one in the student chest just after taking this picture.) The ball-peen hammer was left at Woodworking in America by Peter Ross (he kindly told me to keep it). I use it for teaching how to “bishop” proud pins and tails (get the wood wet, then lightly hit it with the domed striking surface to spread the fibers and fill small gaps). The plane-adjusting hammer was made by Raney Nelson of Daed Toolworks; I use the 8-ounce Dunlap for setting small nails…and as a plane hammer when it’s closer than the one Raney made.

Cutting & Cleaving
At top are my two flush-cut saws. Only the top one gets loaned. Its blade is replaceable (for when blood makes it rust). I’m not sure why my small router plane is in the middle till; I think I moved it down when I got the No. 60-1/2 block plane; it used to reside where that block plane now sits. The spokehaves get used a lot in my “Dovetailed Shaker Tray” classes, and for the occasional other curve need. The PMV-11 plane blade actually gets used a lot; it’s the one I hand out in ATC classes to mark the skirt baselines off the chest (that sentence will make sense only to those who’ve read the book or taken the class). I bought it to put in my No. 3; someday I’ll actually do that. I use the Bohle hacking knife for making pegs.

Bits Etc.
I love this set of fractional brad-point bits, and I need to stop loaning them because it appears this set is no longer available (I prefer to not loan things I can’t replace). I also have a few other bits tucked away in the case, including a broken Insty-bit that I use as a countersink. Underneath is a brand-spanking-new box of tiny bits (thank you, Chris; sorry I kept borrowing yours). That lone countersink doesn’t fit in the index box, so it just rolls around in the till. The saddle square gets used for just about every project – particularly during stock prep (best $14 I ever spent – a decade later and it’s still only $16.50). At top right is my Starrett centerpunch, which gets used on every hardware install (and which I think is great fun to use). Below it are two tools I don’t use often but I love: a 4″ sliding bevel that was a gift from Fred West (it gets used once in a while to mark 30º angles on Dutch tool chests when I don’t have a larger one to hand) and a small square I bought to match it, both from Vesper Tools.

The Bottom Till
This holds the stuff that is either too big/bulky for the smaller middle or top till, and/or tools that I don’t use much. And/or that I got used to hiding a decade ago…a habit that hasn’t completely left me. (I’m overly protective of my paintbrushes…and would dearly love to find some new old-stock Purdys. If you know of a pre-2004 stash, do let me know.)

Brushes & Such
Gloves to protect my lily-white hands (to help cut down on the splinters, plus wood sucks what little moisture there is from my hands). That Wooster brush is in bad enough shape now that I’ll loan it. The Purdy is not. The card file is for cleaning my rasps (which are at home – so this is pointless). The cork is a sanding block. Above that is the roll of blue gaffer’s tape for marking my tools (it was in the middle till; I just moved it), topped by the blue nail polish for the same. At the top right is a box of headless brads…because the drawer where they go is full, and I brought these in from home, where I didn’t need them.

Hodgepodge
The pinch rods are stashed here because they’re too short for measuring an ATC, and I don’t want students grabbing these by mistake when the glue is wet. (I shortened these for working on my staircase, but I didn’t really need them at home after that, so here they sit.) Oh look – another spokeshave! This wooden one (which I love) was made by Kansas City Tool Works (now out of business). On the left are inexpensive dial calipers; I rarely care about caliper-level of perfection – but sometimes, one has to. The Barr chisel should be in my tool rack, but there’s no room remaining thanks to a recent saw acquisition (I tape a folded business card over the cutting edge to protect it…and to protect my fingers when I reach in the till. The Zona saw comes in handy sometimes, but I should drill a hole in the handle and hang it on the tool wall. I don’t often reach for it. At the bottom center is a heavy toothed blade from Ron Bontz meant for bopping into the corners of half-blind dovetails for easier clean-out. It sounds really useful – and soon I’ll get around to cutting some half-blinds and find out! The last tool, far right, is a pencil gauge that can be used on outside curves (e.g. the back of a stick chair seat) – another gift from Chris. So that I quit borrowing his.

Moulding Plane Corral
I have most of my moulding planes at home (because of a misguided thought of making by hand all the replacement mouldings needed for my house) so I mostly use this area for stuff I want to store upright (and that doesn’t really fit elsewhere without getting in the way.)

Scrapers, Tips & More
The two scrapers I actually use are a quite flexible Lie-Nielsen (for getting into corners) and the Crucible curved scraper (which, even with my achy hands, is comfortable to wield); the ones I don’t use are in the leather wallet underneath. The driver tips don’t really belong in my tool chest; I just don’t know where else to put them. The Bevel Monkey gets most used for setting 30º angles, and the set of needle files get used to fix my planes after almost every class (the front edges tend to get dinged up and require filing so as not to leave tracks).

Edge Tools
The Lucian Avery scorp and Lie-Nielsen straight drawknife are for all the chairs I might someday make.

Most Students’ Least-favorites Tools
I cope out (or fret out) the waste on dovetails; this can be vexing to those new to these saws – but I find it saves a lot of time on waste removal, particularly on the pin boards. These are the only tools my students regularly balk at using. (While I covet Chris’s Blue Spruce Coping Saw – that’s what I’d buy if I were starting from scratch – these two Knew Concepts saws are old friends. NB: The KC fretsaw is available with and without “swivel blade clamps” – make sure if you get one, that it’s “with.”)

Moulding & Rabbet Planes
I do store a few wooden moulders in the moulding plane corral: two 1/8″ beading planes (from M.S. Bickford [top] and Philly Tools [middle] that get used on the upper skirts of ATCs and other things); and one straight rabbet plane from M.S. Bickford.

Chest Floor

Mostly Planes
There’s a lot of unused real estate on the floor, so I managed to shoehorn it all into one picture. My No. 7 is at the top (another non-loaner) with the rest of my bench planes on the left: a Type 11 No. 5 that Chris had Jen Bower engrave for me (thanks to both!), and three smooth planes (Nos. 4, 3 and 2). I like the bronze because it’s easier to file, and these get files on the leading edge a lot (the smooth planes are remarkably prone to throwing themselves atop holdfasts and other metal bits…). I use the No. 3 in my own work. Above the smooth planes is a medium shoulder plane. To its right is a chisel plane; I find this tool useful for fitting built ins, but not for furniture work. It should go home to my other chest. Under the chisel plane are two Veritas tools: a right-handed skew rabbet plane (wish I’d not sold the left-handed one, but oh well) and an edge-trimming plane. Alongside is my beloved (or a word that is stronger than “beloved”) blue Blue Spruce mallet. If that ever breaks I will be seriously bereft. Above it is a small bottle of jojoba oil that I take on the road; it’s in my chest only so I don’t forget it when I’m packing. Last is one of my large router planes (the other is in the students’ chest). I do love a router plane!

Hanging Racks
You may have noticed way up at the top that I have panel saws hanging on the underside of my chest lid at home. At the LAP shop, I borrow from the tool wall when I’ve a rare panel saw need. So I don’t need a floor till; my backsaws hang behind my chisels and other pointy tools.

Dovetail Saws
I swear these spawn in my chest. The two walnut-handled ones are from Bad Axe, and have extra small handles; because I use my DT saws a lot, I prefer they feel comfy…which is how I ended bringing home from Ed’s Tool Store the 19th-century Woodrough & McParlin on the left. The wee handle is a perfect fit; I guess it belonged to a very young apprentice? Of the Bad Axe saws, I prefer my old one, at top; it’s like an old pair of slippers – super comfortable if not as pretty as it once was. I need to spend more time with the new one, and wear away some of its set (I’ve been using the old one for so long that it could double as a flush-cut saw I think!). At the bottom is a Lie-Nielsen progressive-pitch saw that is no longer made, and that I don’t often lend – but I rarely use it. I guess that makes me a collector. Oh dear.

Other Backsaws
The “American Kid” tenon saw at top is a hybrid filing with a handle meant for children. It fits me well. The Lie-Nielsen crosscut carcase saw is excellent – and because I don’t use it daily, I don’t mind that the handle is a bit large for me. At the bottom is another collectible, a crosscut carcase saw by Wenzloff & Sons.

Screwdrivers
I have an almost-full set of Grace USA straight screwdrivers, a Lie-Nielsen driver “rescued” from a Chris culling (I’ll hang on to it until the next time I clean my chest), a Phillips driver (’cause sometimes I need one, though I almost always use slot screws) and my Element’ary driver with a locking magnetic collar (its tips are in my top till).

Marking Tools
You can’t beat the Tite-Mark cutting gauges…and I wish people would quit copying these. Kevin Drake deserves all the $$ for these (you can get them via Lie-Nielsen or Tools for Working Wood). Then there’s my large family of dividers: three Starretts and two Crucibles (these all get loaned out for laying out dovetails). And oh look…another loaner Czeck Edge marking knife (the rubber band is so it doesn’t fall through the 1/2″ hole in the tool rack). Finally there’s my newest favorite pointy tool: a Mathias Fenner birdcage awl (this year’s lovely and much appreciated Christmas gift from Chris).

Chisels
I use three of these six Lie-Nielsen bevel-edge chisels regularly (1″, for first-class saw cuts on 3/4″ and 7/8″ tailboard half-pins, and the 3/8″ and 1/4″ for chopping dovetail waste remaining after coping). I use the others when I’ve loaned out the ones I really like to use. The Blue Spruce fishtail chisel is for cleaning out corners in half-blind dovetail pin boards – I don’t need it often, but when I do, I’m awfully glad to have it.
As Chris mentioned in his ATC inventory last week, we get a lot of emails about this chest and the book Chris published in 2011. I have a weird relationship with the book (about which I’ve written before – sorry to repeat myself). As he wrote, it’s the book that allowed him to quit as editor of Popular Woodworking Magazine. If he’d not left, I would never have become editor and content director for the brand…which was professionally rewarding but not the greatest for my mental health. I am nonetheless altogether thankful to have held had that position for five years. I am even more thankful that now I again work with Chris every day in the shop. Every tool chest that I build or help others build reminds me anew of how lucky I’ve been.
– Fitz