Christopher Williams, author of “Good Work: The Chairmaking Life of John Brown,” arrived in town on Thursday night to get ready for his Welsh Stick Chair class here next week – so we thought we’d give you a look behind the scenes at just some what goes into getting ready for a class.
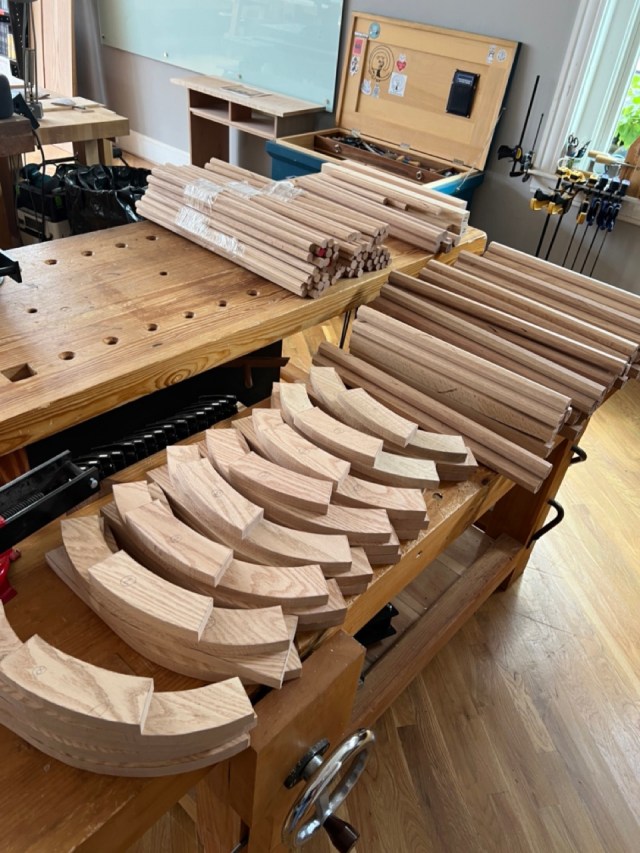
The Christophers left Covington at around 8:30 on Friday morning (when it was still a tolerable 85° or so) for the hour drive to C.R. Muterspaw Lumber to choose enough 8/4 and 4/4 red oak for seven chair “kits” (red oak because it’s strong, available in straight grain and reasonably priced, and it looks nice with a clear finish, or paint).
Kale and I stayed here to hold down the fort – so there’s no video from the lumber picking. (And I, for one, literally can’t stand the heat; I’m considering a move to the Northern Territories.)
Seat blanks (the angled lines are how Chris Williams helps students get the front and back legs on each side in the same plane).
But Kale picked up the camera as soon as the guys were back, and caught some shots of what goes into class prep (at least on day 1 – Chris and Chris are finishing up as I write this at lunchtime on Saturday).
Making sure we have enough good parts ready (with a few extras) is key to a worry-free class. It’s a lot of effort – but worth it, so that students have a good experience…without our having to scramble (much) during the week.
There are still a few spots left in my Dutch Tool Chest class, Oct. 30-Nov. 1 in London, England. In the class, you’ll learn some fundamental hand-tool woodworking skills (planing, sawing and chisel use, as you cut dados, rabbets, dovetails, thumbnail mouldings, chamfers and more – plus how and why to use cut nails) as you build a solid tool chest that will serve you (and your heirs) well for many years. (Note: It also makes an excellent toy chest – kids love the hidden compartment!)
Plus, tickets are go on sale Sat., June 22, for the London IWF Bazaar on Fri., Nov. 1 and Sat. Nov. 2. The bazaar will feature Saturday seminars, with talks on 18th-century furniture, cricket tables, peasant furniture, Shaker furniture, saw sharpening and more, as well as the following vendors: Classic Hand Tools, Lie-Nielsen Toolwords, Lost Art Press (hey – that’s us!), Bad Axe Toolworks, Ian Parker, The Windsor Workshop, Niegel Melfi/Melfi Planes, Michel Auriou, Richard Arnold, Veritas, Sean Hellman, Skelton Saws, St.John Starkie & Bryony Roberts/The Quiet Workshop, Oscar Rush/Hand Forged Edge Tools, Philip Edwards/Philly Planes, Southern Fellowship of Woodworkers, Furniture Maker’s Company, Lowfat Roubo /Derek Jones, G-Sharp Tools/Gervaise Evans, Festool UK, Lamello.
The courses and the bazaar are at the London Design & Engineering UTC, 15 University Way, London E16 2RD.
Edwardian Hallstand, 2002. A spec piece in curly white oak, made in my workshop on a buffalo farm. The piece was later published in Fine Woodworking. Photo by Kendall Reeves, Spectrum Studio of Photography & Design (spectrumstudioinc.com)
Standing in contrast to James Krenov’s “The Impractical Cabinetmaker” from 1979, Hiller’s “Making Things Work” is not about waiting for a particular plank of wood to tell you its true purpose. It is not an exhortation to fuss over each detail, no matter the personal cost.
Instead, Hiller’s funny and occasionally ribald story is about a cabinetmaker who was trained to work at the highest level possible and how she has dealt with the personal anxiety that occurs when the desire and drive for excellence collides with paying the monthly bills.
1. On the importance of conjunctions.
A few years ago I met one of our town’s most respected figures: a husband and father who has held several elected public offices and devoted his career to the cause of social justice. As we shook hands he said, “I understand that your work is very good, but not very cheap.”
“But?” I wondered, biting my tongue.
2. The Value of Nothing, Part One: The Magician’s Act
Guy and Poppy were retired business professors who had traveled the world. And judging by what I saw as they showed me around their home during my first visit, they’d brought a good bit of it back home with them.
They had been referred to me by a contractor who assured them I’d be ideal for their project. “We just bought a reproduction of a piece of sculpture,” Poppy wrote in her introductory email.
The first photo shows the original swan at the S. Museum, and the second is the reproduction in the museum shop, just like the one we have. We need a stand to display the statue. Please give us a call if you’re interested in helping us with this.
It wasn’t the type of job I ordinarily do, but because they’d been referred to me by a contractor I like and respect, I called Poppy and arranged a meeting.
Their house was stunning: a classic of modernist style, inside and out – not that I would have guessed as I pulled up to the windowless façade, a gray stone rectangle apparently modeled on a freight container. But no sooner had I set foot inside than the scales dropped from my eyes. The other exterior walls were glass, spectacular in the house’s wooded setting.
Works of art filled the interior. Here a Coptic embroidery flanked by a pair of Yoruba masks, there a threesome of Warhol prints. A 16th-century Japanese screen formed a movable divider between the living room and the kitchen, itself a perfectly preserved marvel of original 1960s design. Clearly these people had excellent taste and understood the value of art and craft. I made myself a mental note to send the contractor a letter of thanks for the referral.
They showed me the swan, a plaster cast of the original statue carved in marble, and explained their ideas for how to display it.
“See how the neck has been extended in the reproduction so it sits square,” Guy pointed out. “The swan’s tail is on the same level as the neck. We’d like to have a base in which the swan’s chest sits down in-side, with the neck and head hanging over the edge, as in the original sculpture. Also, we don’t just want an empty box for a base. That would be a waste of space. We could really do with some additional storage. I was thinking perhaps a couple of compartments with doors. No visible hinges or pulls, though; we do want it to look like a base for a sculpture, not a cabinet. Maybe zebrawood? Oh, and if you could put it on hidden wheels, that would be wonderful; that way we can move it around on the carpet whenever we feel the need for a change of scenery. We’re getting a bit long in the tooth to be lifting heavy objects.” He glanced affectionately at his wife. “Aren’t we, Poppet?”
Poppy took me into the study and fired up her computer to show me photos of the original frieze of which the swan was a fragment. She found the folder of pictures from the trip and furrowed her brow in concentration as she scrolled through thumbnail images.
“We’re getting close now,” she assured me after what seemed an eternity. She clicked on an image to open it at full size. Suddenly the screen filled with a picture of a misshapen purple posterior that put me in mind of Barney, the PBS dinosaur. “Oh dear!” said Poppy, “Wrong picture. Hang on.” She clicked forward to another, this one leaving no doubt that the posterior in question was Guy’s. “Guy had a very unfortunate fall on the steps of our hotel,” she said matter of factly. I blushed. “I had to get photos for the insurance claim.” She clicked on. “Ah! Here we are.”
“We had a fellow at the university do some work for us last year,” she told me after closing the folder.
“He had every problem in the book: financial troubles, health troubles…. I think his great-uncle also died during our project. In any case, the small job he did for us took two full years. So you can understand we’re not too keen on asking him about this one.”
I took some measurements, made a few notes, and said goodbye. While driving back to the shop, I thought about the project. These people obviously had strong ideas about how the base for the sculpture should look and function, yet they knew my specialty was period-style furniture, not museum-worthy display cases. There would definitely need to be some back-and-forth discussion, which probably meant a couple more visits to their home, half an hour’s drive away from my office, in addition to the time I’d spend on research and drawing. And all for a very small job. Poppy’s mention of the fellow from the university was a little concerning. I’m familiar with the phenomenon of the full-time, full-benefits employee who avails him- or herself of institutional facilities after hours. Unburdened by trifles such as shop rent, insurance, and similar expenses that full-time business people have to cover, such moonlighters can do some serious undercutting when it comes to price. In doing so they perpetuate unrealistic notions of what it costs to make things, which often leads their customers to see us professionals as engaging in daylight robbery.
For a moment I felt myself falling into a familiar doom-portending spiral. Why must people ask me to pull a rabbit out of a hat? “Give us an estimate to design and build this thing. Sure, you have precious little to go on, we have no idea what such a thing should cost, and you under-stand that we want something that will knock our socks off, though of course, as retirees, we have to watch every penny. But you come highly recommended. We’re confident you can do it.”
I stopped myself. These were sophisticated people. “Just be straight with them,” I told myself. “Trust the process.”
Still, to hedge my bets, I thought it prudent to ask whether they had even the vaguest budget in mind. “Dear Guy and Poppy,” I wrote the night following our initial meeting.
“I thoroughly enjoyed meeting you and seeing your fabulous home. I was writing a formal proposal for your job when it occurred to me that I should ask whether you have a budget in mind. In cases where designing a custom piece is such an integral part of the work I am proposing, I cannot give a fixed price; there is too little information available at this stage. So I usually submit a design proposal based on my design rate of $75 per hour.
“However, if you have a budget in mind, please let me know, and I will take that into consideration as we go through the design process.”
To cover myself, I threw in an extra paragraph.
“Because I operate a full-time business on which my livelihood depends, and because I am using equipment and a facility for which I am 100 percent responsible, my charges for such work are likely to be higher than those of a person working at the university who can do the work using university-owned equipment, in his or her spare time. Apologies for this explanation. I hope it will be helpful.
“I am certainly interested in doing this work for you. If you would like to proceed, please let me know where, along the budget spectrum, you would like your job to land, and I will gladly write up a formal proposal.”
Two days later I received a reply. “Well, you have startled us a bit, Nancy,” Poppy wrote. “The higher price you’ve proposed is twice the price we paid for the piece itself, including the shipping, and that seems awfully high.”
I don’t know who ended up building the base for the swan.
3. The Value of Nothing, Part Two: Artistic License
6/3/11 3:35 PM Inquiry Dear Ms. Hiller, I have admired your quartersawn oak desk with inlaid bumble bees and am interested in possibly commissioning one like it. Will you please tell me what it would cost for such a desk with a top measuring 36″ by 60″? “Dr. X”
6/3/11 8:18 PM Re: Inquiry Dear Dr. X, Thank you for your inquiry. I designed and built the desk that you found on my website in 2004. The desk’s construction is traditional, using mortise-and-tenon and dovetail joinery, and the inlay is all done by hand. I keep detailed records of the labor and materials that go into every piece. Based on today’s material costs and my current shop rate, the desk would be $5,250 plus sales tax. Of course the design could be modified to suit whatever bud get you might have in mind.
I would be delighted to discuss this with you by phone or in person. Sincerely, Nancy Hiller
6/17/11 7:04 AM Following up Dear Dr. X, I am writing to confirm that you received my reply to your inquiry on June 3. Every so often I learn that an email message I sent was not received. I would be mortified if you thought that I had not responded promptly. Please will you let me know whether you received my message? Sincerely, Nancy
6/24/11 10:09 AM Re: Following up I did receive your quote. It is considerably higher than the prices I got from H Furniture and F Cabinets to build the same desk. Both H and F use tenon joinery and dovetails so we have nothing further to talk about.
4. Looking Over the Edge
10/11/03 5:47 AM Request for a meeting Dear Ms. Hiller, I admired your Edwardian hallstand in Fine Woodworking and was thrilled to see that you are located in Bloomington, which is less than two hours away from my home. I have taken a number of wood-working classes and am seriously considering leaving my corporate job to become a professional furniture maker. I would greatly appreciate an opportunity to meet you and tour your shop. Would this be possible? Sincerely, G.P.
10/11/03 6:46 PM Re: Request for a meeting Dear G, I would be happy to meet you and discuss your plans, but first I’d like to set you straight regarding the nature of my shop. There is nothing to “tour.” My current shop – the nicest one I’ve ever had – is in a utility building of about 1,000 square feet located on a cattle farm. It is a single space; you can see everything from the front door. I am there most days, so just let me know some days and times that would be good for you. Nancy
G arrived at the scheduled time and we had a nice conversation. He worked for an international company headquartered in Indianapolis. He was probably around 40, married, and told me that while he valued his job and did not take the pay, security, or benefits for granted, he was sorely tempted to try his hand at furniture making full-time. “I’ve taken a class in furniture making as a business,” he told me, “so I would have no trouble telling a prospective client that I had to charge $1,500 for a coffee table.”
“The question is not so much whether you have the guts to charge what it costs to build a piece,” I replied, “but whether the prospective client is able – and more important, willing – to pay it.”
I gave him what insights I could about the realities of professional furniture making based on my experience, and told him that in my opinion he was in an enviable situation: securely employed, with paid vacations and other benefits that afforded him the freedom to do work he wanted to do in his spare time. I told him to feel free to keep in touch about his plans, but he didn’t, so I have no idea whether he ever took the plunge.
We kicked off the Chairmakers’ Gathering with a welcome, then a few words from Patrick Cecil, a ladderback chairmaker from Cannon County, Tennessee. Patrick shared the rhythm of his work week, from cutting parts to loading 20-30 chairs onto a truck on Fridays – then doing it again the following week. He learned from and worked alongside his grandfather Arlis Thomas. By Patrick’s conservative estimate, Arlis made more than 125,000 chairs during his career! (Patrick is somewhere around 25,000.)
The (threat of) rain kept us inside for much of the day. Luckily, the workshop areas within Berea College Student Craft were plenty large enough to all the events and the 200 or so attendees.
We had four stages. On the Turning Stage, chairmakers who use the lathe for their parts showed how they work. The StoryTime Stage saw chairmakers share aspects of their careers and their processes; a highlight there was Drew Langsner’s slideshow of his years running Country Workshops. Wood was worked and hickory bark was shaved and peeled at the Greenwood Stage. And The Assembly Stage was for chair demonstrations, including Tom Donahey showing his full chairmaking process. Terry Ratliff and Brian Boggs shared some encouraging remarks to close our terrific day.
Now that the event is over, what sticks with me is the generosity surrounding it. Twelve chairmakers traveled to Berea (often from a distance) to share the “how” and the “why” behind their chairmaking careers. The attendees came from around the country to engage. They sat in the chairs in the Gallery and flipped them over for a close look, asked questions at all the stages and during the full-group Panel Discussion, and got autographs from the chairmakers.
Chairmaking is experiencing a moment of excitement right now within the woodworking community, and it was rewarding to see the spotlight on this experienced group of Appalachian ladderback chairmakers and their work.
Comments are now closed. Join us again next Saturday!
Chris is out of town this weekend, but Wally and I are here and ready to answer your woodworking and cat-treat-related questions. But unlike Chris, I will not start responding at the buttocks-crack of dawn – I like to sleep in a bit on Saturdays. And every day. (And Wally sleeps about 18 hours per day.)
As you surely now by now, leave a question in the comments and I’ll do my best to answer. You can even ask me about the Dutch tool chest book (now that the manuscript is in Chris’s hands, I’m far less stressed about it).