Peter Galbert’s hoop-back on the left, and perch on the right. He uses these two seating forms to teach you the foundations of chairmaking in his new video series.
Part one (available now) focuses on kiln-dried wood and Pete’s “perch” – a stool with a decidedly modern look. In this episode, he discusses chair design and ergonomics, and introduces all the tools and techniques to get you started in chairmaking. And he shows you how to make the perch, of course.
Part two (available soon) will focus on green wood and making a traditional Winsdor hoop-back stool (what some might call a sack back), and introduce some more advanced techniques.
Pete says that his overall goal “is to remove whatever is limiting you from making your chairs. Because really, this technology is as simple as drilling a hole, and whittling a peg to fit in it, and knocking it home.”
The tools Pete introduces/shows you how to use.
Altogether, Pete says there will be 8-10 hours of video instruction in this “foundation” series (all included in the $69.99 price). By the time the series is complete, you’ll have a solid foundation in chairmaking tools and techniques, as well as design and comfort considerations, to make many kinds of seating – and you’ll discover that chairmaking isn’t scary at all!
This link will take you to all of Pete’s Vimeo videos (including his recent series on using milk paint), as well as Vimeo videos featuring Pete’s work (I’d forgotten about that video Chris Schwarz did of “Chairmaker’s Notebook!). To sign up for his new series, click on the trailer for “Foundations.”
My most recent commission, a built-in for the living-room alcove of a 1920s house, has been as rewarding to design and build as it has been a challenge with respect to budgetary constraints and safety during a pandemic.
My clients, Anke Birkenmaier and Roman Ivanovitch, have a minimalist modern aesthetic, with hardwood floors, pale walls and modernist furniture, some of it from the mid-20th century. Their home’s exterior is solidly American Foursquare, with painted clapboards, original windows and the original front porch, which has a limestone foundation and several limestone steps up from grade. Inside, the original plainsawn oak trim remains, some of it stripped of paint applied by a former homeowner. In contrast, the fireplace surround is more forward-looking in historical terms, a Jazz-Age design with geometric motifs. This focal point provided precedent for something more streamlined than the original built-ins that are typical of my clients’ neighborhood.
Before. The built-in was for the alcove to the right of the fireplace.
Roman is a professor of music. A piano presides over about a third of the living room’s floorspace. Anke is a professor of Spanish. The cabinetry would store musical scores, sheet music, CDs, family board games and lots of books.
I draw inspiration from all sorts of historical sources, but in this case one particular built-in came to mind: a wall of cabinetry and open shelves I’d long admired in a book given to me decades ago, “Contemporary Furniture: An International Review of Modern Furniture, 1950 to the Present,” by Klaus-Juergen Sembach. The modular ensemble was designed by Mogens Koch, a Danish architect whose designs are still produced today. Koch was in his early years of professional practice when what is now my clients’ house was built.
An original piece designed by Mogens Koch. (Click here for source.)
The orderly divisions of the upper section appealed to me and seemed ideal for the kinds of music-related books I’d seen on the freestanding shelves when I first visited the house. After I drew the piece to scale the clients suggested they’d like walnut for the lower cabinets and paint for the uppers.
Almost done. Before I installed the CD shelves and door knobs.
Budget-friendly Details
Unlike those who built Koch’s designs in solid hardwood, with traditional exposed joinery, I was working with a budget that required me to use affordable materials, as well as choose carefully how I invested my time. The final built-in reflects the following considerations:
1″-thick slab doors are far quicker to make than frame-and-panel doors and complement the streamlined aesthetic.
Because they’re quick to install and facilitate adjustment, European hinges are considerably less costly than traditionally mortised butt hinges, which feature in many Mogens Koch designs.
The casework for the base sections with doors is made using an efficient method, from 3/4″ prefinished veneer-core maple plywood with solid walnut faces (using the same basic technique as I describe for kitchen cabinets in “Kitchen Think”). The central base section with open shelves for sheet music is made from 1/2″-thick walnut-veneered veneer-core ply, the shelves fitted in dados.
The upper sections are made from Baltic birch plywood, which could be painted without requiring solid lippings or veneered edges.
A Few Aesthetic Details Worth Noting
For dynamic rhythm I divided the space into three sections across its 96-1/2″ width.
1/2″-thick shelves and verticals (instead of my customary 3/4″) preserve the lightness of the Mogens Koch design. Where verticals are doubled up between modules, the extra thickness visually emphasizes the structure.
The ensemble has a strong central focus, with a section of the upper cabinetry subdivided for CDs, a 1-3/4″ bump-out at the base, and graduated horizontal lines of open shelves for sheet music.
Each of the uppermost three sections increases in height toward the top for happy proportions.
To lighten the appearance of this large built-in, the kicks are slightly recessed.
Fisher’s high valuation of hard work emanated from his constant recognition of the fleeting nature of time and, throughout his life, Fisher lived under a sense of Divine calling. Every moment mattered. He saw himself as a steward entrusted to use his time in this life wisely. Fellow minister, the Rev. Stephen Thurston, couldn’t help but recall that Fisher “was remarkable for his industry, esteeming it a great sin to waste time. Hence he accomplished much – labored on his farm, wrought at his bench, studied much, published several books, wrote more sermons than any man [he had] ever known …”. (9)
It was, at first, hard for me to contextualize Fisher’s level of productivity because I knew many ministers of this period were both well-educated and prolific. It is true that, compared to 21st-century standards, the amount of work Fisher produced is astonishing, but I wondered if that was typical for the 18th and 19th centuries. It turns out my doubts were unfounded.
Fabricating the elaborate clock mechanisms required a careful and skilled hand.
After reading scores of observations from his contemporaries, I found every single comment about the parson’s productivity concurs with this amazement. Even in his day, people could not believe what he accomplished. His son Josiah recalled, “Every moment of the day he was fully occupied from his early rising to about 10 at night. By a systematical division of time he was enabled to perform an amount of labor which is truly surprising.”
Fisher’s entry for Jan. 1, 1790, solemnly reflects on the passing of another year: “The fleeting years roll on in constant succession; seventeen hundred and eighty nine is past forever! Our clocks may stop, our business may be suspended; but the wheels of time will ever move till the grand period, when eternity commences … It is of infinite consequence that we should seize and use the present moment; not in the work of tomorrow, nor in the work of yesterday, but in the work of today, in the work of this instant. Time can never be recovered.” This conviction never abated and, accordingly, his actions throughout life were ordered and punctual. In the words of Candage, “his minutes were as precious to him as money to the miser.” (10)
This prioritization on productivity was apparently enough for Fisher to undertake the construction of a clock during his vacations from Harvard between 1790 and 1792. This “single day time piece,” a complex mechanism of wooden and brass gears of his own design, was a challenge that pushed his intellectual and artistic limits. Even the logwood-dyed clock case must have been something special – he spent three weeks constructing it.
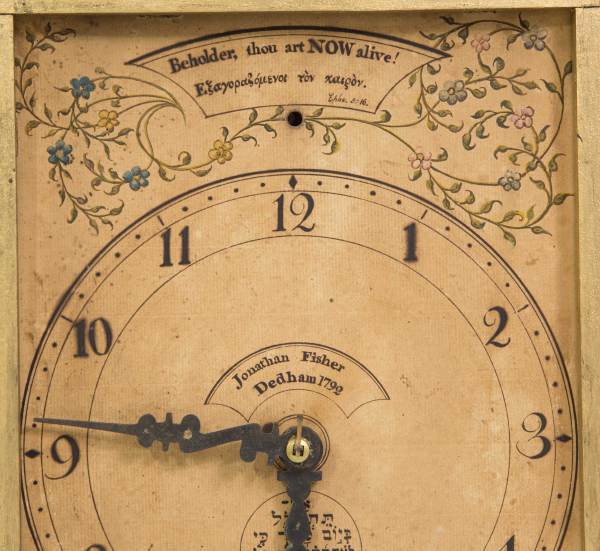
Fisher’s clock face.
It is telling that of all the furniture that Fisher made for himself, this is the only piece that elicited explicit commentary. When Fisher later copied these early journal entries, he added an annotation that it was in his grandfather’s room until 1817, at which point, he brought it to Blue Hill to be installed in his new addition. Once home, he “repaired it and somewhat improved it, and set it up in [his] own house in Bluehill, where to this day, December 31, 1833, it has been a valuable piece of furniture.”
For some unknown reason, the original clock case was discarded in the 1817 restoration process and the clock itself was installed into a built-in closet in his hallway facing the kitchen. As a part of this restoration, Fisher also painted an elegant and florid new face for his clock. Several inscriptions remind the viewer to use their time wisely. At top center, the face reads: “Beholder, thou art NOW alive! Eph 5:16” (which is “Redeeming the time, because the days are evil”). Just below center of the dial, Proverbs 27:1 is written in Hebrew: “Boast not thyself of tomorrow; for thou knowest not what a day may bring forth.” The bottom of the clock reads: “What is your life?” in French and, “Time irretrievably flees” (a reference to Roman poet, Virgil) in Latin. Fisher saw the new clock face as an opportunity to call attention to the fleeting nature of life. The clock, then, functioned as a minister to him and his family, a preacher of righteousness, calling him to industry.
The mechanical aptitude required to make a clock exceeded that of the average rural craftsman.
But the spiritual value is only one side of the coin because it is hard to overestimate the significance of clocks in the late 18th century. To be able to tell time to the minute was an indication of sophistication and intellect. Scholars, ministers and gentlemen had clocks. Farmers had no use for the second hand – they thought in terms of morning and evening. But the urban elite had meetings and appointments. For a rural frontier minister to not only own a clock, but build it himself, is noteworthy.
The mechanical aptitude necessary to produce such a device was outside that of the average “mechanic” in the 18th century. Designing and fabricating the clockworks during vacations from college was the epitome of the marriage of head work and hand work. Such complex mechanisms demanded thorough planning and a careful hand in a way that none of his cabinetmaking did.
The clock was installed into this built-in closet in the main hall of his 1814 addition.
This clock face vividly illustrates how the intellectual, spiritual and creative vision Fisher had could collaborate to produce an object that asserts the power of all three at once. This complexity of abilities and motivations makes Fisher a fascinating study. To see an educated man who was just as comfortable conversing with the intelligentsia of his day as he was hewing out posts for his kitchen chairs is inspiring, to say the least.
(9) From Fisher’s funeral sermon delivered by the Rev. Stephen Thurston. (10) Candage, Rufus George Frederick, Memoir of Jonathan Fisher, of Blue Hill, Maine (1889), Kessinger Publishing, 2009, p 226.
CCC workers in the 1930s with some nice pullover shirts. Killer trunk scaling calipers, too.
Editor’s note: Today we are launching our pullover work shirt, which is in the warehouse and ready for shipment. Because of massive delays in the country’s delivery systems, we cannot guarantee delivery before Christmas. You can read all the details about the shirt’s construction on the page in our store. It is, of course cut and stitched here in Cincinnati from high-quality materials. Below, you can read our clothing designer’s account of how he developed the shirt.
— Christopher Schwarz
When Chris and I talked about designing a work shirt, we knew we’d want to make a pullover style. That’s been a good choice for hundreds of years. No placket or buttons to interfere with planing, shaving or hewing at belly level. Simple in cut and detail, not festooned with living history museum ruffles. Sleeves that can be easily rolled up. Unstructured and comfortable, but presentable, too.
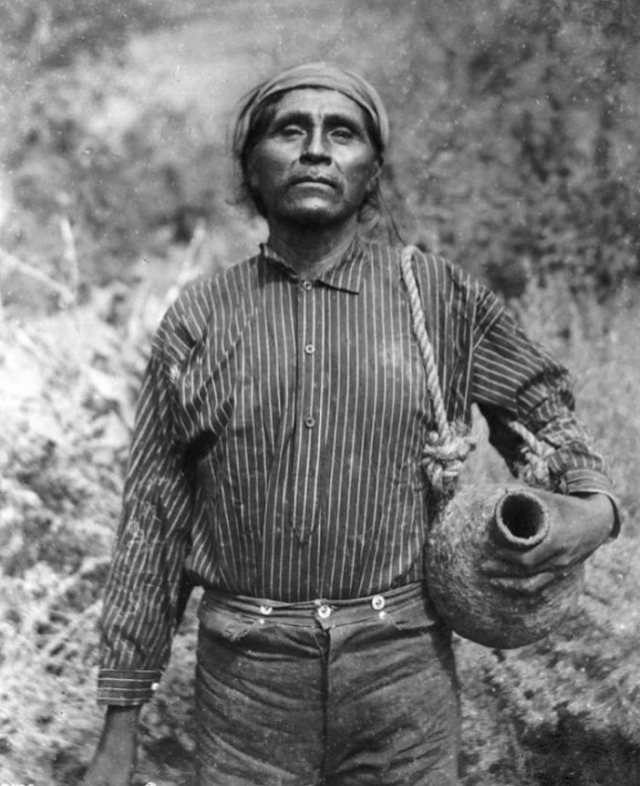
Havasupai man with a pitch-lined water basket and a very nice shirt, c. 1900
I found a rich mid-weight indigo cotton from Japan, and the team at Cincinnati’s own Sew Valley cut and sewed a batch of shirts. It took a lot of development. Like wood’s worst warping happening between felling the tree and drying the lumber to a reasonable moisture content, fabric’s big shrink happens at the first wash after weaving. During the first wash of this fabric shrank it by 3″. That was startling. So we calculated that big shrink into the pattern, sewed up some very odd-looking shirts, then laundered them all down to normalcy before sending them to the warehouse. The shirt you receive won’t shrink hardly at all, especially if you follow the instructions (wash cold, hang dry).
Another CCC group, from Maine in 1938. Nice shirts, fellas.
This is a real indigo – not a vegetable dye, but chemically identical. It will rub off if you grind your shirt on a white couch. In everyday life, it shouldn’t be noticeable, but do know that the dye can transfer. It’ll fade like that old pair of blue jeans – slowly and handsomely.
Look at that nice square bottom placket. This is what I based our placket on.
The cut was intended to have enough room for easy work while not feeling like a balloon or a costume. It’s long enough to tuck in, but not dress-like. The sleeves stay rolled up pretty well thanks to a shorter cuff placket than is typical on a dress shirt. The collar is unstructured. It’s as simple and steady as a shirt can be.
We’re not taking much of a margin on these. They’re made of good fabric, by a factory that pays its workers a living wage, and that ain’t cheap. But we think it’s the way to go.
Caleb Rogers lives in a spot that, while enviable at any time, seems especially so in the midst of a pandemic: a cabin of around 500 square feet, close to California’s Joshua Tree National Park. From his desert home he can see just three houses within a space of many miles, and of those three, two are abandoned.
He mentions his surroundings by way of illustrating why, beyond what he calls his addiction to the news, the pandemic has not affected him much. He sees his cat and does his work. Once or twice a week he drives to town to buy food, puts on a mask to go into the store and goes home. Once or twice a month, when making deliveries, he gets a glimpse of how the pandemic is affecting other people. He drives to Los Angeles to deliver a piece and sees the lines at the supermarket, “a line of 40 people waiting to get into Trader Joe’s, wearing their masks, and everyone’s on edge. We just don’t have that here [in Joshua Tree]. We have the wind. That’s the movement we have here. I feel like a tourist when I go into the city and have a peek at the way people are living. And all the shops that are closing! Rodeo Drive! I was in awe of all the boarded-up shop fronts. The city is really taking a hit. People seem to be so divided. Thank goodness I’m still working, I still have jobs. I’m really grateful.”
Born in 1974 on a small horse ranch near Albuquerque, New Mexico, Caleb grew up moving around a lot. His parents separated when he was 4. Because his mother, a writer, has always been “a bit of a gypsy,” Caleb and his sister often found themselves in a new school.
Sometimes they moved far afield. “What I remember about growing up,” he reflects, “was living in England. That was the first time I felt settled, the first time I recall seeing my mother happy where she was.” His mother had taken the family there for a holiday, then stayed four years, from the time Caleb was 10 to age 14. It was the longest time he’d spent living in a single place.
Caleb (right) with his sister and mother, probably at his grandmother’s country house in Chappaqua, New York, circa 1980.
His mother’s love of travel rubbed off on him, and his own love of travel has had a deep influence on his work. By the time Caleb took up woodworking in his early 30s, he’d left junior college and hiked 500 miles of the Pacific Crest Trail, moved to Guadalajara and hitchhiked to Guatemala. There he met a young woman from England. Smitten, he followed her back to London and eventually on to the cathedral city of Winchester.
As a practicing Buddhist, Caleb’s girlfriend had a butsudan, or Buddhist altar, in their home. Butsudans come in a variety of forms, from simple raised platforms to elaborately decorated cabinets. Despite its significance to its owner, the cheaply made object puzzled Caleb, who “thought it needed to be replaced….”
“It was more of a personal aesthetic,” he says – an aesthetic informed by the conviction that a piece’s form should express the values or ideals it represents. Inside the altar is a scroll that symbolizes the soul; it’s a focal point for meditation. “But her butsudan was particleboard veneered with walnut!” he explains. “Sweetheart,” he told her, “I get the practice, but please let me build you something better.”
Butsudan in poplar with asanoha (hemp leaf) motif.
“I see it everywhere,” he continues, referring to how cheaply most things today are made. “Part of my drive, to this day, is to strike that balance, to remind people of the importance of living with something that’s beautiful, that’s handmade. That really does drive me to get here to work every morning. I find that the quality of one’s life goes up, the fewer things one has and the more personal those things are. Most people have a lot of stuff; that takes up a lot of space. For myself, I find living with a few things that have been made by hand enriches my life. It makes life easier in so many ways. I don’t seem to need as much, to go out and buy something new. I get so much satisfaction from the things that I do have.”
Inner and outer doors of a tall butsudan in poplar and western red cedar.
But back to that first butsudan. Caleb knew nothing about woodworking when he decided to build it. He simply thought he could make something better. At the time, he was working in a pub; one of his customers was a woodworker. “He saw my doodles for the altar,” Caleb says, “and showed up the next day with a box of hand tools, everything I needed to get going in our spare bedroom. I picked up a pallet – there were always pallets at the back of the pub – and in a few days I was able to finish the butsudan that I had drawn up.” He calls that first piece “relatively crude” but is glad to know it’s still in use.
After Caleb and his girlfriend broke up, he traveled some more. He taught English, music and art in China and wandered through Morocco, France and Spain. In 2012 he got married and moved to Peru with his wife, then back to China for another couple of years. “No matter where I was, however, I was always thinking about building my butsudans. Something about it seemed urgent to me.” So in 2014 Caleb and his wife returned to the United States and he decided to try making a living as a woodworker, specializing in butsudans. “It took a while before I got my first order,” he says, “but fortunately I’ve been working consistently ever since.”
He moved to Joshua Tree in 2017, when he and his wife separated. It was a way “to rehabilitate myself. [Being] somewhere where other people were not” made it a good place “to get my head straight.” He immersed himself in work. His shop is a rented garage about 20 minutes away from his home, also in the desert. The shop has no air conditioning. “It is hot,” he allows. “But I get very focused when I work, and whether it’s hot or cold, it all seems to blur together.”
Business, Wood, Joinery & Tools
Some commissions come through his website. Before the pandemic, he was doing a lot of work for clients in Europe. Now he works for clients in Los Angeles and closer to home, with most jobs coming by word of mouth. A few clients have become patrons, furnishing their homes with his work. Friends see it and place their own orders.
Tansu in pine and alder with chrysanthemum motif.
Every commission starts with a conversation, followed by numerous emails, and sometimes phone calls. He likes to see photos of the clients’ home, to get a feel for the space and their tastes; that helps with deciding on scale, lumber species and finishes. “My favorite commissions are the ones where my client feels they have a genuine problem which they want to solve,” he says. “I love the idea of organizing space, getting something tidied up.”
When first starting out, he worked in domestic woods. Poplar was readily available; for a while he used it almost exclusively, occasionally substituting alder. Recently he has been using oak and sapele, among other species. When teaching classes he uses pine. “I love the knots, the squirrelly nature of it, the smell.”
Freestanding partition with bending kumiko in poplar, alder and washi.
A distinguishing feature of Caleb’s work is the absence of nails and screws. “I like the challenge of designing things knowing that all the connections have to be in wood,” he says. When he does use hardware, as he did for a recent shoe cabinet, he prefers it to be traditional Japanese stuff. (One source is Hida Tool of Berkeley.) And all of his pieces are knockdown, built with traditional joinery, which he finds endlessly rewarding. “You take the classic mortise and tenon,” he suggests by way of example. “There are so many variations. One joint I use a lot is the dovetail that’s locked into place with either a through-tenon or a blind tenon. It’s very easy to put together, very easy to take apart. It seems to be very strong.” Furniture that can be broken down to flat parts has helped him get commissions from clients beyond Southern California. “At first [clients are] daunted, but some email me saying ‘That was so enjoyable!’”
An example of how Caleb uses a tenoned member with a wide shoulder to lock a sliding dovetail in place for a knockdown piece. Once the tenon is fully home, its rail tied into a larger puzzle of interconnected parts, it prevents the dovetail from being pulled out.
Detail of kumiko.
Caleb is self-taught. Returning to the woodworker who was his customer at the pub in England, he says, “We never built anything together. He just gave me some tools and magazines. Everything I’ve learned is something I’ve figured out – looking at furniture and wondering how it’s put together, how it could work. The tansu, for me, was always such a source of mystery: ‘How do you get a corner to go together like that?’ My love of joinery is a love of problem solving. I like joinery to be hidden as much as possible, a mystery, so you don’t see how the cabinet’s put together. It’s a personal thing. I tend to revisit the same joints over and over, to build the same forms, mostly Japanese-style tansus and butsudans.”
Tall entryway cabinet in alder and birch.
Caleb still has the three Sheffield steel chisels he started out with, gifts from that customer at the pub. He has added a few power tools, such as a contractor-grade table saw for ripping; as a custom woodworker who lives primarily on commissions, he has to respect the time constraints imposed by sometimes-modest budgets. Select power tools help him find the balance between a client’s budget and the time he can afford to invest. Even so, he estimates about 80 percent of his work is done by hand, with Japanese handplanes (known as kannas), Japanese chisels and Japanese saws. “I love being able to cut on the pull stroke. All Japanese tools are designed to be used on the pull stroke, drawing the work in toward yourself, using your body as a clamp or a stop. It feels more intimate somehow,” he says. He appreciates the mobility granted by reliance on so few tools and attributes this preference for minimalism to his childhood – “a few tools in a box, get to a new place, unpack and get to work.”
In addition to commissioned work, Caleb teaches classes at his cabin. In his tansu-building class, students work outdoors, exclusively with hand tools, to build a complete cabinet in one week. “The idea behind it was to get people involved in woodworking,” he says. “People who have an interest in it but felt ‘I don’t have the space for it, I don’t have the tools.’” The class is designed to show them how much they can do with an improvised workshop, outdoors. Most students rent an Airbnb in Joshua Tree.
“One thing I enjoy about doing the classes when we’re outdoors and only using hand tools is moving with the rhythms of the day and the weather, and being quiet,” he says. “The name of my business is Esho Funi Butsudans. It’s the idea of the oneness of self and environment, of how inseparable the two are. When you’re working with your hands and building a piece of furniture, that line disappears. This thing I’m making is very much me. In building it, working with the wood, considering where the knots are, and how the wood may behave five years from now, it bleeds over into me. The two things are just the same. When the piece is finished, it has its own personality, its own character. To me that is…I can’t think of anything, short of having children. Sharing myself. Growing. It’s a therapeutic thing to do, to build something with your hands and return to it every day.”
Lighting
One of my favorite Caleb Rogers creations is not cabinet or an altar, but a light fixture. Floating in the dark, its undulating organic form calling a jellyfish to mind, it’s a delicate confection in tissue-covered reed.
“I’ve always loved lighting, playing around with light. My mother designed sets for the theater for a time. She was brilliant at creating a mood using light.” He describes the process of making these lights: “I start bending the reeds and hot gluing [them] here and there. And then I’ll take tissue paper and white glue and cover the whole thing with tissue paper and put a light in it, and gradually layer that tissue paper until the quality of that light coming through is just right.”
One light he made for a client in Los Angeles was so large that he had to cut it in half to get it in his Nissan Sentra for delivery. To get a feel for the space and the kind of light he wanted to design, he’d spent a night on the sofa at his client’s house, staring up at the space in the ceiling where the client had said he wanted the lamp to be. It took Caleb six hours to stitch the light back together so that it looked just right.
He tries to work quickly and prolifically, to keep his work affordable and the commissions coming in. “Before I start a piece, I build it in my head, maybe 100 times, before I pick up a tool, so that when I do start on a project, I know what I’m doing. I don’t take breaks; I don’t eat lunch.”
Asked how he prices his work, Caleb responds with a reflective question: “How do you price something? What are you willing to sacrifice in your life so you can do this [kind of work]? I keep my bills as low as possible. I don’t have any debt, I don’t have credit cards. I want to be able to do my work and keep my prices reasonable. I try not to think about what, on an hourly basis, I’m making. At first I was making butsudans for whatever someone could pay, just so I could keep working and put the photos on my website.” That generated more work. “I’ve been able to do this as my sole source of income for going on five years. So I’m very fortunate. I don’t have fixed prices. It has a lot to do with the client, what they can afford. I want to build the thing I have in my head and I don’t want to compromise just because I might have to work a little harder or a little longer for a little less money.”
He’s grateful to have a few clients he considers patrons, who commission dozens of pieces for their homes. “For somebody like me, it makes all the difference in the world. If you have money out there, there’s really nothing better you can do than supporting an artist you like.”