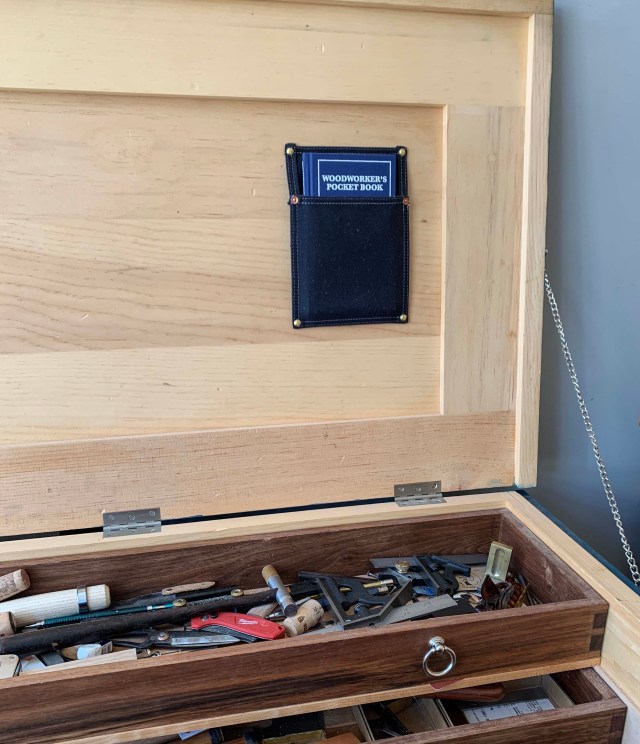
Not only do we once again have “Woodworker’s Pocket Book” in stock, on Saturday, Texas Heritage will post a batch of slipcovers in which to store the book on the inside of your tool chest. The slipcovers will be part of the company’s annual Small Business Saturday Sale. So if you want one, stick a Post-It note on your oatmeal tin or mirror as a reminder to visit the site on Saturday morning. (No pre-orders, as it states on the Texas Heritage site.)
Like all of the company’s offerings, this slipcase is handmade in Texas. It’s navy blue, 14-ounce waxed cotton canvas with hand-peened copper rivets and brass eyelets, and comes with slotted brass mounting screws. Both Christopher Schwarz and I have them inside our tool chests, so we can easily grab the book whenever needed.
— Fitz
NB: If you put one inside a Dutch tool chest, mount it sideways. I had one in my travel chest mounted so that it was right-side up when I opened the lid…but the 30° slant of the lid caused it to slip down to the front wall, at which point it became a lock of sorts. It was a struggle to get the chest open and rescue my book!
Across the studio, behind a grove of microphones on stands, the piano sat silent under a quilted cover like a sleeping racehorse. Calvin leaned forward in his chair staring at it, trying to strike an intense, artistic pose as Bubby read over his script. A figure in the hallway passed the small window in the studio door and Calvin whipped his head up painfully quick. He glanced at the clock. Bubby said they would have the studio to themselves until four. The chair creaked as he leaned back, shifting his pose to one of relaxed confidence—which would do just as well if Kathryn Dale Harper should happen by. But this pose quickly grew tiresome as well, and he leaned forward again to poke quietly at the saws, augers and gouges in his pasteboard box.
Bubby finally handed the script back to Calvin. “Okay. You need to write an introduction. You need to say who you are, what you’re doing, and who it’s for. You need say the title and set the stage. And you have to state that it’s a transcribed show at the beginning and at the end. That’s a federal regulation.”
“Do you want me to write all that now?”
“Nah, its just boilerplate to me. Same on every show, time-wise. Like the ending, it’ll be something like—
If you would like a measured drawing to make your own folding ladder of liberty, handy around the farm and home, just write to Grandpa Sam’s Woodshop of the Air, care of the National Farm and Home Hour, US Department of Agriculture, Washington 25, D.C. Be sure to include a three-cent stamp to cover the cost of duplication. This has been Grandpa Sam’s Woodshop of the Air, transcribed from Washington, D.C.
“So ‘Grandpa Sam’s Woodshop of the Air,’ that’s the title?”
Bubby pinched at a weeping blister on his left hand. “Hattersley’s suggestion, so I’d go with it, if I were you.”
“I thought it had a certain buoyancy about it!”
“Thought you’d like it.” He grinned at his friend. “Okay, after the close, you need a signature sign-off. Something that will stick with ’em.”
Calvin leaned over toward the sound effects table in the center of the studio as he thought. “How about:
This is Calvin Cobb wishing that, as you slide down that banister of life, all the splinters go in your direction!”
Bubby nodded enthusiastically. “Believe me, that’s not too corny.”
Calvin rubbed the canvas cover of the wind machine. “Nah! You know we can’t end each show with a Confucius-say joke about splinters in the ass.”“Well, it’s borderline. So, got any theme music?”
“Not yet.”
“This is very psychological, now. You need some old music that’s gone out of fashion, but that still has positive associations. Gotta pluck the right strings.”
Calvin stared at the piano and flipped through mental images of tattered sheet music. Willow Weep for Me?
Bubby shook his head. “It doesn’t have to have a wood reference.”
“Something by Bela-Bale, maybe, then.” He waved away his comment. “Sorry, uh, how bout Nola?” Bubby hummed the tune to himself for a second. “It’s bouncy.”
“Yes, but is it buoyant?”
“Buoyant enough for government work. Okay, Nola for now, and your first sound effect is what?” Calvin looked at the script. “The auger, I guess.”
Bubby wrote the cue on a notepad. “Right, okay, I’ll do peanut shells in a meat grinder for that.”
“I brought over an auger and a brace,” said Calvin, rummaging in his box of tools.
“Wouldn’t sound right. Okay, you got sawing here too. Let me hear you saw.”
“Rip or crosscut?”
“Both. And I’ll do Washington’s snoring since you’ll be doing the character voices over it.”
Calvin pulled his five-and-a-half point Disston No. 9 from the box and rip-sawed down the length of a pine plank spanning two sawhorses. Bubby made snoring sounds, striving for a comic asynchrony. He signaled Calvin to stop. “You know, if this was a union job they’d have to give me actor’s pay for the snoring. Alright, lets hear the crosscut.”
Calvin changed saws and began cutting across the grain. Bubby snored while studying the bouncing needle on a meter. He shook his head. “Get a thinner board so it’s a little crisper, and I’d better do the sawing too. I can make it funnier.”
“Right! Tell me how you can saw funnier than me.” Calvin plunked the saw blade with his thumb, making it ring with a “boing” sound.
“It’s all in the timing. And that ‘boing’ you just did is a perfect rimshot for the punchline.” Bubby reached with his toe to level the gravel in a big shallow box on the floor. “So, here’s your Hessian on guard duty.”
He stepped in the box, marched in place for a few steps, then swiveled and marched in place again.
“We’re going to be making history, you know that.”
“Well, it’s not very good history.”
Bubby frowned at him for a second, then grinned and slapped at Calvin’s script. “No, not your story itself! Just that it’s going to be the first recorded program ever on the networks.”
“You mean the second. You did the first. And what’s the big deal, anyway?” said Calvin, trying to shift the subject. “Unless there’s a scratch or a skip on the record, you can’t tell if it’s recorded or live—or is that the problem?”
“Oh, that’s what they say, but it’s just money.” Bubby leveled the sound effects gravel with his toe. “It’s like Rockefeller oil. Once you control the pipeline, you can strangle the little guys. NBC and CBS put all this dough into their wire networks. But if anyone bypasses them by mailing out shows on disks, there goes the hegemonic power of the dastardly duopoly.” He laughed. “I sound like Kathryn Harper.”
Calvin glanced at the window and stretched his arms over his head in an exaggerated show of nonchalance. “Are you suggesting that the voice of the American homemaker is a red?”
“Oh, she’s very in with that Popular Front jazz.” He tossed his head back, regarding Calvin through narrowed eyes. “Are you surprised?”
“Well, it is kind of an odd fit—slip covers and surplus value.”
Bubby shrugged. “Lots o’ radishes out there still—all stylishly red on the outside but white underneath. But me? I’ve got you some surplus value right here.” He reached into his jacket pocket and handed Calvin two blue tickets.
“Holy cow! Tommy Dorsey! How’d you get these?”
Making a show of adjusting his collar, Bubby affected a hoity-toity voice. “I’m a celebrity now, don’t you know? Such things come my way.”
“But don’t you want go?”
Bubby shook his head slowly. “The dance is out at Glen Echo, right next to the roller coaster. I’ve heard all the screaming I need to hear for a while.” He blew out a breath and sat on one of the sawhorses. “I just burn my hands trying to pull some stupid girder and the next thing you know my name is in the paper and everybody’s being nice to me!” He stood, taking control of his breathing before reaching into a bag beneath his table and pulling out a head of cabbage. “So here’s when your Kraut gets clubbed.” He whacked the cabbage with a short billy club, let a half second of silence pass and grunted “Unhh!” A sequential flopping of his elbow, forearm and fist onto the tabletop made the sound of a body hitting the ground. “Trust me, it’s perfect when you can’t see it.” Bubby nodded slowly as he looked in his little spiral-bound notebook. “Okay, we got the prison door.” He leaned over and patted the chain-festooned iron firebox door standing on a short wooden frame. “Got the tunnel.” He patted the empty trash drum beside him. “Got your wood gouges, creaking gridiron and unfolding ladder.”
Calvin took up the challenge and pointed to a yellow balloon on the cart. “All right. Thumb dragged across the balloon for the creaking gridiron. Where’s the folding ladder?”
Bubby picked up a short cedar box with a paddle-shaped cedar lid. He held the lid handle and rubbed it down the edge of the box to make a squeaky opening and closing sound. “Its a turkey call.”
Calvin nodded appreciatively. “And the gouges?”
Bubby took up a serving spoon and swept it repeatedly across the tabletop, slowly rolling its point of contact from the bowl of the spoon to finish the sweep with its edge. He bounced his eyebrows in happy triumph and popped Calvin on the shoulder with the spoon. “We’re going to be on a tight schedule, so I’m going to give you a production calendar for the whole summer. Enjoy the dance, ’cause you sure won’t have much time for a social life once we get going.” He glanced up at the wall clock. “Ah! Let’s get this place cleaned up.”
“I thought we had until four o’clock!”
Bubby crossed the studio to retrieve a broom. “When the piano man speaks, all must obey. He wanted to start at three.”
Calvin held a sheet of paper on the floor as Bubby swept the sawdust onto it. “Is Brockwell privy to Miss Harper’s pink persuasion?”
“Couldn’t be. He’s the bone they had to throw over the right side of the fence.” Bubby removed the quilted cover from the Steinway grand and began rearranging the microphones. “Some of his stooges in congress invoked the public interest provision of the Communications Act of 1934. As a balance to talking about social security, they say we have to let Brockwell share his helpful hints about blood, soil and der volk.” He handed the piano cover to Calvin and nodded toward the props table. “He’s been trying to get his own radio program for years now.”
“What’s been stopping him?”
“Stay and listen.”
Calvin finished tidying the props and wandered slowly to the booth. He let himself in and began thumbing through the record collection in the dark corner.
Bubby, still in the studio, switched on a microphone so that his voice came on the speaker in the booth. “You may be stuck here for an hour or so,” he warned. “We’re going to rehearse and then we’ll cut one.” He made a farting noise. “Or maybe two.” He made another.
Though we’ve dialed back the number of classes we’re offering at the storefront, we do have a few scheduled for the first half of next year (mostly because Chris is kind to me and – despite the havoc a class wreaks on his shop and life in general – knows I a) love teaching and b) need to feed my cat). We might be adding no more than two classes in the upcoming weeks…but I didn’t want to hold off any longer on announcing these.
The classes will go on sale on Monday, Nov. 29 at 10 a.m. Eastern, through our Ticket Tailor portal. Even though there’s a big “Register Now” button alongside each class at that link, you cannot register until 10 a.m. on Nov. 29. But you can read more about each class, see the estimated stock price, etc., if you click through.
Notes: 1) You must have had the Covid vaccine to attend a class at our shop 2) Please email covingtonmechanicals@gmail.com – not the LAP help desk – if you have questions about classes.
• Build the Anarchist’s Tool Chest with Megan Fitzpatrick; February 21-25, 2022 ($975 + stock fee) • Make a Carved Oak Box with Peter Follansbee; March 28-April 1 ($1,400 + stock fee) • Build a Dutch Tool Chest with Megan Fitzpatrick; May 6-8 ($425 + stock fee) • Make a Dovetailed Shaker Tray with Megan Fitzpatrick; June 4-5 ($320 + stock fee)
The traveling version of the “Anarchist’s Tool Chest” atop my full-size version.
In Autumn of 2019, Nicole Spagnuolo emailed to ask if I’d like to record a video for The Wood Whisperer Guild. “Sure!” I said, forgetting – in my delight and honor for having been asked – that I vehemently dislike being on camera. We decided on a smaller version of Christopher Schwarz’s “Anarchist’s Tool Chest.” Then COVID hit, so travel was difficult and ill-advised, and it all rather slipped my mind.
About two months ago, Marc Spagnuolo reminded me, so we scheduled the shoot for Nov. 8-12 with Todd Tidwell, the videographer for the Guild, who would drive up from Texas (that’s a haul!). I blithely said something like, “I’ll prepare parts as if for a cooking show – several versions of things in different stages – to help move things along. I think it will take three days.” Then I forgot again…because apparently the mere thought of a camera pointed at me makes me lose about 20 IQ points.
I remembered a week before – thank goodness – and after a panicky visit to my lumber stack in the cellar, found I had just enough sugar pine from which to prep most of the the parts. But this was the absolute dregs of stock I’ve accumulated over four years of classes. Lots of having to cut around knots and be on the lookout for surface checking, and deal with twist and cupping. There’s a reason I hadn’t used these pieces already: too much of a pain in the ass. But needs must. And I had not a stick extra – so no prepping additional parts ahead of time.
For the lid pieces, I had to pilfer from a leftover class kit (I now have two-thirds of a tool chest kit sitting in my basement at home). And after messing up a part or two as the cameras were rolling, I had to steal from the skirt pieces of an almost-finished full-size tool chest that’s currently sitting in our machine room. (I guess I’ll use the skirt pieces in my basement to finish the chest in the machine room…which will leave me with a set of carcase panels.) Oh – and I didn’t remember to order hardware or paint until the last minute. (Thank you Orion Henderson/Horton Brasses for having the hardware I wanted in stock, and for shipping it quickly!)
So even though I couldn’t do it cooking-show style, I figured that would add only a day. So: four days; no problem.
I forgot that once the cameras fired up, I’d lose an additional 20 IQ points. Plus we all know the joke about open glue bottles, right? Pop that lid, and there goes 40 points. With 66 dovetails to glue up for the carcase, two skirts, dust seal and interior tills, and four mortise-and-tenon joints, well, I had the bottle of Old Brown Glue open and ready to grab the entire time. So now I’m down about 80 points. Every day.
With two cameras pointed at me, I found myself losing words I commonly use. “What are those valleys between saw teeth called again?” “What’s that tool you place at the end of a nail then hit it to sink the nail deeper? “Mullet…that’s a hairstyle…can it really be the right word for the offcut used to test the fit of a tongue-in-groove joint?” Sigh.
But most embarrassing? I cut shovetails. Even when I was starting out, I never cut shovetails. Mobius strips, yes (that is, I’ve flipped a pin board side to side instead of end to end more than once, and ended up with pins in opposite directions). But now I have. On camera. Marc has ocular proof of my shame. (Just after that mistake, we broke for lunch so I could get over it…and as I walked outside, a bird pooped on my head.)
They’re called “shovetails” because in order for this geometry to work as a joint, you have to shove them together then add nails.
In the end, it took a full five days…which is what Marc and Todd anticipated. They’re much smarter than am I – even though they’re around cameras all the time!
In the end, the tool chest looks pretty good (if I do say so myself). Now here’s hoping that Todd has enough not-stupid video of me – or can splice enough together to make me look pretty good, too. Thank goodness for skilled editors!
But despite my self-consciousness (and camera-and-glue induced stupidity), it was a lot of fun to record. Thank you to Nicole and Marc for asking me to do it (I feel truly honored!), and to Todd for his grace and kindness all week. And special thanks to Chris for letting me take over the shop (and for longer than I anticipated), and to both him and his family for tiptoeing around all week.
Tool rack for pointy tools, and saw rack. There are also two 3″-deep tills inside, with enough room underneath for bench planes and other floor-stored stuff.
– Fitz
p.s. This one is about 15″ tall, 18″ front to back and 38″ long. Chris offered plans for a slightly different size/interior in SketchUp years ago; here’s the blog link.
Although purchased for dovetailing, these pencils also make good cat toys.
Anyone who’s taken a class with me in the last five years knows how I feel about .5mm mechanical pencils. When students’ dovetails are too loose or too tight, my first question is, “What pencil did you use to darken your knifeline?” If a dado is too loose (or too tight), my first question is, “What pencil did you use to mark the cutline?”
I find a .5mm mechanical pencil has the ideal lead diameter. The line it marks on a flat surface is exactly thin enough that you don’t have to decide where across its width to cut; you just cut the line. And if you drop a .5mm lead line into a knifed line, the lead catches on both sides of the line, leaving an unmarked trench between (which is where I instruct students to saw when cutting their pins).
From left, lines from a .5mm, #2, and lumber pencils.
I don’t really have a favorite .5mm pencil in terms of the results, but because I tend to lose them a lot (especially while teaching, because I loan them out constantly), I buy inexpensive ones – whatever is available for less than $20 in a multi-pack at any office supply store, large grocery or drugstore.
And if you ever take a class with me, you’ll see a .5mm on the tool list. I mean it (few students seem to believe me!).