Editor’s note: Our Mind Upon Mind series is a nod to a 1937 Chips from the Chisel column (also featured in “Honest Labour: The Charles H. Hayward Years”), in which Hayward wrote, “The influence of mind upon mind is extraordinary.” The idea being there’s often room for improvement. (You can read the entire Chips from the Chisel column here.)
To that end, we’ve asked you what else you have thought of, tried out and improved upon after building projects from our books. We’ve loved reading all your submissions!
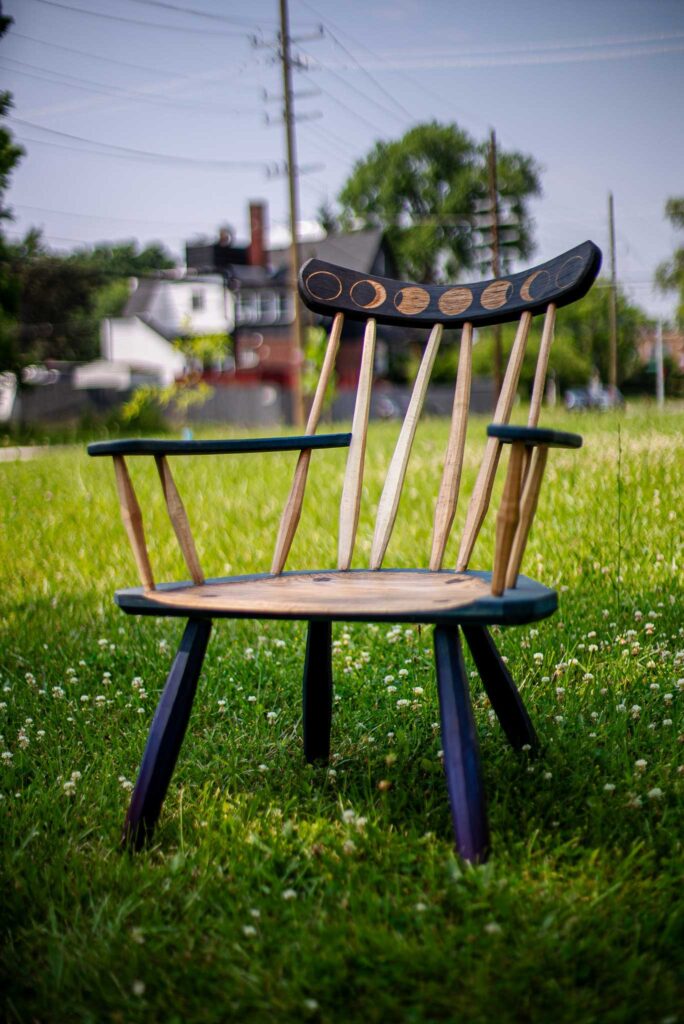
Today’s pick is from Matt Williamson.
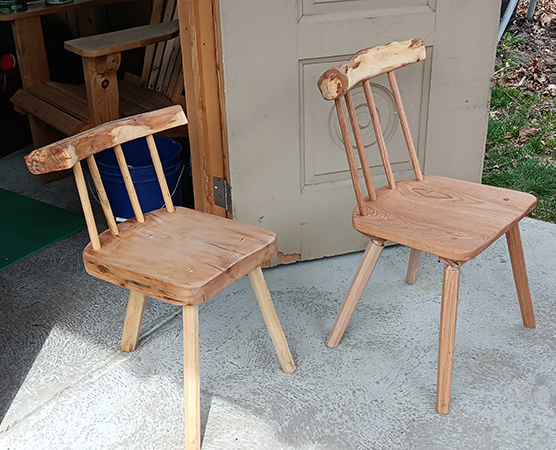
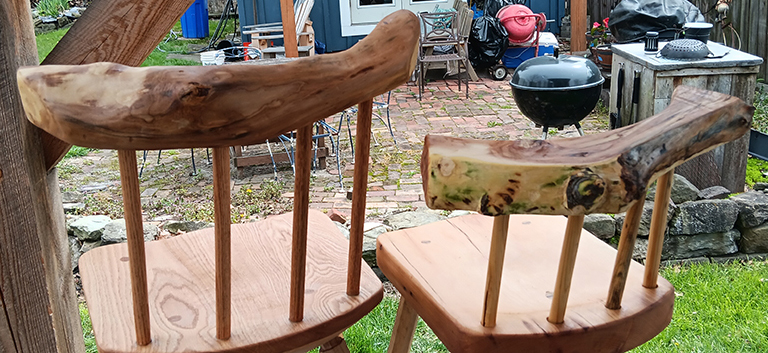
I have been messing around with “The Anarchist’s Design Book” and have made a few adjustments that you might find interesting. These are probably not improvements so much as solving problems caused by my desire to use what I have in lieu of greenwood I have yet to source.
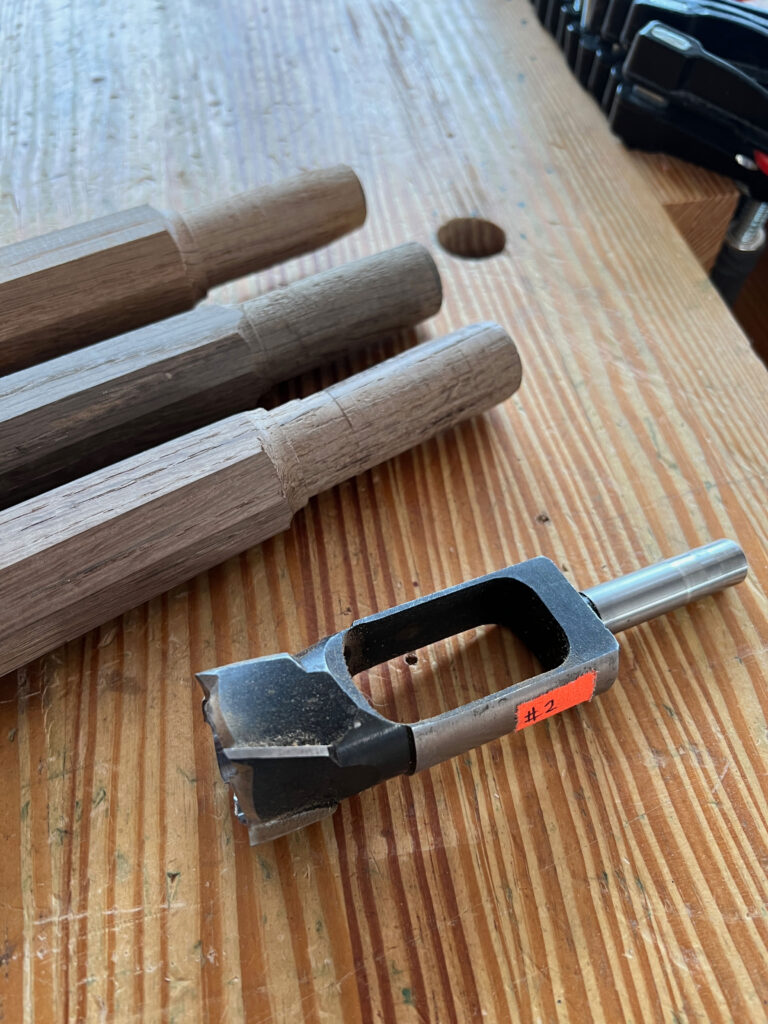
For the staked stool, the seat is from a 13-1/2”-wide 9/4 pine joist I pulled from dumpster when a historical building in the neighborhood got rehabbed. For the staked chair, the hardwood I had included some 4/4 red oak and some 6/4 red oak that, again, I dumpster dove for in the neighborhood. These 6/4 scraps were not big enough to make a seat, but I thought they would add strength to the 4/4 seat panel and give the legs something to hold onto. It is a bit heavy.
I did not have any greenwood that could be bent for the staked stool back so I used a piece of apple wood from a tree I cut in the fall that basically followed the 12″ curve. I kind of liked it and found another piece to use when I made the staked chair a little while later.
Did you change up one of our projects or do you have a clever idea for an improvement? Email kara@lostartpress.com. You can read more about the submission process here.
The following is excerpted from “The Anarchist’s Design Book,” by Christopher Schwarz, an exploration of furniture forms that have persisted outside of the high styles that dominate every museum exhibit, scholarly text and woodworking magazine of the last 200 years.
There are historic furniture forms out there that have been around for almost 1,000 years that don’t get written about much. They are simple to make. They have clean lines. And they can be shockingly modern.
This book explores 18 of these forms – a bed, dining tables, chairs, chests, desks, shelving, stools – and offers a deep exploration into the two construction techniques (staked and boarded) used to make these pieces that have been forgotten, neglected or rejected.
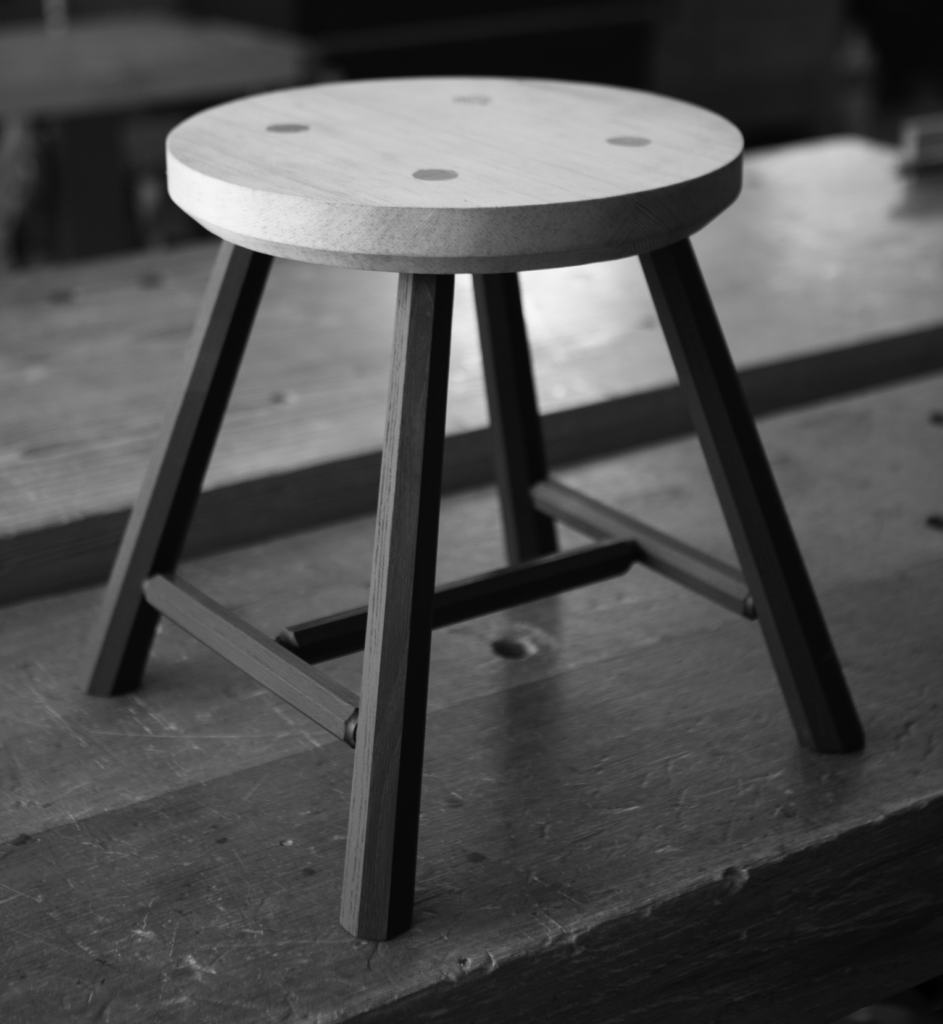
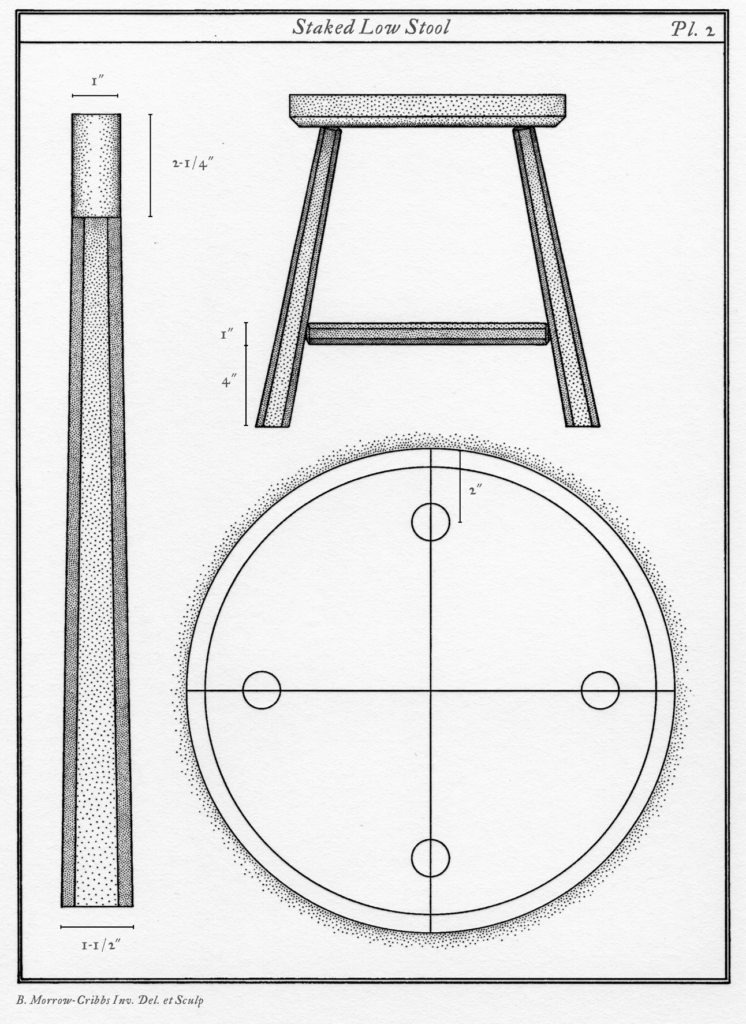
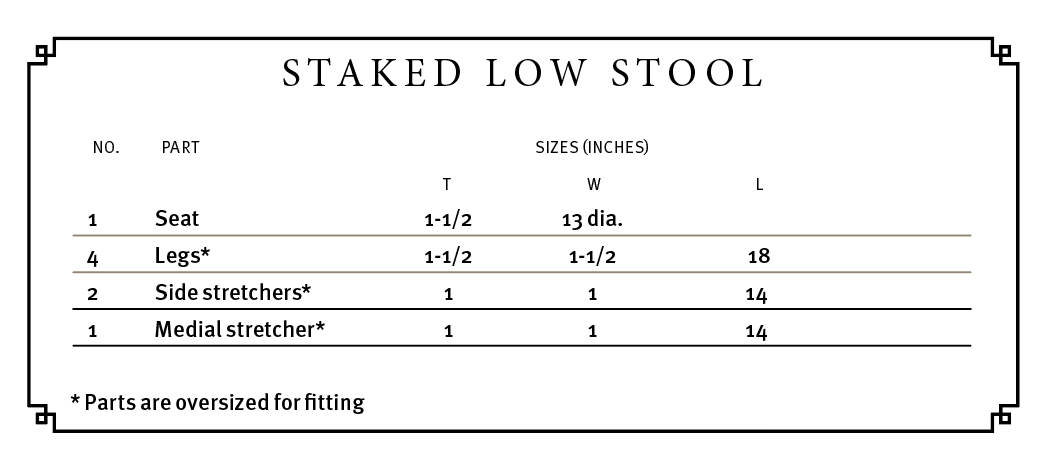
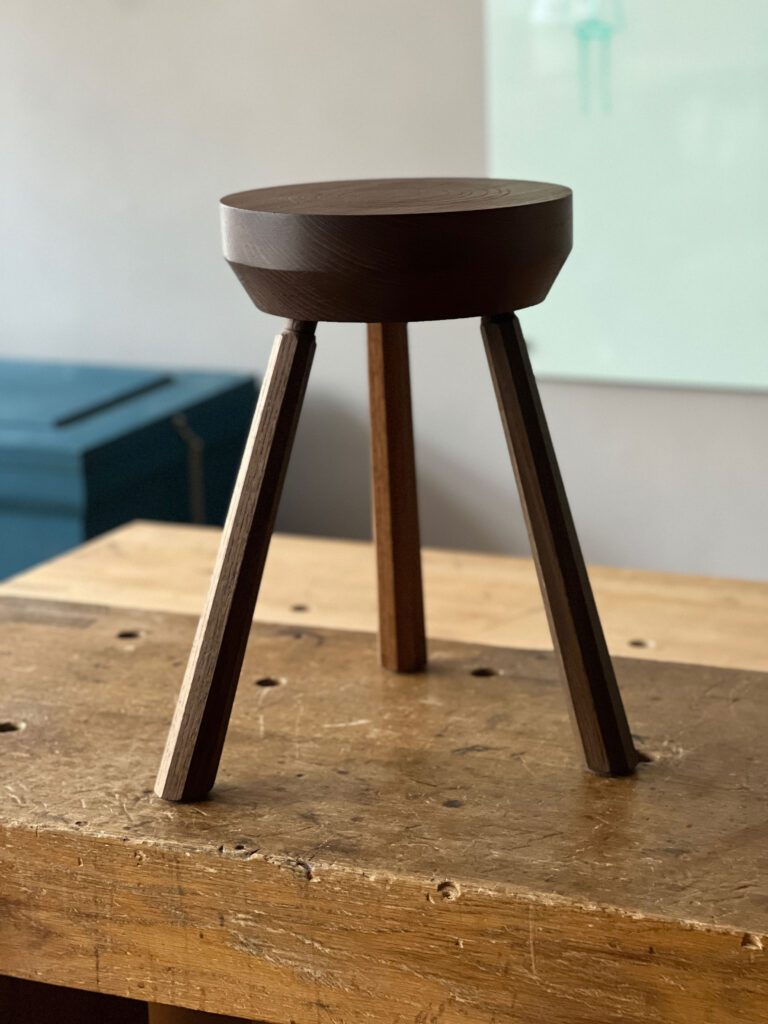
Here’s a simple stool design that represents a lot of false starts, research and prototyping. It’s not perfect, but it is a nice, stout stool. The stool is based on 18th-century low stools from American homes. This stool is also an excellent introduction into building the seat and undercarriage of a full-blown chair.
This stool has a pine seat and hardwood legs – ash in this case. The seat is 13″ in diameter and the legs hold the seat about 16″ off the ground – a good height for a low stool. The H-stretcher is a bit of overkill. But I think you should include it. It will teach you how to add stretchers to any of the chairs in this book – or from other people’s books. So let’s go.
Make the Seat The seat is a softwood that is about 1-1/2″ to 1-5/8″ thick. You can glue up the seat from two bits of wood (that’s what I did) and put the seam in the dead center of the seat. Keep the leg joints away from this seam; you don’t want the legs levering the seat apart. (Yes, a long-grain-to-long-grain joint is stronger than the wood itself in a perfect world. But that is not where we live.)
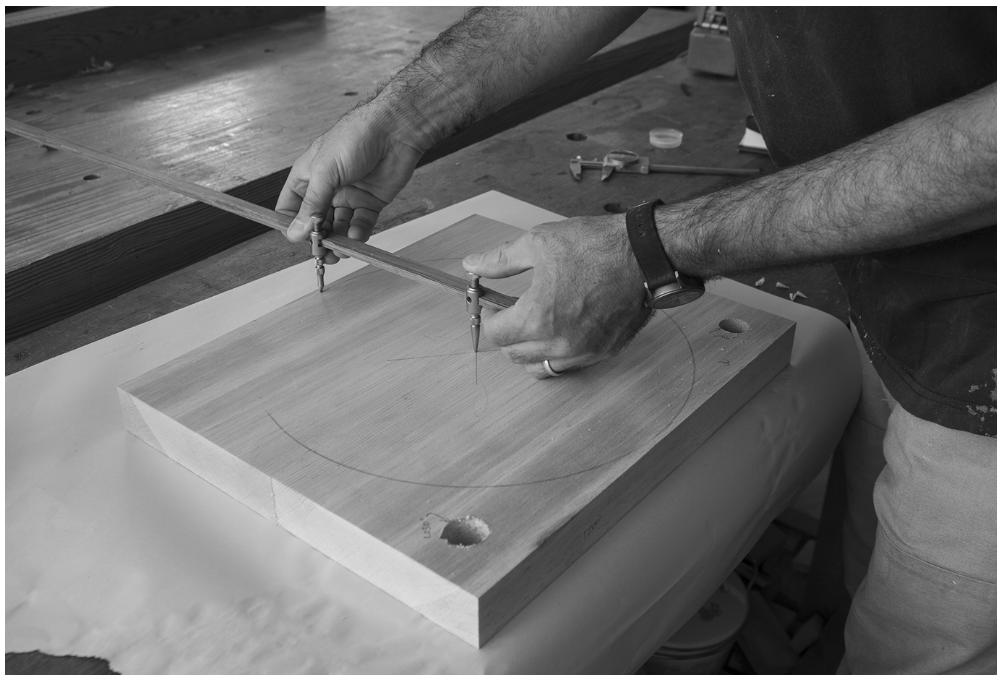
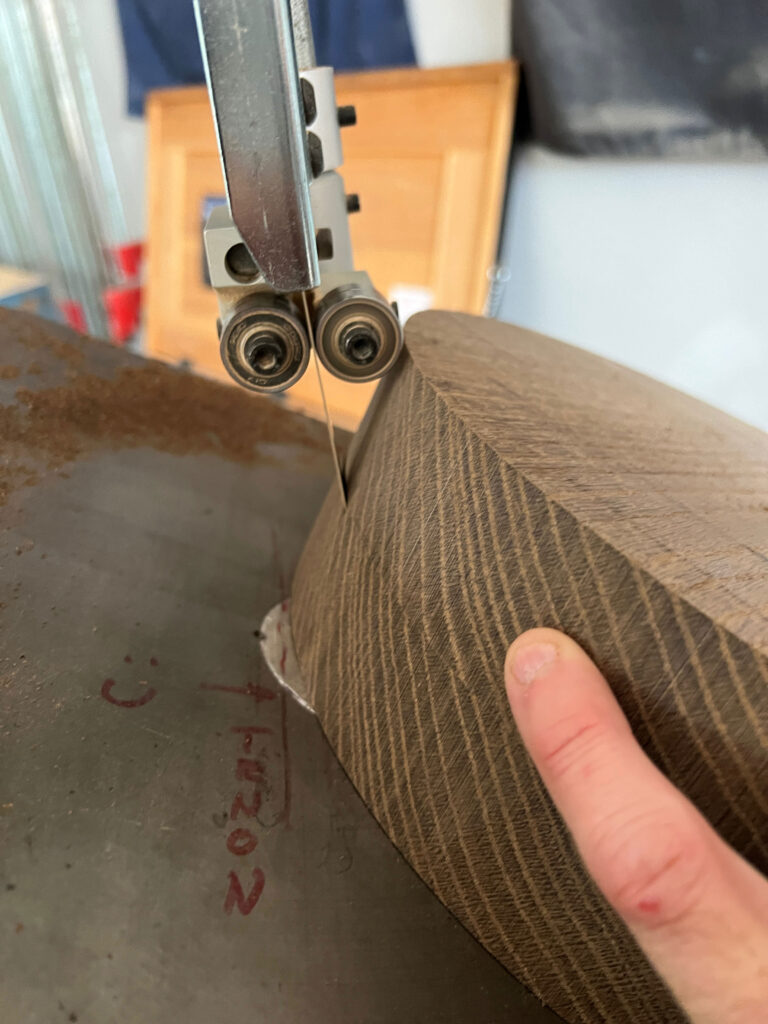
Around & around. Here I’m marking out the diameter of the seat. Note the two holes in the corners of the blank. These are test mortises that will allow me to test the fit of the tenons on the legs. Waste not, blah blah, blah.
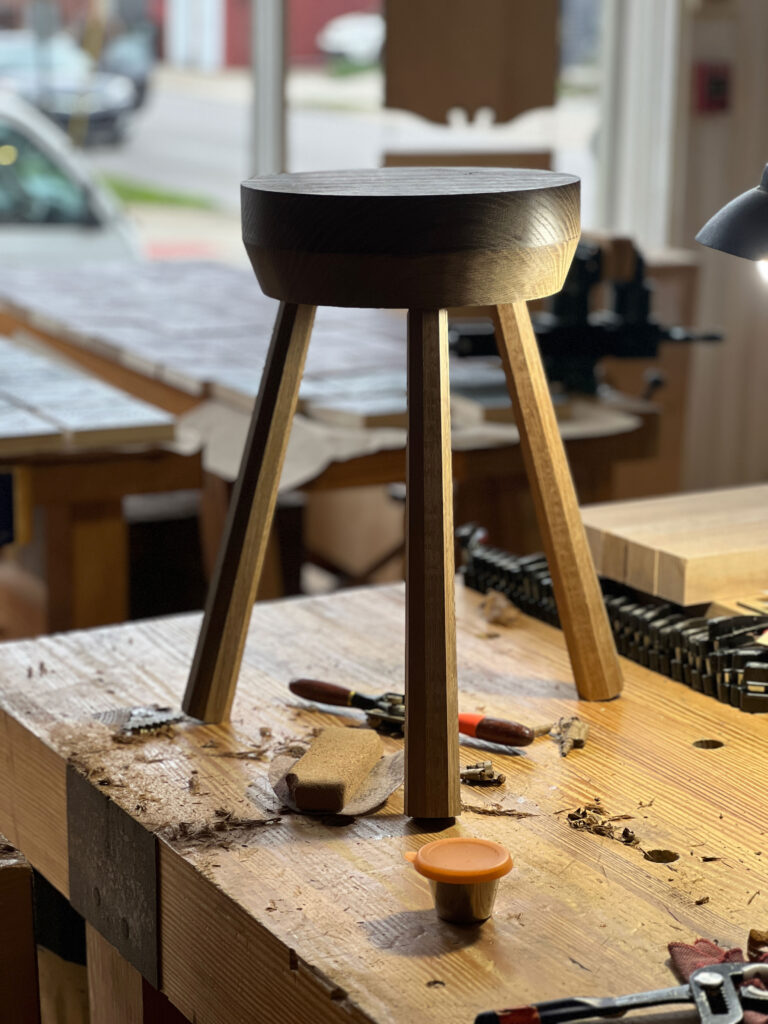
With the seat blank glued up, use a compass or trammel points to lay out the 13″-diameter seat. Cut the seat to shape. Then cut a 1/2″ x 1/2″ bevel on its underside. This bevel lightens the look (and the weight) of the stool. You can do this on the band saw or do it with a block plane or spokeshave. Now you can mark out the location of the joints. Here’s the easy way. On the underside of the seat, draw a line through the centerpoint of the circle. Make this line parallel or perpendicular to the glue seam in the seat (if you have a seam).
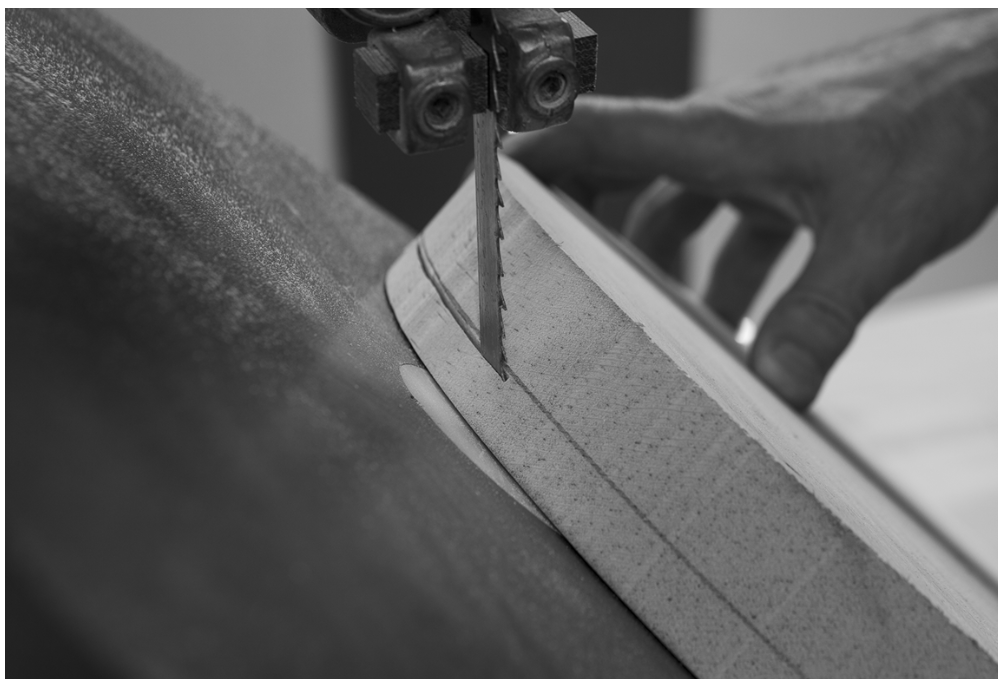
Around again. After cutting the seat round, tilt the saw’s table to 45° to cut the bevel on the underside of the seat. Mark the 1/2″ bevel on the seat’s edge and follow that with your saw’s blade.
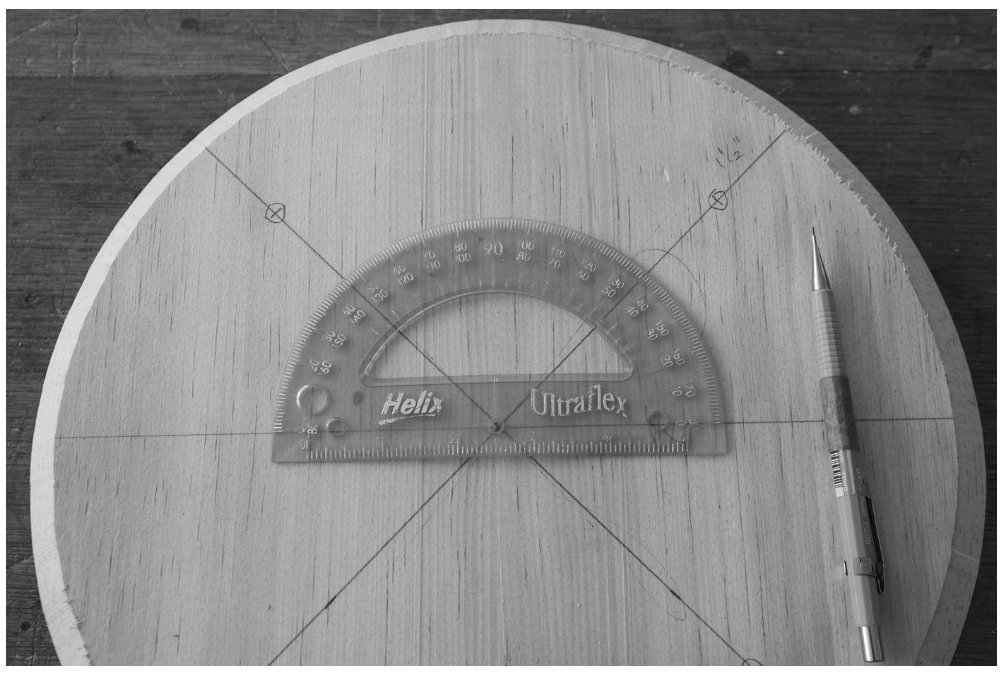
Place a protractor on your pencil line and mark the seat at 45° on both the left and right sides of 90°. Connect the marks with the centerpoint and you will have a perfect “X” on the underside. Now take a ruler and mark out the location of the four leg mortises 1-1/2″ in from the edge of the seat’s bevel. (It’s all shown in the photo [below] if you look closely.)
Good layout. There are 100 ways to do this. Place the protractor on your line and mark the seat at 45° on both sides of the protractor. Connect these marks to the centerpoint. And done. Perfect.
Make the Legs The legs are 1-1/2″ x 1-1/2″ x 18″ and are made from a dead-straight hardwood such as oak, maple, ash or hickory. Knock off the edges until the legs are octagons. Then taper the legs so they taper to 1″ at the top.
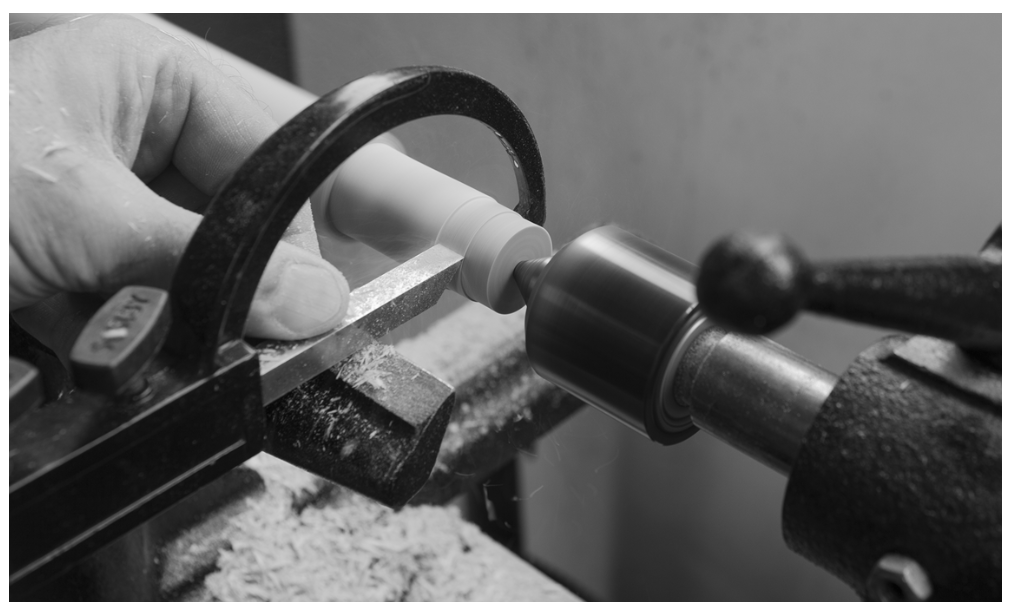
For this project, I decided to use cylindrical tenons. While I prefer tapered tenons, cylindrical tenons are far more common in the historical record and are easier to make, especially if you own a lathe.
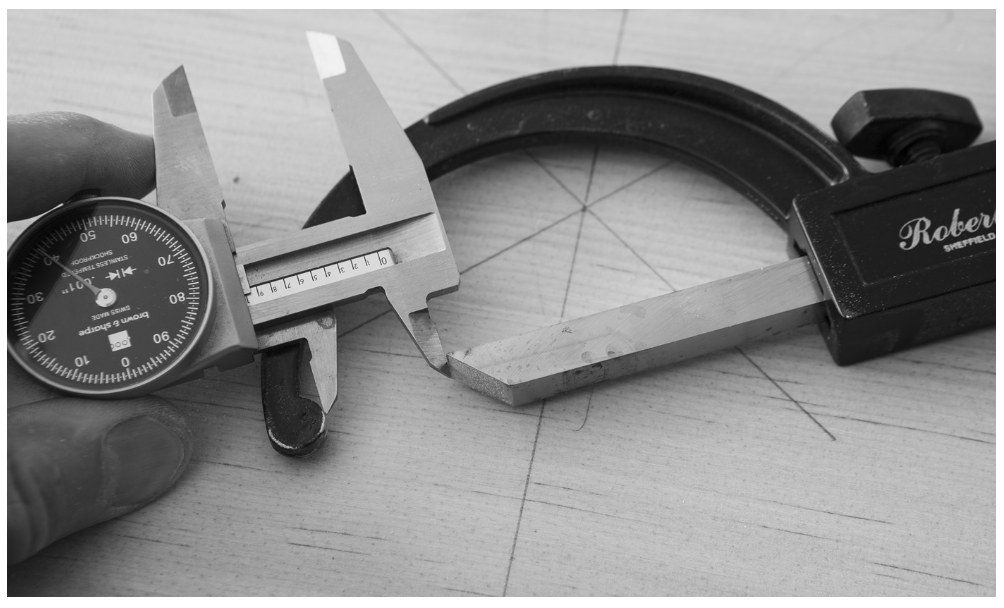
How this works. The bedan tool’s sizing attachment is set to .940″ – the diameter of the bit for the leg mortises. Slide the sizing tool toward the cutting edge until it matches this measurement. Then lock the position of the sizing attachment and make a test tenon. Really. Test tenon. Don’t ignore me.
The tenons for this stool are 1″ in diameter and 2-1/4″ long. Turning them on the lathe is straightforward. If you want your tenons to be dead-on accurate, I recommend you purchase a bedan tool with a sizing attachment. A bedan tool is basically a wide parting tool with its sides relieved (like a traditional mortise chisel) to allow it to maneuver in the cut without binding. The sizing tool is an attachment that clamps to the tool and allows you to set the diameter of the cut.
Perfect tenons. The sizing tool lets you cut tenons within .001″. The tooling works just like any standard parting tool.
To use the bedan tool and sizing attachment, first drill a test mortise and gauge the exact diameter of the bit that will drill your mortises. Set a dial caliper to that measurement (lock it) and use the caliper to set the bedan tool and its sizing attachment.
Test each tenon. After I cut each tenon, I check it in the test mortise (made with scraps from the seat). This is a backstop because I don’t trust my bedan sizing tool, though it has yet to let me down.
Bore the Mortises The leg mortises are bored at an 21° resultant angle. The sightline is 0° and runs directly into the centerpoint of the seat. Set a sliding bevel to 21° and tape it to the sightline. Clamp a backing board below the seat to reduce (but probably not eliminate) any splintering.
With this stool, I’m using a 24 mm bit from WoodOwl that is supposed to leave a clean exit hole without splintering. It does a pretty good job, though no bit is perfect (hence my backing board). These particular bits work best in an electric drill.
The tape helps. The vibrations from boring can make your sliding bevel move. And even a little bit of movement makes a big difference in the leg angles. So spring for the tape.
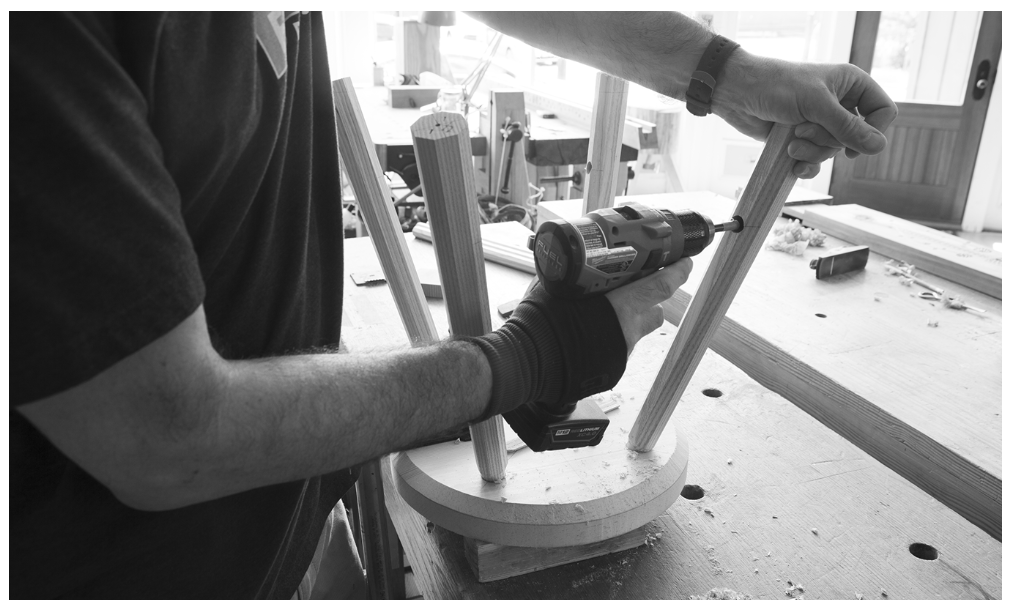
Drill the four mortises. Then put the legs into their mortises and have a gander at how accurate you were.
Rotate the legs in their mortises and orient them so their attractive surfaces face out. Then meaningfully mark the legs and the seat so you can get the legs back into this ideal arrangement.
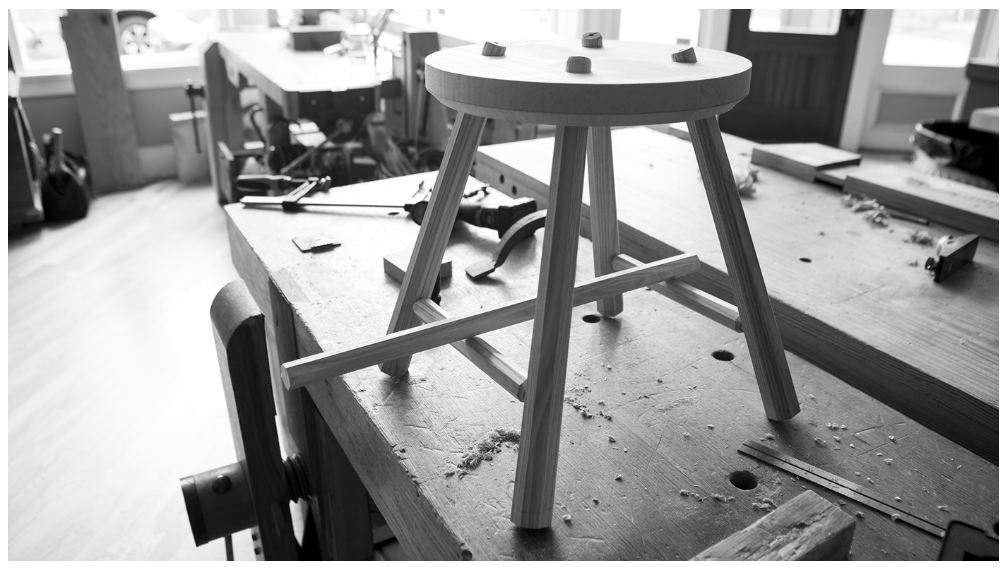
Right about here. Putting the stretchers at this height makes the stool look like a chair that has been shrunk just a bit (which is a pretty accurate assessment of the design).
Now it’s time to bore the mortises for the side stretchers. These are positioned about 4″ to 4-1/2″ up from the floor. Here’s how to mark them out. First, level the stool like you are preparing to cut the legs to length. Shim the feet until the seat is level all around. Then cut a 4×4 block of wood to 4-1/2″ long and place it on the bench. Fetch the half-pencil (it’s a pencil planed to half its thickness). Mark the location of the mortises for the side stretchers on the legs.
On the tip of disaster. After you do this a few times, you’ll gladly bore these mortises without guidance from others. Until you get this confidence, have a spotter tell you if you need to raise or lower the drill to keep the bit in line with both mortise locations.
To bore the mortises, flip the chair upside down so the seat is on the benchtop. Place a couple sticks between the seat and benchtop to let the tenons poke through the seat. Then take an awl and mark the centerpoint of each mortise on each leg. I do this by eye. Measuring always seems to make it worse.
Tiny test tenons. These thin offcuts determine the final length of the stretcher. Pinch them together and mark across the offcuts. Remove the pieces and reassemble them to determine the final stretcher length.
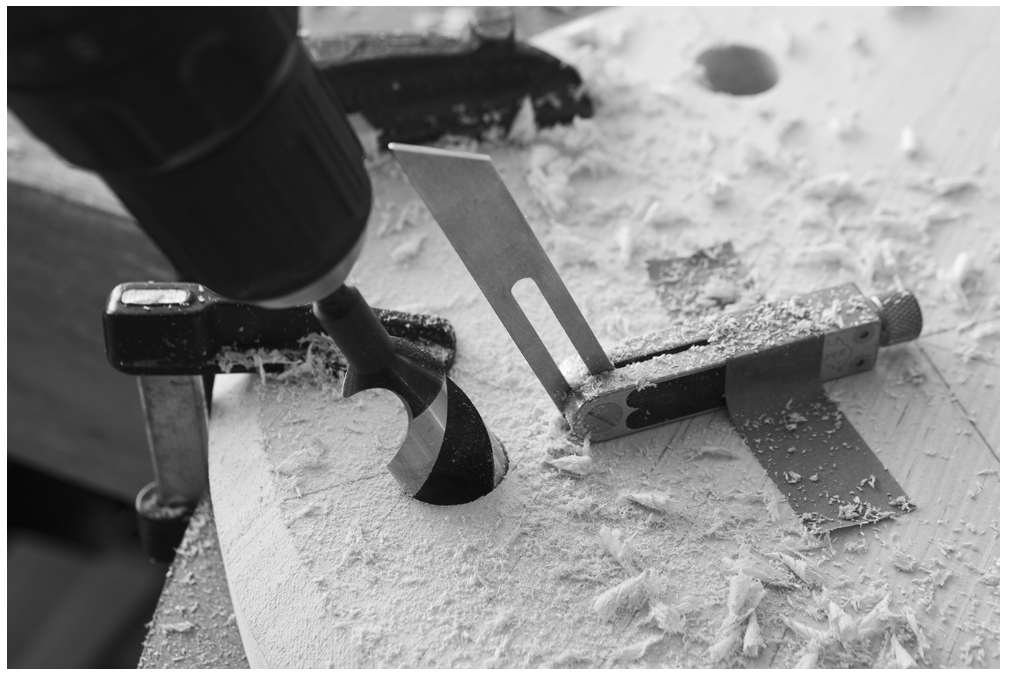
Chuck a 5/8″ Forstner bit into a cordless drill. I drill the 7/8″-deep mortises in the legs entirely freehand, using the seat and the marks on the legs as a guide. Rotate the leg in its mortise so you can get the drill and the bit in position in line with the leg. The drill and bit should be aligned with the mortise on the opposite leg. The photo [“On the tip of disaster”] shows how this works.
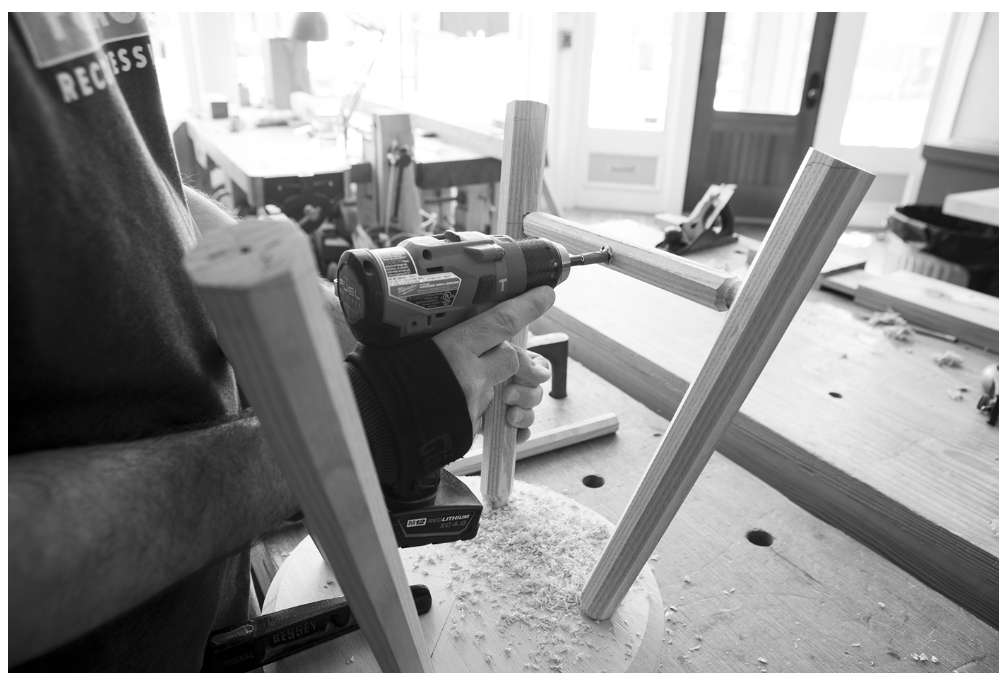
Stretchers. The side stretchers are installed. And the medial stretcher is laid on top. Now we’re ready to drill the mortises for the medial stretcher.
If you lack confidence because this is your first rodeo, have a spotter give you some directions. They should be able to tell you if your drill bit is in line with both mortise locations in the legs. Drill the blind mortises, stopping before the bit explodes out the backside.
Boring again. These mortises are only 5/8″ deep. Put some fresh tape on your bit before boring these joints. This is not where you want to make a fatal error.
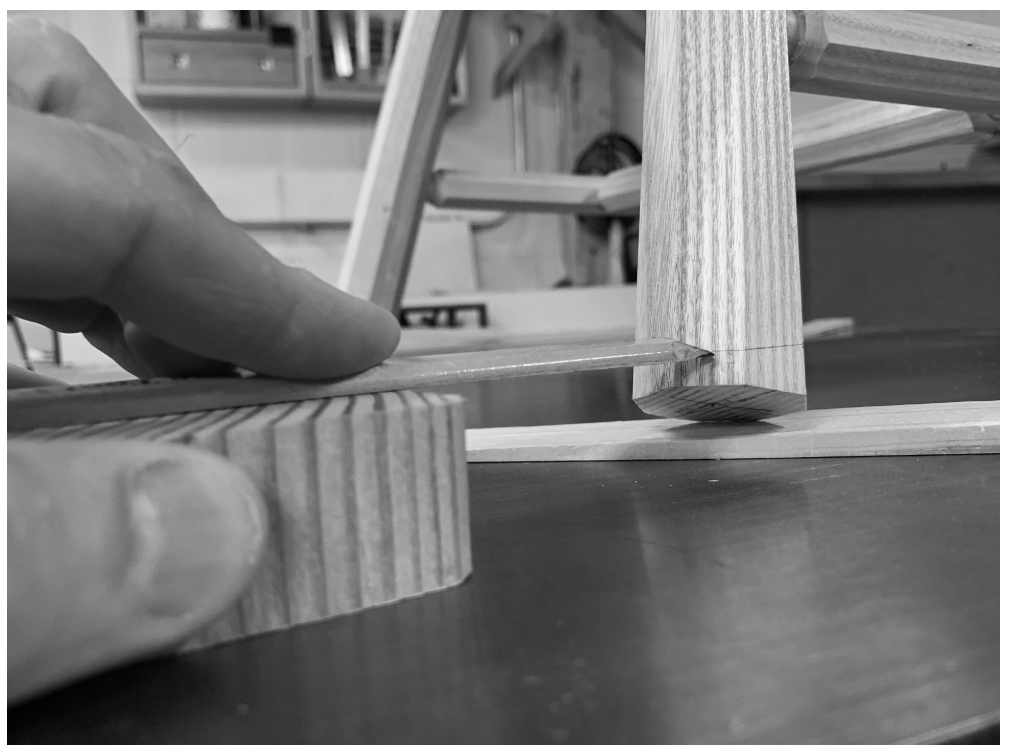
Make the Stretchers The stretchers are 1″ x 1″ material that has been planed octagonal. After preparing the overlong stock for the stretchers, you need to determine how long they should be for your stool. To do this, fetch two skinny scraps. Pinch them together and press the ends into the bottoms of the mortises. Make a pencil mark across the two scraps. Remove them from the mortises. Reassemble them with the marks aligned. Measure the overall length, and that’s the finished length of the stretcher.
Do this for both stretchers. Mine were slightly different lengths. If you are cutting the tenons on the lathe, then add 2″ to the calculated length to give you some room to work without running your tools into the headstock and tailstock of the machine. (I wrote this sentence to remind myself to do this next time.)
Cut the 5/8″-diameter tenons on the side stretchers using the same techniques outlined for the legs. Yup to the bedan tool and the sizing attachment. After turning the tenons, saw the stretchers to their final length and install them in their mortises.
The medial stretcher is easy. Mark the centerpoint on each side stretcher. Use the same 5/8″ Forstner bit to drill a 5/8″-deep mortise in each side stretcher. Once again, I drill these freehand. Keep the bit 90° to the stretcher and parallel to one of the facets of the octagonal stretcher.
You know what to do next. Get the skinny scraps and use them to determine the finished length of the medial stretcher. Cut the stretcher 2″ overlong. Turn the tenons on the ends with the bedan tool. Cut the medial stretcher to finished size and fit everything. If the stool doesn’t explode, you are ready to glue it up.
Assembly Before you disassemble the dry-fit stool, mark where the wedges should go in the legs’ tenons. I use a Sharpie for this to avoid confusion. Disassemble all the parts and mark them up so you can assemble them in the same orientation with glue in the equation.
Kerf the legs to receive wedges. Use a band saw or a handsaw for this. You want the kerf to be of significant thickness. Make some 1″-wide wedges for the legs.
Right before assembly, clean up all the tool marks left on the legs, stretchers and seat with planes and spokeshaves. This is quick work with sharp tools.
Here is the sequence for assembly. Learn this and you’ll be ready for a full-on chair in your future. Glue the medial stretcher to the side stretchers. Twist the parts until the assembly sits flat.
Put glue in the mortises in the legs. Wipe off any excess and put the stretchers’ tenons into the legs in the mortises. This will be an ungainly thing, like a baby goat. Rotate the legs until the assembly is stable. Set it on the bench.
Paint the interior of the mortises in the seat with glue. Do not skimp or get in a hurry. Take a deep breath.
Navigate the legs into their mortises. This might require some grabbing and bending. That’s OK as long as the seat doesn’t split. The goal is to get the tip of each tenon into its mortise.
Tap the legs down, working around the stool’s four legs until the legs are seated. Small taps are better than big ones.
Flip the assembled stool over. Paint the wedges with glue and drive them in with a hammer.
The great leveler. This inexpensive saw made its way into our shop via an unknown path. I didn’t purchase it. No one sent it to me. It just was there one day. So we stoned off the set of its teeth and use it as a huge (and fast) flush-cutting saw. If you are visited by the saw fairy (as I was) this is a good thing to do.
Let the glue dry overnight. The next morning, saw the tenons flush to the seat. There are (at least) 50 ways to level your tenons. When your seat is flat and not saddled, the fastest way is with a Japanese ryoba saw. We took a hardware-store saw and stoned the sides of its teeth with a diamond plate to remove the set of the teeth. It now barely scratches the seat in use.
After sawing off the tenons, plane the seat to remove any toolmarks.
Level the Feet As shown in other sections of this book, there are lots of ways to level the feet. Picking one method depends on how your head works. Here’s how I did it for this stool. I first leveled the seat using wedges underneath the four legs.
Then I determined the final seat height (16″) and made a block of wood to guide a pencil. The height of the block represented the amount of leg I needed to saw off to achieve the final seat height. In this case, the block was about 1″ high. I placed this block on the benchtop and used a half-pencil. Then I sawed off the legs to their finished lengths. I then chamfered the feet to prevent the feet from splintering out when the stool is dragged across a floor.
The half-pencil and a block of wood helps you mark out the correct length of the legs.
And then you are done with construction. Finishing these stools can be as simple as a coat of linseed oil and wax. Or you can dive into milk paint, soap finishes or the Wild World of Wiping Varnishes. Do your best work – you don’t want to be accused of polishing a turd. (And you thought you’d get away without a single stool joke.)
It’s a crude and obvious joke, but what do you do with all the extra kinda-crappy chair parts and chunks of waste that are piling up in your shop? Make stools.
Ever since I began making chairs, I also began designing and making a lot of stools using the leftover chair parts. While simple vernacular stools get little love in the woodworking literature, they are one of the most common pieces of peasant/farmer furniture out there. Sometimes called “creepies” or “milking stools,” these low perches are a great way to hold your butt off the ground while you are working.
While working on “The Anarchist’s Design Book,” I developed a three-legged staked creepie that had been kicking around in the back of my mind for a few years. That stool ended up in the chapter titled: “The Island of Misfit Designs.”
Yet I keep making these stools using leftover chair parts (they take only a couple hours to make), and people are delighted by them. So here is how I make them.
The seat is made from chunks of leftover 8/4 material. When making chair seats or combs, I usually end up with short chunks of wood that are no good for chairs. Rather than throw them away, I make them into stool seats.
Glue the two pieces of 8/4 stock face to face.
The seat is two chunks of 8/4 stock, about 11-1/2″ x 11-1/2″ that are face-glued to make a blank that is about 3-1/2″ thick. The exact thickness isn’t important.
After the glue dries, I cut the square blank into an 11″-diameter circle using the band saw. I rasp off any big lumps or bumps on its rim. Then I tilt the band saw’s table to 30° and saw an underbevel on the blank. I saw right on the seam between the two layers of wood. This helps hide the glue line.
Then I clean up the edges of the seat with rasps, sandpaper and a scraper.
I use 30° here. Try other angles.
To lay out the mortises on the underside of the seat, I first draw a diameter that is 1″ less than the diameter of the underside of the seat. After cutting the underbevel, the seat is about 9″ in diameter. So set your compass to make an 8″-diameter circle.
Now lay out the location of the mortises using the compass. Its current radius (4″) can easily lay out the three mortise locations. Choose a location for one of the legs on the 8″-diameter circle. With the compass, step off twice around the circle. That’s where the second mortise goes. Step off two more times. That’s where the third mortise goes.
Connect these mortise locations with the center of the circle. These three lines are your sightlines for drilling.
Draw the 8″ diameter circle on the underside of the seat.
Choose a mortise location. Step off twice to find the second mortise location. And twice more for the third.
Now drill the mortises with a 1″ auger. Set a sliding bevel for 18°. (This is called the “resultant angle” in chairmaking.) Put the sliding bevel on one of your sightlines. Line up your drill bit in line with the sightline. Tilt the auger bit back toward you to match the 18° bevel. Drill. The mortises should be about 2-1/2″ deep.
The legs are usually leftover 1-3/4″ octagonal sticks that didn’t make the cut to be used in a chair. Usually because of some small defect or color problem. I also have a lot of extra legs sitting around in case I mess up a leg or two while building a chair.
The legs should be 1-3/4″ x 1-3/4″ x 18″-long octagons with straight grain. Cut a 1″ x 2-1/2″-long tenon on the end of each leg. Sometimes I use a 1″ plug/tenon cutter in my drill. Other times I make the tenon on the lathe. Sometimes I taper the legs. Sometimes I do a double-taper. It all depends on what the legs look like and how late in the day it is.
Cut the tenons. I used a plug/tenon cutter in a cordless drill for these.
Before assembling the stool, clean up all the show surfaces. Then glue the legs into their mortises with hide glue. I don’t fox-wedge the mortises. If the legs ever come out, I’ll just glue them back in.
Then level the legs and cut them to length. I like my stools to be between 16″ and 20″ in height. Lower stools for around the fire. Taller stools for work.
These days I usually engrave a spell on the seat as well.
“Please almighty beings, protect this rumpus from harm.”
— Christopher Schwarz
A witch’s mark engraved on this example.
Another finished stool. With leveled legs. A little wonky.
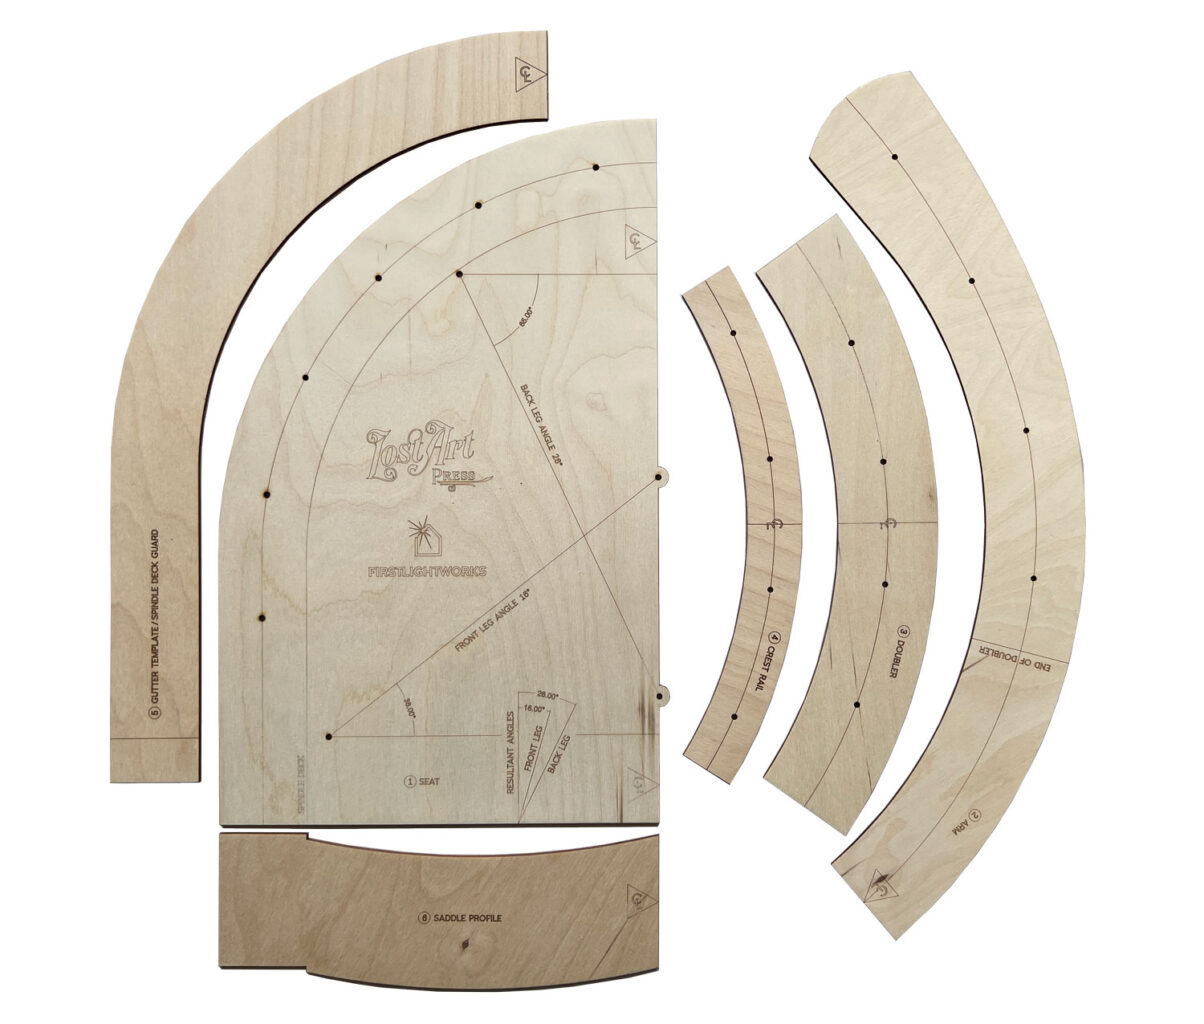
This is an experiment. A fair number of readers have asked us to restock the full-size chair wooden templates for the Staked Armchair from “The Anarchist’s Design Book.” We carried these templates for a couple years and discontinued them after sales cratered.
The templates are $49 and come with six full-size laser-cut templates for making the four-stick Staked Armchair. Unlike our earlier templates, these are made from 1/8” Baltic birch so they will be more durable.
These templates are great for any beginning chairmaker. And many of the parts are compatible with the armchairs from “The Stick Chair Book.” The seat and arm shape is the same, as are the leg locations and stick locations. So the templates are a good place to start exploring chairmaking.
(FYI, we also carry full-size paper patterns for the five chairs in “The Stick Chair Book.” These need to be adhered to your own wood and cut out.)
The templates are laser cut in Ohio. If you want a set, don’t tarry. We might not stock these permanently.
Hey! Two of my chairmaking friends, en and Jim Crammond, are putting on a Gibson chair class in Michigan starting Sept. 30. They are both great people and chairmakers. If you’ve wanted to build a Gibson chair, this is a great opportunity. Details are below.
— Christopher Schwarz
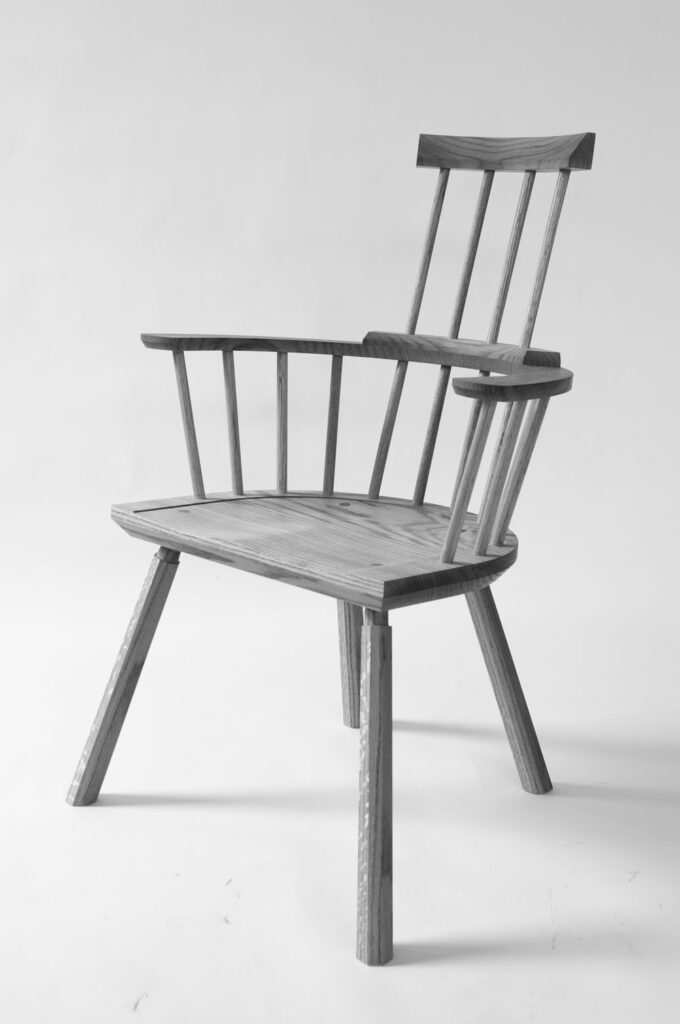
Join us for an immersive chair making class where you will build an Irish Gibson chair, a vernacular chair form that is known for its comfort and relative simplicity to build; it’s a great first chair or 12th chair! The fact that these simple and distinct chairs were made by farmers and non-professional woodworkers, with limited tools, and with materials that were easily accessible makes this chair a joy to make. In this class you’ll have the opportunity to personalize this chair (vernacular forms invite creative input) as well as pursue tools and methods that suit your setup at home.
Class Details:
Dates: September 30th to October 4th, 2024
Location: Monroe, Michigan (details upon registration)
Cost: $1,000 (Includes cost for workshop, supplies, and lunch). Deposit of $200 to confirm registration. Full payment is due upon arrival to the workshop.
Lunch will be provided daily
What You Will Learn: In this intensive five-day workshop, you will delve into the craft of chair making with two chair makers with a combined history of 25 years in the craft. Whether you’re a novice or seasoned woodworker, this class will teach you the fundamentals of chairmaking and set you up to continue chairmaking at home.
Tools: Learn to use the froe, lathe, drawknife, shaving horse, bench plane and other tools.
Design: Understand concepts such as rake, splay and sight lines that influence chair design and comfort.
Techniques: steam bending, splitting and riving, staked tenon joinery and more, adapting techniques to suit your setup at home.
Reserve Your Spot Today: Spots are very limited (only five!) so sign up early.