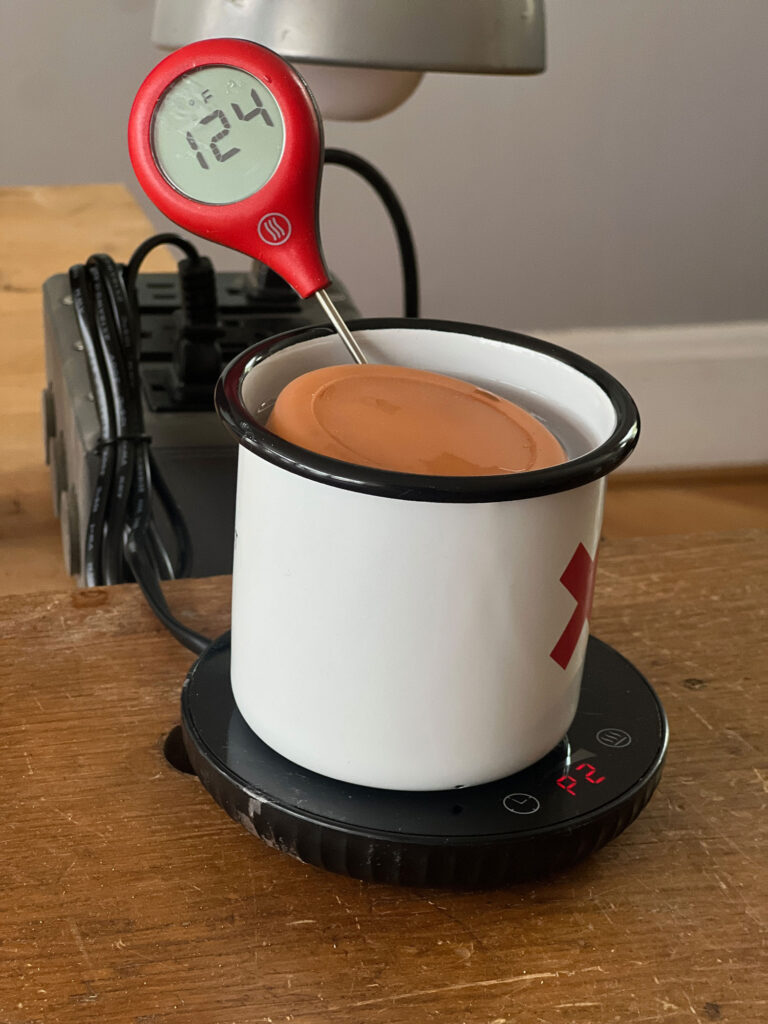
One of the other suggestions for a replacement for the beloved Hold Heet glue pot is to use a coffee mug warmer, such as this one. I chose this particular model because it has two heat settings that are ideal for heating glue (122°F and 140°F), plus it has a timer and an automatic shutoff.
I’ve used it a few times, but the limitation of this kind of glue heater was obvious from the start: It’s too small to heat more than a little bit of glue. If you work on small projects and need only a few ounces of glue at a time, a mug warmer is ideal. But I had trouble heating enough glue for a chair class and had to break out the Hold Heet.
Honestly, it’s a lot to expect from a $20 appliance that is supposed to keep 8 ounces of coffee warm. It just doesn’t put out enough heat to warm a water bath and a plastic glue bottle. (You can’t put the glue bottle directly on the warmer; it will melt.)
One possible option would be to store your glue in a steel container, which could go directly on the appliance. I tried using a large ceramic vessel but couldn’t get the water above 100° F. The thing likes to heat metal.
So the best option was a steel vessel filled with water and a glue bottle inside.
So, bottom line: It’s great for people who need enough glue for a few crackers. But if you need enough for a big piece of casework, look elsewhere.
Monroe earned a degree in fisheries from Colorado State University before moving to Alaska. Turning down an offer with U.S. Fish and Wildlife Service, he built his home, much of the furniture and later worked with master log builder, Lee Cole, in 1977. Building a trussed-log bridge over the following two summers led to his meeting Dick Proenneke – their mutual passion for craft and wildlife kindled a friendship until Dick’s death in 2003.
A graduate of The Krenov School of Fine Woodworking, Monroe has taught woodworking courses around the country and has written articles for Fine Woodworking magazine.
Today Monroe has given up part of his Saturday to answer your questions about woodworking, Dick Proenneke and a conversation he’s been having with himself and others about using tropical hardwoods.
Here’s how it works: Type your question in the comment field. Monroe will answer it. It is that simple.
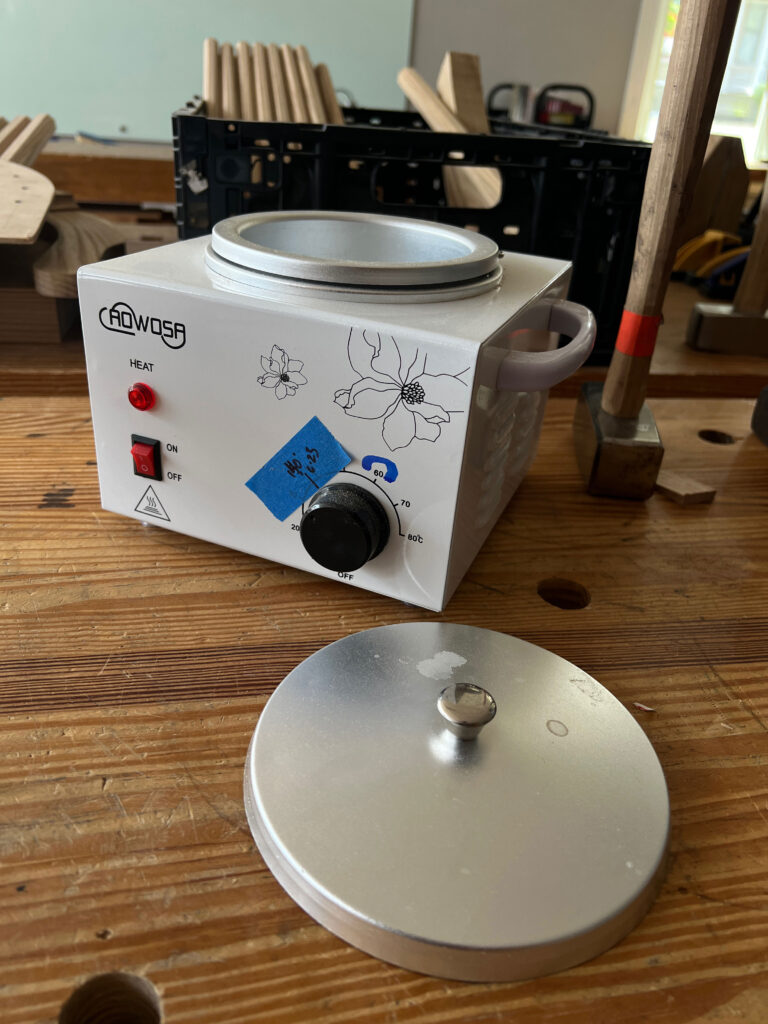
With the disappearance of the Hold Heet glue pots from the market, readers have asked for some alternatives that don’t involve purchasing industrial equipment.
I’ve tried several options. This entry is about using a wax warmer that is designed to heat body wax for hair removal. The machine is sold under a variety of brand names, but they all have similar specifications. So while I cannot compare the Aowosa to the Daordaer, my guess is these white sheet-metal waxers are quite similar.
First, the good news: They are inexpensive (less than $50) and they work. Just don’t trust the temperature scale (more on that in a bit). They heat up fast and hold the temperature steady. Like the Hold Heet, there is a removable double-pot with a handle, which makes it easy to keep the pot full of water during long days. The lid is fairly useless unless you heat small containers of glue.
Now the bad news: This is not by any stretch of the imagination professional equipment. Everything is lightweight and thin. I’ve had my Hold Heet for as long as I can remember. It is built like a little tank. I don’t get that same vibe from these wax warmers. I hope I’m wrong.
The main problem is that the temperature scale on mine is not even close. When I set it for 140° F (60° C), it raced up to 180° F. I let the machine run for a couple days to see if there was some sort of break-in period. So far, no. So I put a piece of tape on the scale and marked where 140° really is.
I will continue to use this machine during classes when we heat a lot of glue. And it’s convenient for making small batches of Soft Wax, too. But will I bequeath it to my children at my death? I’m guessing no.
— Christopher Schwarz
P.S. If someone can recommend a reasonably priced heavy duty unit to test, please post it in the comments.
In a space of just 10” x 39” x 19-1/2”, H.O. Studley managed to arrange – with perfection – more than 250 of his tools into a dovetailed mahogany cabinet that has captivated tens of thousands of woodworkers since it was first unveiled in 1988 on the back cover of Fine Woodworking with a single shocking photograph.
After a brief stay at the Smithsonian, the cabinet was sold to a private collector and hadn’t been seen by the public for well over a decade. Studley’s workbench has never been on public view.
This book is an in-depth examination of one of the most beautiful woodworking tool chests ever constructed and presents the first-ever biography of Studley (1838-1925), a piano and organ builder in Quincy, Mass. It features measurements, details and photographs of all the tools in the cabinet. Every swinging frame, hinged panel and nook of this three-dimensional, multi-layered sculpture has been analyzed so you can understand how it folds in on itself like a giant piece of mahogany origami.
But most of all, you will see the cabinet in a way that only a handful of privileged people ever have. And you will realize that the magazine photograph that electrified the woodworking world in 1988 only scratches the surface of the cabinet’s complete magnificence.
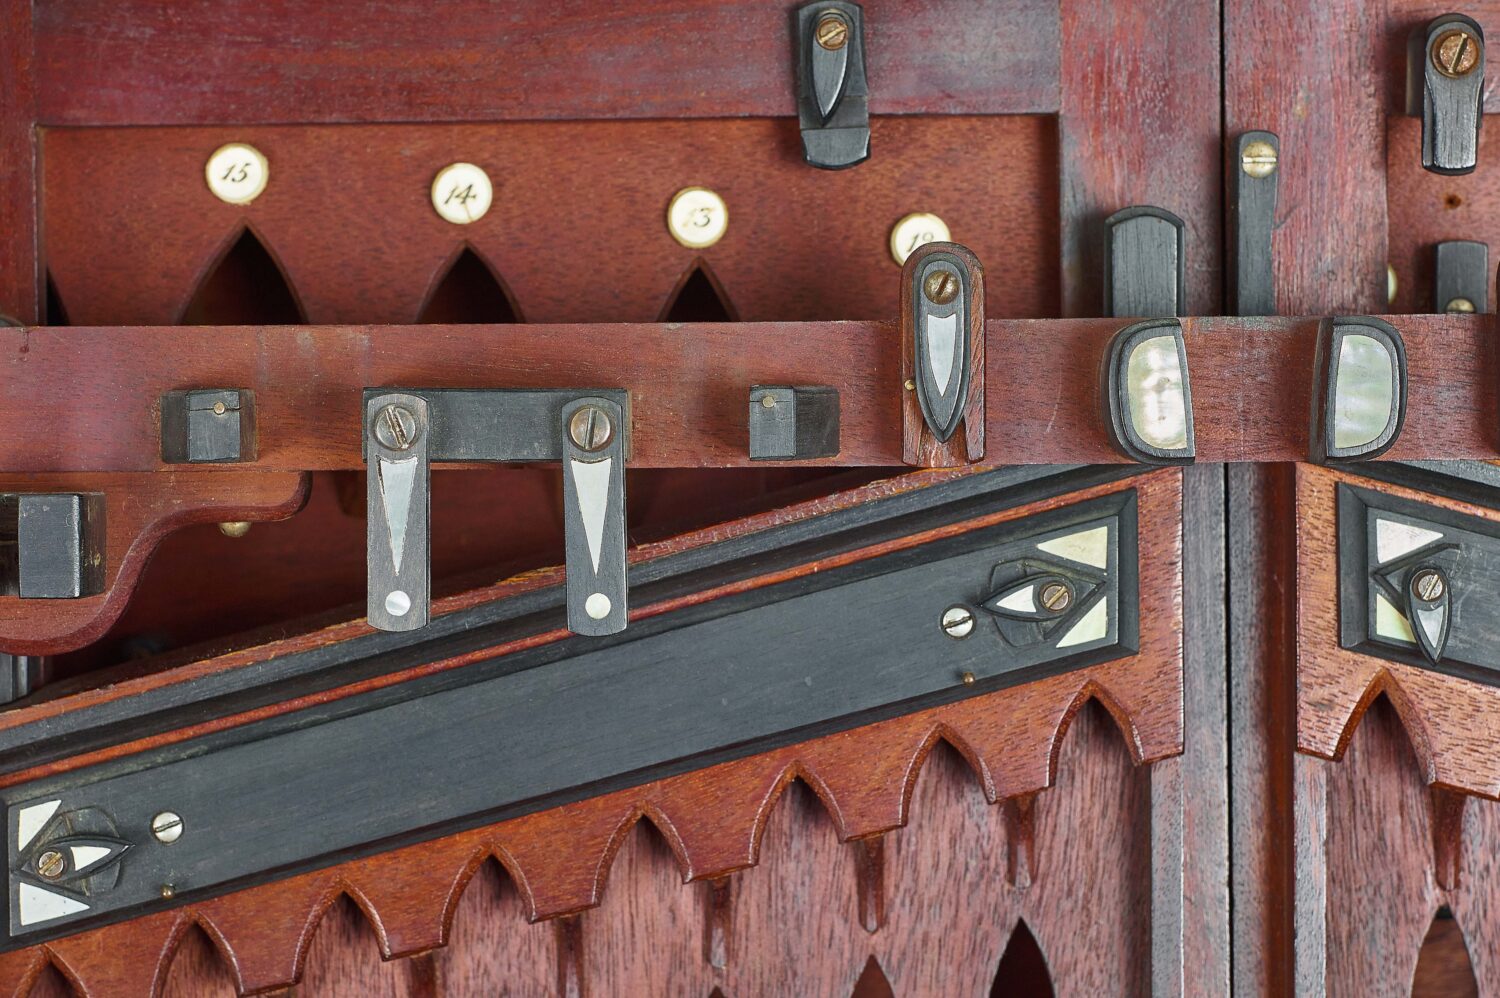
The scale and density of the decorative details in the Studley cabinet limited each element, especially the inlays, to about a quarter the size of a postage stamp.
My late colleague and dear friend Melvin J. Wachowiak, Jr. once remarked that anything made more elegantly than necessary for its usefulness was Art. By that assessment, with which I agree, the Studley tool cabinet is unrestrained Art. There are a multitude of visual and physical moments in the cabinet that did not need to be there. Their presence is either to aesthetically enhance the whole, or to demonstrate the maker’s virtuosity at his craft and his delight in it.
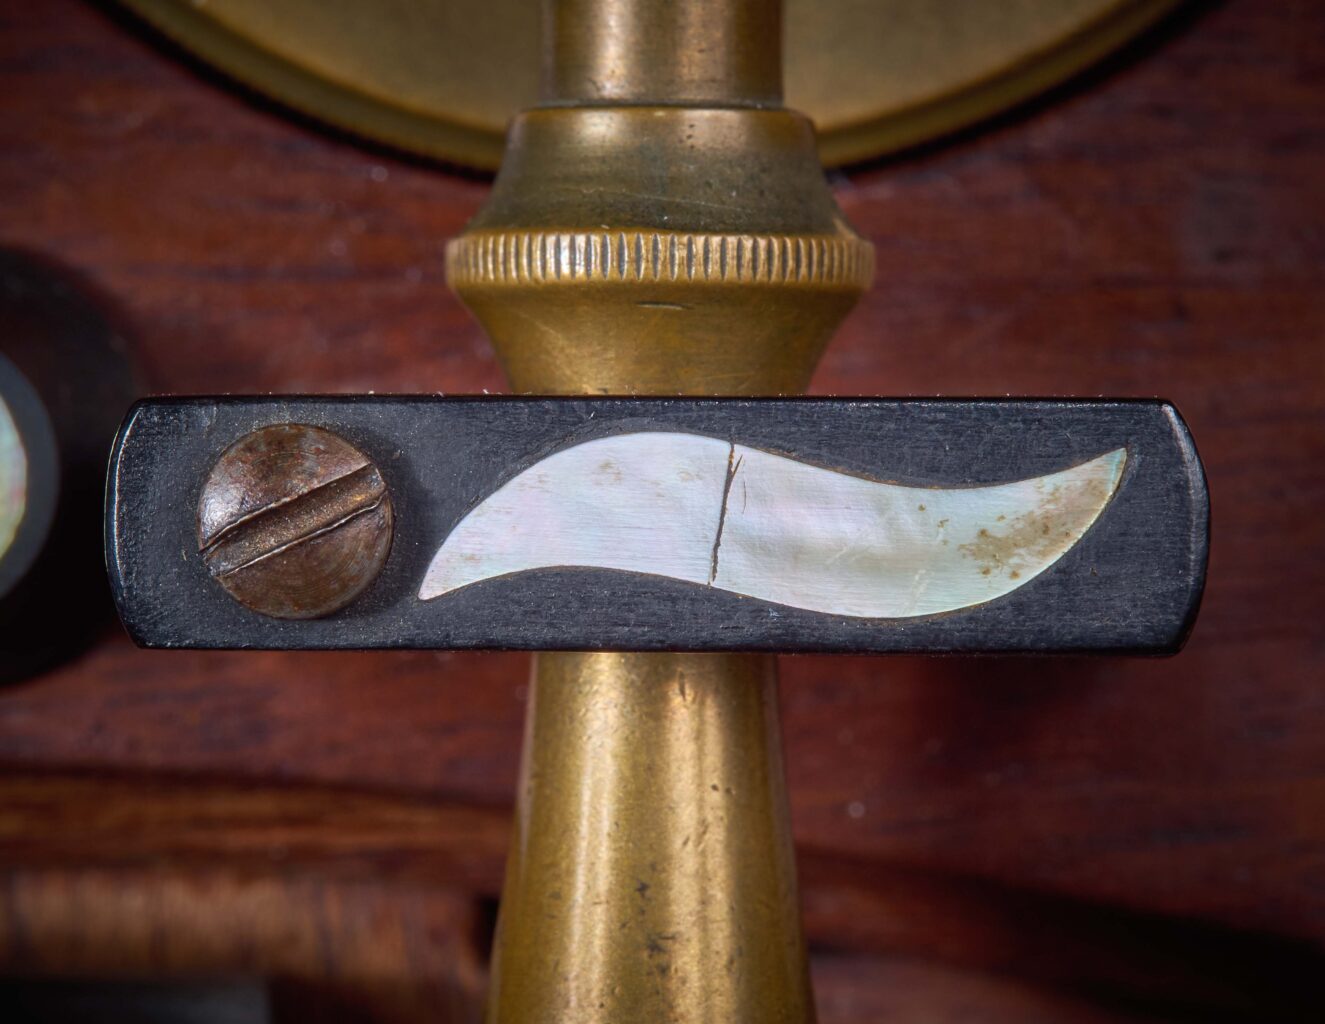
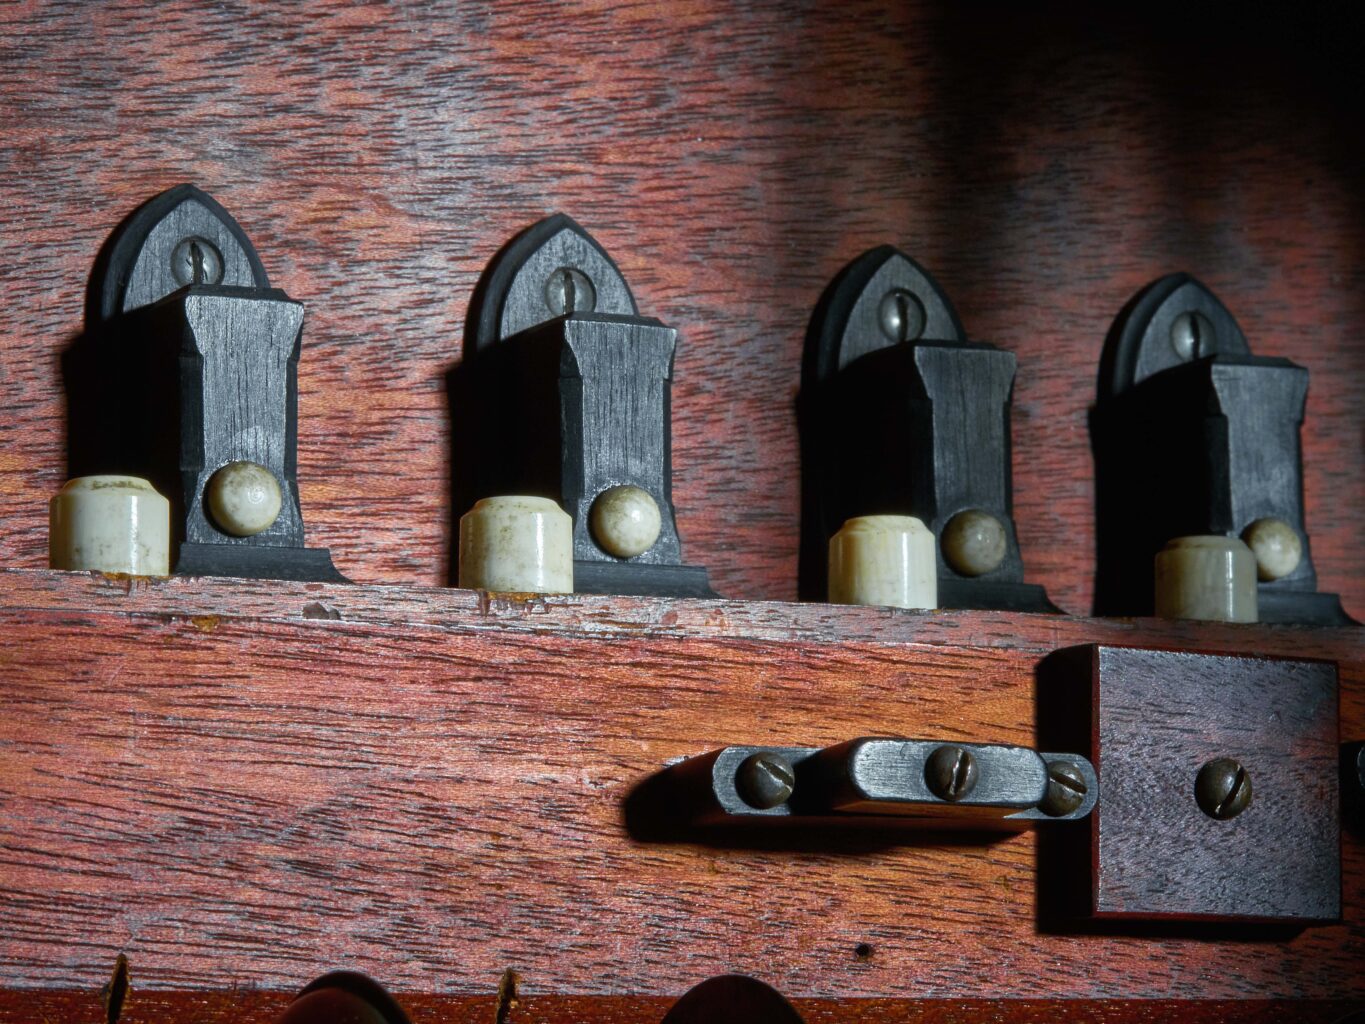
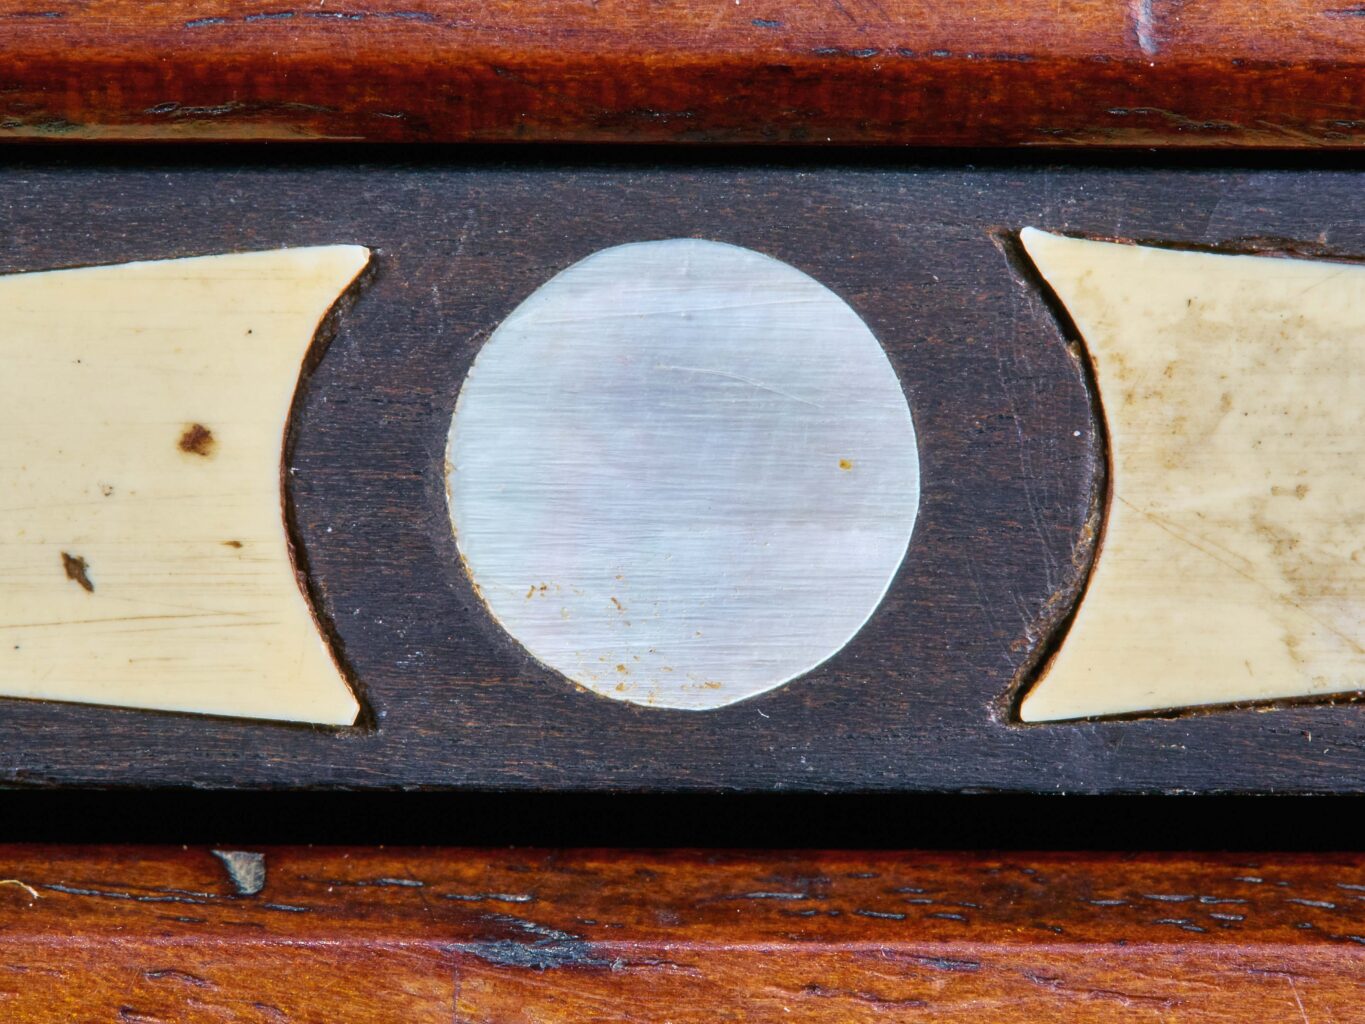
The Inlays To a modern woodworker the tool cabinet might seem opulent, even garish, but in the late-Victorian world of organ and piano building, the exuberance made sense. The material vocabulary is what you would expect for a palette of inlays on a piano-maker’s toolbox: ivory, ebony and mother-of-pearl.
The inlay techniques Studley used on the cabinet were straightforward and exacting. For the round, button-like inlays he likely used a drill bit to excavate the pockets. The inlays vary in size, but most are in the range of 1/4″ in diameter plus or minus, with a few in the 1/8″-diameter range.
Almost all of the 136 ivory inlays are buttons or roundels.
On the right side of the cabinet, where Studley located sets of graduated drill bits, he marked the sets not only with engraved flat ivory roundels but also with half-spherical ivory buttons.
The 217 mother-of-pearl inlays are more evenly divided between buttons and roundels, and pieces of other shapes (alas, I did not conduct a count on that distribution). The shaped pieces were “made to fit,” but there is no way to identify which came first, the void or the infill.
Typically intarsia (a technique by which pieces are literally “inset” into a background) is accomplished by first creating the decorative element, then creating a void to fit that element by scribing the outline of the element on the background and excavating a void. My microscopic examination of the inlays was cursory and inconclusive, but I did not see any tool marks on the background surfaces.
Regardless of their material or shape, on all but a few of the inlays there are no irregularities until extreme magnification is employed.
With enough magnification you can receive a bit of comfort knowing that Studley was not a flawless automaton.
The opulence of using ivory buttons, inscribed with inked numbers to mark the progression of tool sizes (for example, the graduations of the drill bits) is awe-inspiring.
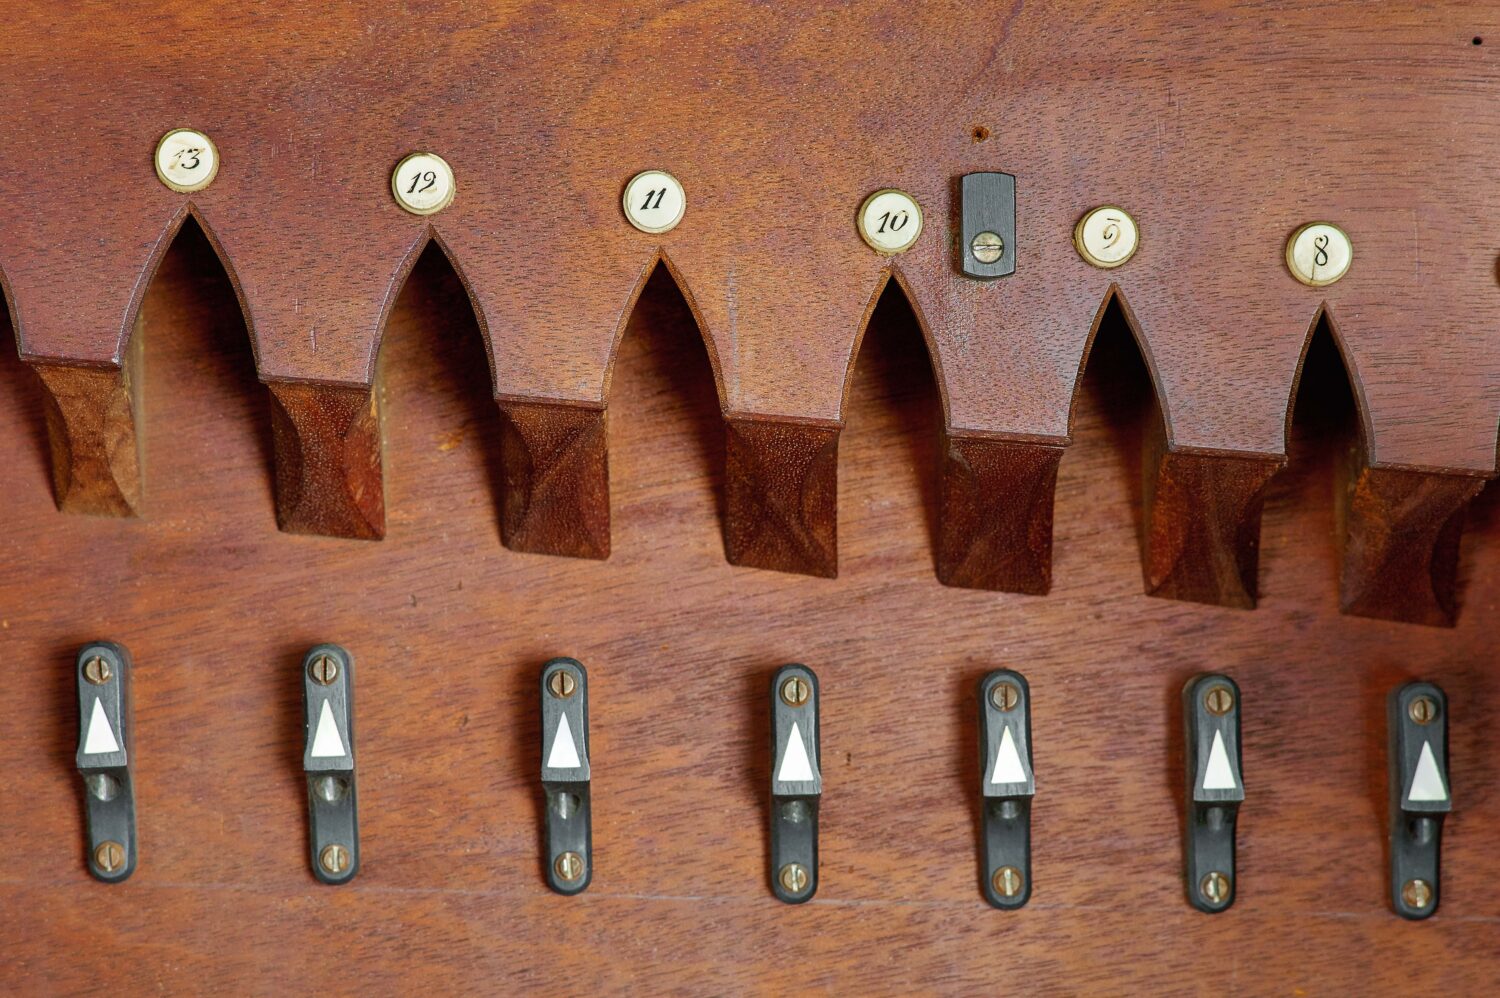
There is place for every drill bit in the graduated set, and an engraved ivory button for each drill bit. Also take note of the subtle but elegant treatment of the bottoms of the spacers between each Gothic arch; the curved double-chamfer is found in numerous locations throughout the cabinet, almost never glaringly obvious.
Concurrently, the mother-of-pearl elements used as mere decoration impart an intense luminescence to the cabinet, especially as the light or the viewing position changes.
The Sculpted Details The strictly sculptural elements of the cabinet, by which I mean those that are rendered and presented to the viewer in three dimensions, number literally in the hundreds. Because it is not possible to rank them in importance or even prominence, I will cluster them into four major areas.
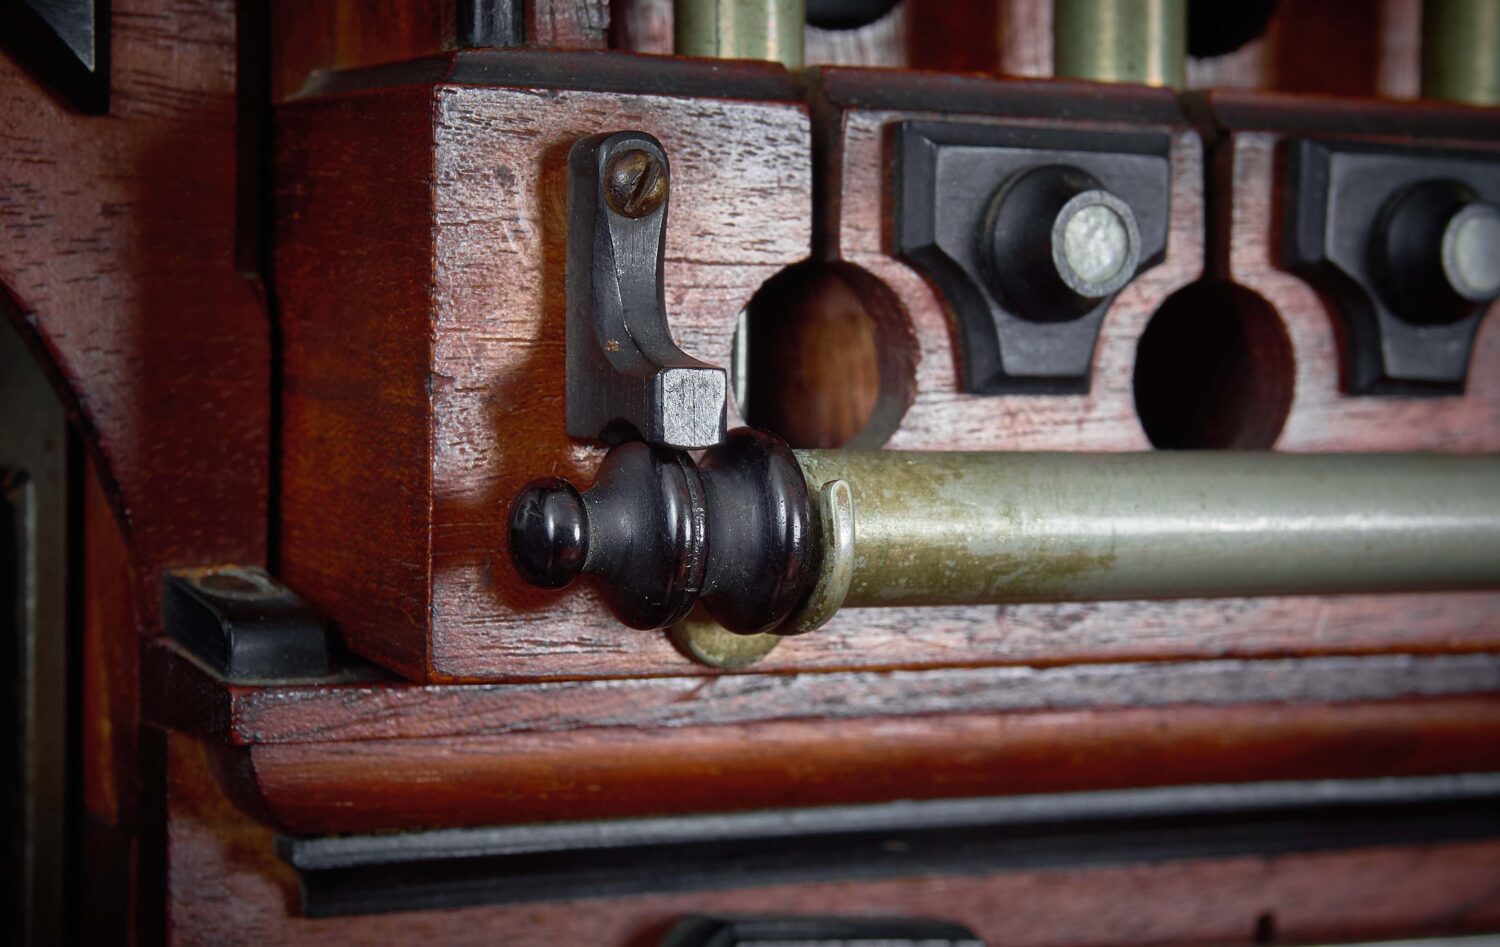
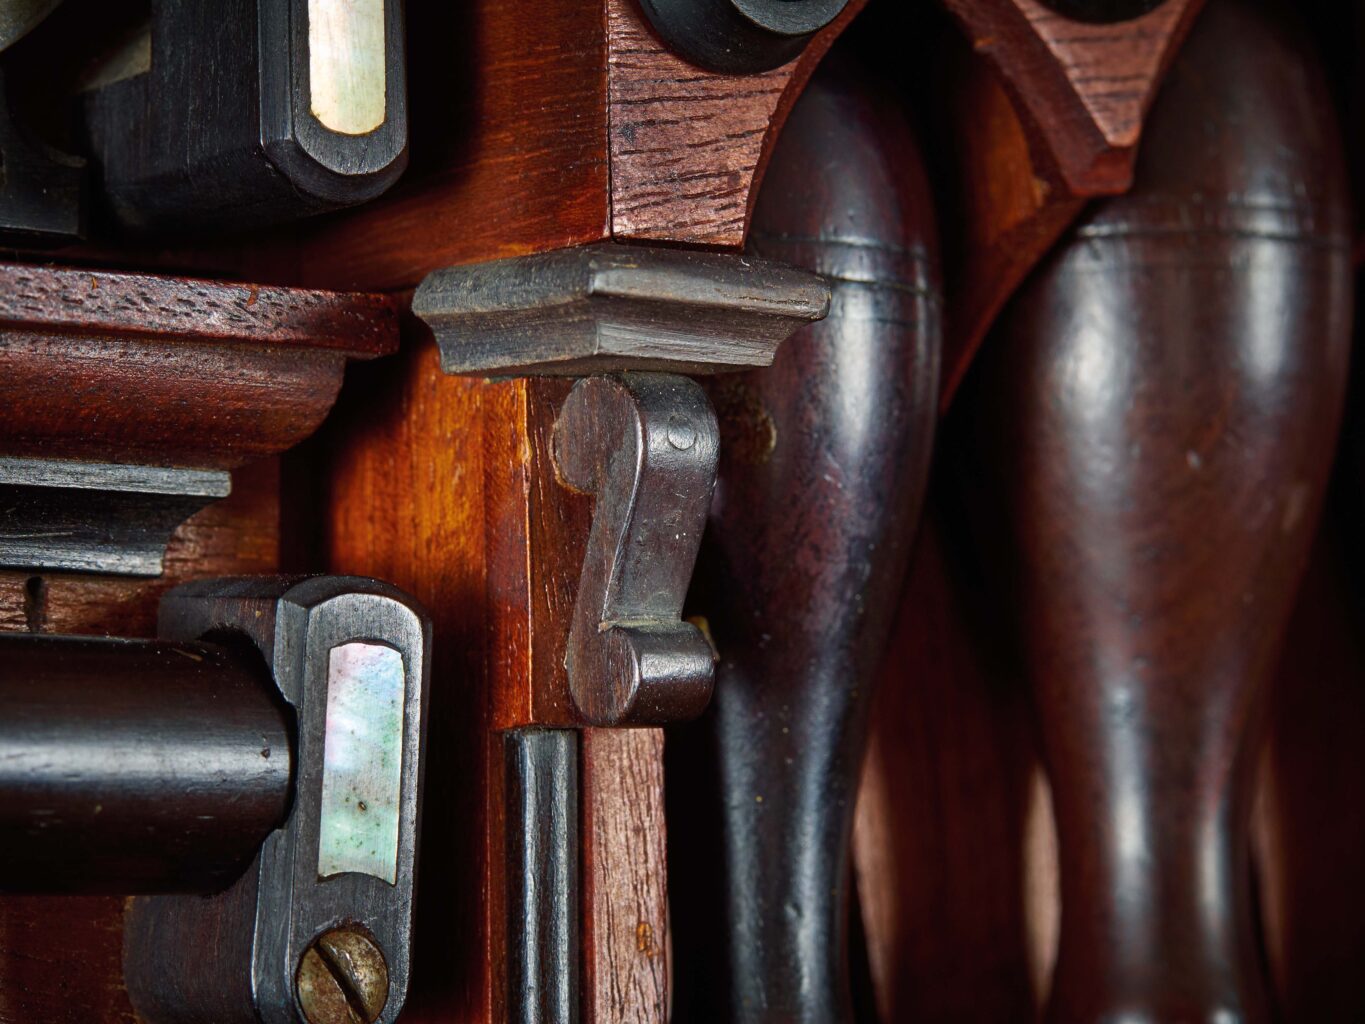
First are the roundels, turned button-like elements scattered throughout the cabinet, never haphazard and always enhancing adjacent elements. There are many different sizes of roundels, ranging from about 3/8″ to 1-1/2″ in diameter. Most, but not all, of the roundels are festooned with round mother-of-pearl inlays at their tips, about which I will speak more in a bit. Each of the roughly two dozen roundels is turned from solid ebony.
The technical and artistic complexity of this one element is astonishing. The turned ebony plugs for the nickel-plated tube (there is one at each end) are adjacent to a series of ebony and mother-of-pearl roundels mounted on sculpted ebony backplates. To carry the power of the accomplishment even further, the swinging tab that restrains the tube in its shaped wire fitting is a spectacular carved ebony “L” with tapered chamfers on both sides of the two curves.
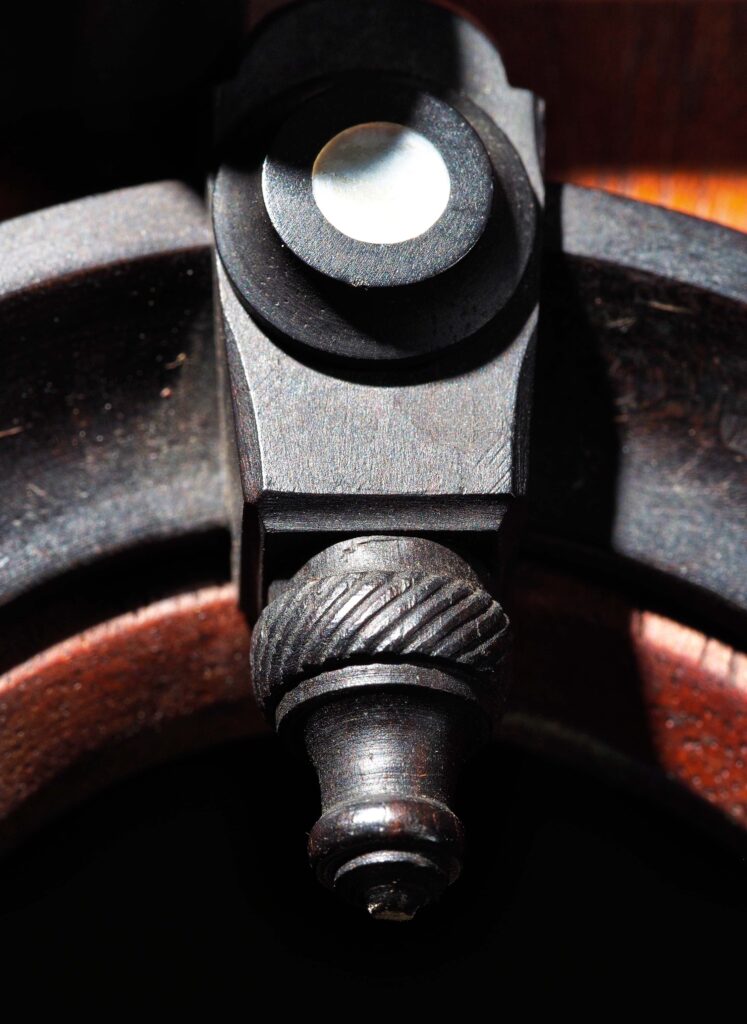
Closely related to the roundels are the drawer pulls and stopper buttons at the ends of the metal tubes containing tools. I include these 17 examples here because, like the roundels, they are small, turned ebony elements.
Second are the shaped decorative elements, which are further subdivided into those that are 1) functionally similar to the roundels in that they are applied to the background, or 2) movable tabs or catches used to restrain tools. Most of these from either category are further enhanced by mother-of-pearl inlays and reflect the element outline as a whole.
Of the first group, numbering roughly 90, many serve to frame a space but others are demarcations between tools belonging to a graduated set, such as the chisels and drill bits. The second group consists of about 50 ebony tabs.
In this single image you can see clearly eight movable ebony restraining tabs, six with inlays, and another five fixed saddles. For scale, the diagonal ebony piece is made to hold a 6″ rule.
The third type of sculptural enhancements are carved elements serving as stand-alone sculptures in their own right. The most prominent of these is the drop pendant that tops the arch above the niche containing the Stanley No. 1 plane. The detail on this element is breathtaking, all the more so when you consider its scale; it is roughly the size of a dime. There are only a dozen or so of these examples in the case, but they are spectacular and attention-grabbing.
The final widespread instance of sculptural exercises in the cabinet includes the arches and their buttresses, most notably around the set of four awls above the Masonic symbol, along with those around the chisels and the two sets of drill bits, which are in the upper right portion of the cabinet on the second and third layers. The arch-and-buttress vignette framing the awls takes its place proudly among the most beautifully designed and crafted artworks I have ever seen.
There are several diminutive carved ebony “S” scrolls in the cabinet, and this one acts as a support bracket where none is needed. Even at this scale, the entire detail is approximately 1/2″ in height, there is a minute chamfer to the edges.
Quantifying precisely the inventory of these decorative details is nearly impossible (is it a series of a dozen arches, or is it a single element of an ascending set of arches?) and frankly not especially useful.
But because you asked, I number the total of individual decorative elements to be in excess of 500.
Perhaps the most gifted craftsman I know recently replicated a single inlaid mother-of-pearl and ebony element from Studley’s cabinet and found it to be a vexing and time-consuming effort. If we fixate on the Herculean labors of Studley we might become obsessed with the mechanistic minutiae of envisioning and fabricating hundreds of stylistic touches, each consuming some quantity of a superb craftsman’s time.
The use of Gothic arches is prevalent throughout the cabinet’s interior, but nowhere is this feature more prominent than in Studley’s presentation of graduated drill bits. Appreciating this decorative feature requires the tools to be emptied to see the bare cabinet and the vision Studley had for it.
Instead I ask you to think of them – and the case itself – as a unified cornucopia in which the whole is infinitely more affecting than a summation of the magnificent individual components.
Editor’s note: There are many more photographs in the book than I’ve shown here of the artistic details discussed above.