We’re selling this cherry comb-back stick chair with a chunk of the proceeds going directly to The Chairmaker’s Toolbox to help the next generation of chairmakers and toolmakers.
I built this chair during the scholarship class last week in our workshop. It’s made from black cherry and is set up for general use – dining and keyboarding. It has nice (but not aggressive) lumbar support. The chair seat is 16-1/4” off the floor. The overall height is 37-1/4”
All the mortise-and-tenon joints are assembled with hide glue. The finish is a non-toxic blend of linseed oil and beeswax made in our workshop.
Because this chair was made in a fast-paced environment where I was juggling teaching and building chores, it has a few cosmetic flaws. But it is structurally perfect. Straight grain for all the legs, sticks and stretchers. Tight joints. Nice hand-shaped surfaces.
Purchasing the Chair
This chair is being sold via silent auction. (I’m sorry but the chair cannot be shipped outside the U.S.) If you wish to buy the chair, send an email to lapdrawing@lostartpress.com before 3 p.m. (Eastern) on Thursday, July 21. In the email please use the subject line “Chairmaker’s Toolbox Chair Sale” and include your:
First name and last name
U.S. shipping address
Daytime phone number (this is for the trucking quote only)
Your bid for the chair.
The highest bid wins the chair. Half of the proceeds will go directly to the Chairmaker’s Toolbox.
Shipping options: You are welcome to pick up the chair here in Covington, Ky., and also get a free yardstick. I am happy to deliver the chair personally for free within 100 miles of Cincinnati, Ohio. Or we can ship it to you via LTL. The cost varies (especially these days), but it is usually between $200 and $300.
This week we are running a stick chair class for six students with Aspen Golann as the co-instructor. The class was organized by The Chairmaker’s Toolbox, and the students are all teachers or woodworkers who want to become teachers.
The goal is for all of the students to have one stick chair complete by the end of the week – plus a bunch of parts started for their next stick chair.
Lost Art Press readers donated all the money we needed to buy wood and supplies for the class. Plus pastries and hot lunches for the entire week. So thanks again for your help.
Sorry this video is a little short. Tomorrow’s will be longer and better….
We received our first load of entries today for the “Stick Chair Merit Badges.” And everyone followed instructions. Thank you!
It’s great to see all the different chairs and their personalities (and their owners). If you would like a merit badge for your shop apron or tuxedo, there is only one way to get them and here are the instructions.
If you don’t sew, and you don’t know anyone who does, you can also glue these patches on garments. I use Fabric Fusion, which is used for fabric repair. It works like woodworking glue. Apply a thin and consistent coat to the back of the patch. Tape it to the garment. Place something heavy on top of the patch for a couple hours. That’s it.
Like furniture, a glue-only joint isn’t as good as something with a mechanical interlock. But this is better than rubber cement.
Note that the “Stick Chair Merit Badges” patches are not iron-on. They need to be stitched or glued on.
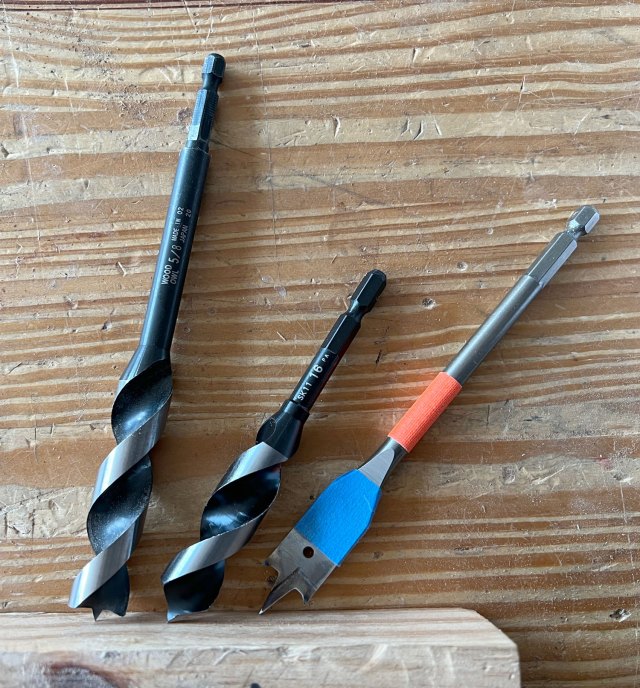
I love spade bits, and I will always recommend them for people getting started in chairmaking. The bits are dirt cheap, widely available, sharpenable and are easily customized to do things other bits cannot.
But like many chairmakers, I am always game to try new drill bits. If someone told me there was a new drill bit made from hard cheese and rat pelvises, I would buy a few to try.
These bits cut quickly and cleanly and – insanely – leave a clean exit hole without any backing board. For the chairs I build, this is a big deal when drilling the holes between the armbow and the seat. With these bits I don’t need to clamp backing boards to the armbow. And I can easily drill through the seat – making the joint between the sticks and the seat incredibly strong with more surface area and wedges.
But the bits have a learning curve. Because the flutes along the body of the bit are sharp, you have to keep a steady hand when freehand drilling, otherwise you will make weird overly elliptical holes. And you need to learn how to start them properly. And to deal with what happens when the cut stalls.
The OverDrive Bits
These bits are widely available in the United States. But after using them for 16 months in chairmaking, I don’t recommend them for making chairs. The bit’s center spur is too short for anything but shallow angles.
Why is this bad? Angles greater than 12° or so are difficult. You have to start the bit vertical then move into the correct (sometimes compound) angle. And you might have only a second or two to do this.
Wait, can’t you do this at “sloth speed” and ease into the cut? No. The bits are (in my opinion) designed to be used at high speed. When used at low speeds, they tend to tear up the wood. The OverDrives are great bits for furniture making where the bit is 90° to the work and in a drill press. But for chairmaking? Pass.
The Star-M, F-Types
I buy these bits from Workshop Heaven in the U.K. If they are sold elsewhere I don’t know. But I haven’t found them in the U.S. These bits are similar to the OverDrive bits, but the center spur is radically different, which makes all the difference.
The long center spur and cone-shaped tip allow you to use this bit at radical angles (though I would argue that you shouldn’t do this without a stern warning, which is below). And because of the bit’s shape you can get the bit settled into the work with slow rotations until you spin things up to full speed.
STERN WARNING: When you use any bit at a radical angle, you tend to bring the flutes into the cutting equation. With a traditional auger, the flutes aren’t sharp, so it’s not a big deal. But with many modern augers, the flutes are pin-sharp. So it’s easy to make the hole an elliptical mess when the flutes start whacking at the rim of your hole.
During the last couple years I’ve found that while the bits allow you to start the hole at a 40° angle, that’s a bad idea. As you approach 20° off vertical, the risk of the bit’s flutes making a mess of things increases radically. Stay under 20° off vertical, and you’ll be OK (with a steady hand).
When I have to angle the bit more than 20°, I switch back to spade bits, which cut slower and don’t tend to ream the hole as much.
So here are a few tips for using the Star-Ms.
Start the bit’s spur slowly (or make a divot with an awl to start the bit). Otherwise the bit can skate across the work when cutting compound angles.
As soon as the bit is started, run up the bit to full speed without pushing the drill downward. The cut will be cleaner.
One you get to full speed, plunge in and let the bit determine your feed speed.
The bits are sensitive to changes in grain direction (like when you laminate two boards together. And when you drill through the far face of the board). No matter how powerful your drill is, the bit will sometimes stall. When this happens, ease off on any downward pressure on the drill. Run the bit up to full speed with no downward pressure then plunge gently again.
The Star-Ms can be difficult to find in stock, particularly in the 16mm (5/8”) size, which is common for chairmaking. But they’re worth the effort and the wait.
To mark the launch of The Stick Chair Journal(coming in August 2022), we are giving away 400 Stick Chair Merit Badges to readers who have built a stick chair and can follow instructions.
This promotion ends when we run out of the merit badges or on Dec. 31, 2022, whichever comes first. (When the time comes, I’ll announce the end of the promotion on the blog and delete this blog entry.)
Here’s how to get your merit badge – one to a customer. Please read carefully.
Build a stick chair with your own hands. (Not a frame chair, ladderback chair, Windsor/Forest chair, IKEA chair, folding chair etc.) A genuine, vernacular stick chair. (Edit: A stool without a back is not a chair. A backstool, which is essentially a side chair, is indeed a chair. I deem that to be a “chair,” the thing needs a backrest.)
Take a picture and print it out on any paper.
Send a self-addressed, stamped envelope (SASE) to us with the picture of your stick chair. Here’s how to address the envelope:
Stick Chair Merit Badge Lost Art Press 837 Willard St. Covington, KY 41011
When we receive your envelope, we will add your photo to a cool collage I’m creating. Then we’ll slide a merit badge into your SASE, seal it and put it in the mailbox at Greer and 9th streets.
This is the *only* way to get a merit badge. You can’t buy one. You cannot twist our arms to accept an emailed photo. International readers are welcome to participate, but they’ll probably have to put a U.S. Global stamp on the SASE.
We are DIY people, right? You can figure this out without asking us to bend the rules, can’t you? Of course you can!
Please don’t send photos of 10 stick chairs and ask for 10 merit badges. They are one per customer. Please don’t ask our customer service people to do you a favor and mail you one. They can’t. Please don’t pester Megan to sneak you one. She won’t.
So put on your big-person britches, build a stick chair and earn your merit badge.
— Christopher Schwarz
P.S. Sorry if this post sounds condescending – the condescension is for the 1 percent. We have done promotions like this in the past where 99 percent of the participants follow instructions and have fun. The remaining 1 percent chap our hides asking for special treatment because “there are no sticks in my county” or “I have never seen an envelope” or “I’m a very important bossy pants, and you should send me one because of that.”