I used paired S-scrolls on this chest for the uprights (the stiles) and crossed versions on the muntins and top rail. Paint adds even more fun.
The following is excerpted from Peter Follansbee’s “Joiner’s Work.”
Forget what you think about 17th-century New England furniture. It’s neither dark nor boring. Instead, it’s a riot of geometric carvings and bright colors – all built upon simple constructions that use rabbets, nails and mortise-and-tenon joints.
Peter Follansbee has spent his adult life researching this beguiling time period to understand the simple tools and straightforward processes used to build the historical pieces featured in this book. “Joiner’s Work” represents the culmination of decades of serious research and shop experimentation. But it’s no dry treatise. Follansbee’s wit – honed by 20 years of demonstrating at Plimoth Plantation – suffuses every page. It’s a fascinating trip to the early days of joinery on the North American continent that’s filled with lessons for woodworkers of all persuasions.
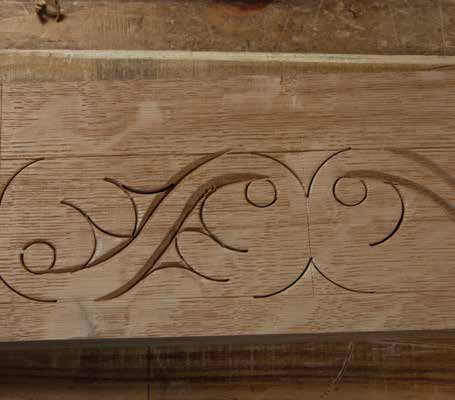
There’s a large body of carved designs I have learned from studying surviving oak furniture from Devon, England, and Ipswich, Mass. These designs are chiefly found on chests and boxes, although they also appear on some chairs and other works. With a few exceptions, the layout for these designs is mostly freehand. It’s a bit daunting at first, but once you learn the vocabulary (my word for the various elements, or parts, of the patterns) of this work you’ll be able to combine the elements in so many different ways that you will be able to fill most any space you are facing. The second overlapping lunette design is part of this group, but by far the most common element is what I have come to call the S-scroll, a term I learned from the scholars and curators who trained me in furniture history. Art historians like to give these things names so they can talk about them, but I am always careful to point out that we have no idea what the makers and users of this oak furniture called these patterns.
The S-scroll amounts to a rounded rectangle with a reverse curve band that creates two diagonal areas. These are then filled with leaves and other designs. Let’s cut a pair of S-scrolls.
Fig. 3.70 Connect the horizontal marginsand the vertical squared lines, and BANG –outline.
Mark out a rectangular space, about 3″ high by 6″ long with no centerline – nothing other than the margins. Now take a gouge similar to a #7 Swiss made, 1″ wide. Strike it at each corner of this rectangle so that the gouge is connecting the horizontal and vertical margins, effectively rounding off the corners of the rectangle.
Fig. 3.71 Strike these nice and deep. You get the best results by cutting it cleanly the first time.
Now with a narrower, more deeply curved gouge, incise a circle just inside one bottom corner and diagonally opposite that at the upper corner on the other end. It usually takes three strikes of the gouge to create a full circle. Make sure to leave enough wood between the rounded corner and the circle; if the circle is too close to the corner, it can become weak and the wood will break out between them, ruining the pattern.
Fig 3.72 I’ve jumped to a different carving for this photo, but this is the moment of truth for this pattern. Don’t worry, I’ve seen period carvings that I would burn. The eye is forgiving, said Jennie Alexander when I was learning chairmaking.
Using the V-tool, cut a pair of curving S-shaped lines that connect one circle to the other. This is new territory – it’s a freehand cut, but don’t let it scare you. I’ve seen period examples that are all over the map – some exquisite, some horrific. One more thing: It’s another venue for two consecutive thoughts. The V-tool lines don’t connect circle-to-circle and margin-to-margin, but margin-to-circle, and circle-to-margin. I think of it as “outside to inside” and “inside to outside.” In the beginning it will help you to mark the line you want to cut. Pencil, chalk, your call. I used to avoid marking it, but have found it helps beginners.
Fig. 3.73 This cut startsin the V-tool outline andcomes out from there.Keep it a bit away from the circle you just chopped. Itcan get fragile if it’s tooclose.
The pattern begins by bending away from the margin/circle at first, then rises up to cross an imaginary centerline, and bends again as it comes toward its goal in the opposite corner. You don’t want the line to head straight for the corners and circles; that can result in a design that’s too skimpy on the inside.
Once you’ve cut the V-tool lines, the rest of the pattern is quite simple. Using a deeply curved gouge, outline the first leaf, the one that flows from the circle.
Figs. 3.74 and 3.75 This format is the one I use the most. I think of it as two-and-a-half leaves:one “fat” one surrounding the circle, the diagonal one; and the half-leaf that then snugs backinto the V-tool line.
Then chop outlines for additional leaves with the #7 gouge. The number of leaves depends on the scale of your S-scroll: one, two, three or more. I angle these so the second leaf axis is a diagonal line from the margin. Then the last incised outline is a half-leaf that connects to the horizontal margins. All of this is long-winded; the pictures help make it clear.
Figs. 3.76, 3.77 and 3.78Chop a crescent behind the firstgouge-cut corners, pop out the circle, and then remove whatbackground you can. Take asmall chop where each leaf laysbeside its neighbor.
After incising the pattern, all that remains is to remove the background with the #5 gouge. Facets are actually just what I want in the background work – a dead-flat background looks too machine-made to my eye.
The details can be varied, from shaping and beveling the bands, texture punching the background, accent punches and/or gouge-chops on the solid surfaces.
Fig. 3.79 One version finished. Here, I used an old 5/32″ nail set as a punch. I’ve seen periodones with a nail used for a similar effect.
Once you can cut an S-scroll, you can use them in designing patterns. They can run in a long single row, alternating curves upward and downward, or in a double row, with alternating pairs on wider stock.
Fig. 3.80 This detail from a joined chest shows pairs of S-scrolls running along the lower railand up the corner post, or stile.
They can “stand up” and alternate, a version that I usually use on a tall box front.
Fig. 3.81 This box front features a row of S-scrolls “standing upright” instead of along a row.
Chest panels and chair backs often have two vertical S-scrolls. There is a staggeringly wide array of design possibilities with this motif.
Fig. 1.32 It’s a subtle curve, but here you see how the “corners” are lifted up. This keeps the hatchet from digging in as you hew with it.
The following is excerpted from Peter Follansbee’s “Joiner’s Work.”
Forget what you think about 17th-century New England furniture. It’s neither dark nor boring. Instead, it’s a riot of geometric carvings and bright colors – all built upon simple constructions that use rabbets, nails and mortise-and-tenon joints.
Peter Follansbee has spent his adult life researching this beguiling time period to understand the simple tools and straightforward processes used to build the historical pieces featured in this book. “Joiner’s Work” represents the culmination of decades of serious research and shop experimentation. But it’s no dry treatise. Follansbee’s wit – honed by 20 years of demonstrating at Plimoth Plantation – suffuses every page. It’s a fascinating trip to the early days of joinery on the North American continent that’s filled with lessons for woodworkers of all persuasions.
Don’t be put off by the scarcity of single-bevel hewing hatchets; you can perform this work with double-bevel hatchets, too. Larger hatchets take some getting used to, but in the end they are quite efficient at stock removal. I keep a large Swedish hatchet around for times when there’s a lot of stock to remove, then I switch to a finer hatchet for more accurate hewing. My largest hatchet has a double-bevel and weighs more than 4 lbs. Its cutting edge is more than 7″ long. Regardless of the head size, I use fairly short handles on my hatchets, about 14″.
While you can make either a single-bevel or double-bevel hatchet work in dressing stock for joinery, the single-bevel hatchet is ideally suited for hewing stock prior to planing it. Moxon’s “Mechanick Exercises” describes its use and shape to some degree:
“Its use is to Hew the Irregularities off such pieces of Stuff which maybe sooner Hewn than Sawn. When the Edge is downwards, and the Handle towards you, the right side of its Edge must be Ground to a Bevil…”
If you’re scouring old tools or want a smith to make one, here’s some of what I recommend you look for. My favorite hatchet is a single-bevel hewing hatchet made in Germany in the early 1930s by a firm called J. F. R. Fuchs. It weighs about 3-1/2 lbs., and has a cutting edge around 6-1/2″ long. In describing these hatchets, it’s easy to think of them as having a flat back, but that’s not exactly the case. The bevel is on the right-hand face for a right-handed joiner, as Moxon describes. But the “back” is not truly flat; it has a very shallow sweep to its cutting edge.
Fig. 1.33 A slight curve in this direction as well is another subtle detail found in the best hewing hatchets.
Think of it as a very large and shallow, incannel gouge. The benefit of this shape is readily apparent when you try to use one that is not shaped like this. A hatchet with a flat back digs into the wood; a proper one scoops the chips out. Additionally, there is a slight sweep from the eye socket toward the cutting edge. Some of this is the shape of the tool, some is exacerbated by honing.
I have another hatchet by the same maker, with an excellent refinement of its shape. The eye is cranked over, to keep your knuckles safe when hewing. This leans the handle away from the plane of action without having to make a bent handle. I use this hatchet particularly when hewing wide panels. These German hatchets are not readily found. One type of hatchet you will, however, find regularly in the U.K. and U.S. is the so-called Kent pattern hatchets.
Fig. 1.34 Here the back of the hatchet is sitting flat on the board, and the canted eye results in the handle being tilted upward.
There are several nice things about the Kent hatchets. Not only are they fairly common, they aren’t expensive. They can work, and – unlike many other hewing hatchets – they are reversible for lefties. Their symmetrically shaped head means you can knock the handle out and put one in from the other end. But often, the cutting edge is straight; I prefer a curve to the cutting edge. The shape of the back should be the same as those shown above.
Fig. 1.35 Some careful hunting around can often turn up a Kent-pattern hatchet in good condition.
The following is excerpted from Peter Follansbee’s “Joiner’s Work.”
If you like green woodworking, “Joiner’s Work” is doctoral thesis on processing furniture-shaped chunks of lumber from the tree using and axe, froe, hatchet and brake. If you are into carving, Peter dives into deep detail on how he festoons his pieces with carvings that appear complex but are remarkably straightforward. And if you love casework, “Joiner’s Work” is a lesson on the topic that you won’t find in many places. Peter’s approach to the work, which is based on examining original pieces and endless shop experimentation, is a liberating and honest foil to the world of micrometers and precision routing.
The book features six projects, starting with a simple box with a hinged lid. Peter then shows how to add a drawer to the box, then a slanted lid for writing. He then plunges into the world of joined chests and their many variations, including those with a paneled lid and those with drawers below. And he finishes up with a fantastic little bookstand.
Construction of these projects is covered in exquisite detail in both the text and hundreds of step photos. Peter assumes you know almost nothing of 17th-century joinery, and so he walks you through the joints and carving as if it were your first day on the job. Plus he offers ideas for historical finishes.
The primary material for joiners’ work is oak (I use white oak [Quercus alba] and red oak [Quercus rubra] interchangeably) that has been riven, or split, from the log.
This results in boards whose face is the radial plane, the most dimensionally stable surface possible. The stock is initially worked fresh from the log, a state we call “green.” After initial planing, boards are selectively dried some, then re-worked – the decoration and joinery are cut once the surface is dry enough to take a good finish, yet the interior of the stock retains some of that moisture, making it easier to cut than air- or kiln-dried stock.
Fig. 1.1 Here an eighth-section of an oak log is ready to become some perfectly quartered boards. Opening the log is always one of my favorite moments, when each piece reveals its potential.
When studying period pieces, I see that case pieces – boxes, chests, cupboards and related items – often display a mixture of riven and sawn stock. Usually the mill-sawn stock is the secondary wood, and in New England pieces this is often Eastern white pine (Pinus strobus). Other softwoods might appear as well. I’ve noted Atlantic white cedar (Chamaecyparis thyoides) riven into chest bottoms and drawer bottoms. It also appears as applied mouldings.
Fig. 1.2 Long sections of Atlantic white cedar are ideally suited for making applied mouldings. I don’t often get this wood, so I try to use every last bit of it when I do.
I’ve seen yellow pine (probably Pinus rigida or Pinus resinosa) in furniture from Connecticut and western Massachusetts. You can make the whole piece from riven oak, and many period works are just that, but when making case pieces, I prefer to use white pine for at least the bottoms, and often the lids, too. This is just a way to save some oak for future joinery work.
Fig. 1.3 This chest with two drawers has a relatively broad range of woods. The carcase is red oak; the lid, floor, drawer bottoms and rear panels are white pine; the applied mouldings are Atlantic white cedar; and some panels and one drawer front have plaques of black walnut.
While I am quite content using oak for most any piece of furniture, you might want some variety in your work. Black walnut (Juglans nigra) and ash (various Fraxinus species) are perhaps the most commonly found non-oak timbers I have seen in period joinery. I have used them and some other woods, too. I’ve seen Spanish cedar (Cedrela odorata) in some 17th-century joiners’ work from Boston, and other timbers besides. And recently, I’ve been using some Alaska yellow cedar (Cupressus nootkatensis) for carved boxes. Try what you have. I’d say the single-most important feature is straight grain. If nothing else, keep that in mind. Recently a friend gave me several sections of riven black walnut. They were short lengths, but just right for a joined stool. My previous experiences with walnut were a mixed bag. I often joke about being a personal monoculture; I have used oak so much for so long that I had no reference point for most other timbers. But it wasn’t until I used the riven walnut that I could truly appreciate this wood.
I used to think “it’s not for me” – but that was because I came at it the wrong way. I knew that for oak, riven green wood was the ideal. Why I thought it would be different for walnut is just one of those mental blunders that hit us all from time to time. I was judging this wood based on cuts that I would never deal with in oak. My first walnut project was a wainscot chair, made from kiln-dried wood, complete with grain run-out and all manner of un-straight fibers. Next up was a board chest, this time in air-dried wide boards. Nice, but expensive. It worked so much better than the previous project, but the chest had few details, and I really didn’t get much out of it.
Fig. 1.4 Straight-grained riven walnut was a revelation for me. This joint stool is the second non-oak example I’ve ever made. I’d do it again if the wood came my way.
Then it all clicked perfectly with the riven green wood. A nice straight-grained walnut log is a dream to work, easy to plane and to chisel – and the axe work in walnut makes you feel like Superman. Turning it is especially satisfying. When it came to carving, I had to lighten up my mallet blows. When I used my usual approach, I blasted the walnut to smithereens. Less mallet work, more hand-work and it cut fine. Live and learn. Now I have to take back all the horrible things I’ve said about walnut. Riven, straight-grained, green, free – that’s the way I like my walnut.
Around southern New England where I live, the ash tree most commonly found is white ash (Fraxinus americana). I have used this wood for furniture almost from my very first projects. When I made ladderback and Windsor chairs, ash was a favorite riving wood for parts. It is lightweight, strong and splits well – an all-around great hardwood. It has a short shelf-life in the log, though; it can go bad pretty quickly if you don’t get to it. Seventeenth-century turned chairs were often ash, but some joined work was, too. You work it just as you would oak. I have found it’s somewhat stringy, and when very fresh it can tear out badly under the plane. But if you work it green then let it sit a while, it will work very well afterward. The color is pretty bland, and there’s no figure on the radial face as in oak. So carve it up then paint it, and no one’s the wiser. Nice wood.
The Way I Work Some woodworkers keep a stockpile of lumber on hand, and draw from their stacks as they begin a new project. Others buy enough lumber (with some extra) for each piece they are planning to build, often working from a list that includes all the pieces in a given project and their rough dimensions. I work in a different way. I start with a log and split out almost every piece of oak that I use at the bench. Starting with the log is a lot of work, but it’s fun. This approach usually results in me starting several projects at once, then I leapfrog back and forth among them. Sometimes I have quite a few pieces underway, usually limited by shop space. As I write this, I have a joined chest, a chest with drawers, a chest of drawers, two wainscot chairs, a long table and several joint stools in progress. I just finished a carved box in the midst of all these.
It’s not an attention-span problem. It’s what happens when I open the log. I have an idea of what I want from a given log, but the tree has ideas of its own. I might be preparing stock for a joined and carved chest, but end up with more narrow framing parts than I need. These get shuffled over to the next project. Panels in a chest range from 7″-12″ wide, usually only about 14″-16″ long. Some logs offer wide panels that are longer than that, but are still too short to get two lengths out of them. These are ideal for carved boxes whose long front and back boards are usually around 20″-24″ long. It goes on and on.
Fig 1.5 This bedstead is now more than 15 years old. When it was new, the color difference between the various woods was obvious. Now they have blended rather well. There are white oak muntins, red oak panels, and the long rails and stiles are white ash. The finish is linseed oil.
Selecting the Timber If you are going to split your stock, it starts with the log. Finding the right log isn’t half the battle, but it’s a good chunk of it. Ideally, you’ll work with an oak that grew dead-straight, is clear, or free of knots, bumps and branches, and is large enough in diameter to yield wide boards along its radial plane. With all those criteria met, you can get even more demanding and look for an oak log that meets all these demands and is also slow-growing. In some places, you can find this timber at sawmills and log merchants, and sometimes even firewood suppliers will have short sections that fit the profile.
If you’re skipping the log-splitting aspect of this work, you can come close to this material if you look for straight-grained quartersawn boards. When using sawn stock, I prefer air-dried to kiln-dried. To me, the kiln-dried stuff seems stiffer and less cooperative. Air-dried is harder to find, but it’s out there. Flat-sawn boards can be used in joinery; they certainly are prevalent in surviving English work of the 17th century. They require some careful planning and much more effort in working, but you can make joined work with flatsawn stock – it just won’t be as much fun as working with riven stuff. When using riven stuff, you’ll be working the wood green, or unseasoned. If you have flat-sawn stock, it needs to be seasoned. The general rule of thumb is one year of air drying per inch of thickness. When I use sawn oak, I like to air dry it outside, then bring it in the shop for a few months before breaking it down to rough-size pieces.
Oak Most of the oaks are ring-porous hardwoods, meaning their growth rings are comprised of two different types of cells. The material that grows in the spring is generally more porous than that from summer growth. This results in a distinct division between the spring or “earlywood” and the summer or “latewood.” Also visible on the end-grain view are the ends of the medullary rays. These are cells that radiate outward from the log’s center, or pith, toward the bark. Ring-porous hardwoods, with only a couple of exceptions, split predictably both in line with the growth rings and perpendicular to them, along the medullary rays.
Fig. 1.6 This section of end grain is strictly firewood, but the structure of the oak shows clearly. Just inside the bark is a narrow band of greyish-white sapwood, then the bulk of the material is the darker-colored heartwood. Radiating out from the center are the ends of the medullary rays, showing up as almost silvery bright lines. Concentric growth rings encircle the very center, or pith of the tree, in this case rotten and bug-eaten. This one has almost everything that can go wrong with a log; the pith is off-center, the log is out-of-round, the medullary rays are twisted and bent and there’s insect damage. There’s also cracking along the growth rings and injury to the tree at a couple of points in its life. Burn it.
The end grain of a large oak shows two distinct colors in the wood. The outer inch or so (just below the bark) is the sapwood. This material is the part of the tree that conducts the sap. It is more prone to decay and infestation, and is considered weaker than the darker-colored “heartwood.” In oaks, the greater proportion of the tree’s diameter is taken up with the heartwood. A young sapling is all sapwood, but over time as the tree grows, there is a transition in which the inner layers of sapwood undergo a chemical change into heartwood. For our purposes, the principal difference between sapwood and heartwood is the greater resistance to decay that heartwood exhibits. In woods such as ash or maple, most of the usable stock is sapwood. In the oaks, the sapwood is generally discarded, and the heartwood is the stuff of choice.
When splitting out oak stock for furniture work, the radial face is the best one to use for a number of reasons. The primary benefit is the dimensional stability of boards oriented this way. In a straight-grained example, there is little shrinkage across this radial face, thus little to no distortion, either. Another feature of this radial plane is the ease of working it – the wood cuts more easily on this face than on the adjacent tangential face. So the carved work is always done on the radial face. Mouldings are often cut in this plane, also. When using riven oak, the stock is usually oriented so the radial faces compose the front of the piece.
The material nearest the center of the log is called juvenile wood. Formed when the tree was a small sapling, this wood is often very fibrous and can include twisted grain. There is no clear distinction between where the juvenile wood leaves off and the workable heartwood picks up. Each log is different. If the innermost fibers appear straight-grained, you can try to keep as much of that stock as possible. One place where you might push your luck with the juvenile wood is when you are trying to split out the widest panel stock you can get. (I’ll cover that in detail when we get to splitting and working panels.)
This week, we’ve had Peter Follansbee (author of “Joiner’s Work“) in the shop teaching six students to carve and make a 17th-century-style oak and pine box with an integral till. The first three days were carving, yesterday was joinery, and today they’re finishing off the joinery, then making and attaching the bottom and lids.
The corner joints get rabbetted and pegged, so after allowing the glue to dry overnight, this morning, Peter showed us how he makes pegs – see below.
A bookstand was not a common item in 17th-century homes. It provides some challenges, but is a small enough project to go fairly quickly.
The following is excerpted from Peter Follansbee’s “Joiner’s Work.” Follansbee has spent his adult life researching this beguiling time period to understand the simple tools and straightforward processes used to build the historical pieces featured in this book. “Joiner’s Work” represents the culmination of decades of serious research and shop experimentation. But it’s no dry treatise. Follansbee’s wit – honed by 20 years of demonstrating at Plimoth Plantation – suffuses every page. It’s a fascinating trip to the early days of joinery on the North American continent that’s filled with lessons for woodworkers of all persuasions.
After building all these boxes and chests, something happens. You have scraps, offcuts, short bits of this and that left over. These bits of wood accumulate around the shop of most woodworkers I know. Reminiscent of Donald Hall’s “String Too Short to Be Saved”– they are a lignin guilt trip, collecting dust and taking up space. When using riven stock, you have a lot of time and labor invested in these bits, and they are perfect quartered stock. Surely they’re too good to burn, but how to use them? They are usually too short to be truly useful, or too few in number to amount to much. Mostly, they sit there mocking you as they take up every available space, waiting for a day that may never come.
I stumbled onto one small item that uses scraps and adds some specialized mortise-and-tenon joints to the repertoire to boot. For years I made turned bookstands based on a single example I studied in a house museum in Massachusetts. One thing that always bothered me about that one was its singularity. I’m leery of “unique” items; they are hard to pinpoint as to when they might have been made. So I was thrilled one day to find another bookstand in an auction catalog. Even better, this one was joined. So I’ve since made several, some in oak, some in walnut. I based the proportions on the turned one I studied.
The joinery was another matter. With only one photo to go by, I had to improvise. So what follows is pure speculation, but it makes a fine bookstand.
Start by choosing and prepping the stock (you can substitute sawn stock if you have no riven wood). The stand is composed of two stiles, one top rail and the bottom shelf. In between these two parts are two crosspieces, into which are fitted the two pieces that form the ratchet mechanism.
Careful paring with bench chisels will get this mortise trimmed to the proper size, without crushing the surrounding wood.
Make the stiles from stock that’s about 1″ or more in thickness. Mine are around 2″ to 2-1/2″ wide by 16″ long. After dressing the stock, carve the design. I’ve used various patterns – just keep in mind the parts are pretty narrow. Next comes the joinery. I made a story stick to lay out the stiles because I knew I’d make these again and again. You can follow my dimensions, or adapt some of your own. Chop a 5/16″ mortise for the crest rail, about 1-1/2″ deep. Lay this out so the tenon is stepped down from the top edge of the top rail. This top rail is about 2-3/4″ high (and 12″ shoulder to shoulder), so I made the mortise about 2″ long. This keeps the joint from showing at the top of the rail-and-stile juncture.
I used a small square to line up the auger bit, then set it out of the way for boring.
The mortise for the shelf is trickier. I wanted the shelf thin to keep the bookstand from becoming too heavy and awkward. Chopping this 7/16″-long by 5/16″-thick mortise seemed fraught with peril; there’s no room to pry. So I chose to bore the bulk of it out and clean it up with a paring chisel.
The mortises for the crosspieces are also bored, not chopped.
Mark a centerline and prick the spacing. For accuracy, I use an auger bit when boring these, in this case a 1/2″ bit. Then saw and chisel a flat round finial at the top of the stiles.
A simple way out: Saw facets around a scribed circle, then pare it round with a chisel.
The crest rail’s details can vary. I made one version of this stand with a row of arcs cut in its top edge. Mark these out with gouges or a compass. To cut them, saw down to the spot where two curves meet, then chop down the arcs with a chisel. Another top rail has small ogees cut along its straight edges. I make these rails with barefaced tenons, that is, a tenon with no rear shoulder. They don’t have to be this way; I think I used this joint on my first joined bookstand, probably stemming from the thin stock on hand. Ever since then, I’ve made these rails featuring barefaced tenons.
Plane the stock to 5/8″ thick; the back of the 5/16″ tenon is flush with the back face of the rail. These joints are drawbored and fastened with tapered oak pins.
A barefaced tenon, shown from the back. This is a common joint in joined chairs. I used it here to help lighten the bookstand. Or to add variety to my narrow joinery repertoire.
The shelf is another story. I couldn’t see the joinery used on the shelf in the only photograph I had, so I decided to make it up. This one’s about 7/16″ thick. But how to join it to the stiles, and have it overlap the front face of the bookstand’s frame? I decided to adapt a tenon I have seen on joined work from the 17th-century Plymouth Colony and elsewhere. For lack of a better term, furniture historians have called this a “lipped” tenon.
Here is the shelf with its lipped tenon all cut, and the outer corner of the shelf trimmed.
I decided I wanted the shelf to extend about 3″ in front of the frame, and marked a line this distance from the shelf’s front edge. Then I marked out the tenon placement and thickness from this line. The shoulder-to-shoulder dimension matches that on the top rail. The ends of the shelf run beyond the sides of the stiles by about 3/4″.
The shelf entered into the stile. See how the “lipped” section fits in front of the stile.
Saw down the struck lines with a ripsaw, then chisel out the bits between the tenon and the overhang. Saw off the rear shoulder. Clean up the end grain with a sharp chisel. Cut the tenon to length (less than the depth of the mortise).
Three rip cuts define the lipped tenon. I made a cut across to bring the tenon to its finished length.
The two crosspieces that engage the ratchet parts are 1″-square sections. Chop 5/16″ by 1-1/2″ mortises in these pieces before turning them. I’ve taken to making these through-mortises, so I mark out the joinery on both sides. This allows me to chop these mortises from both sides, resulting in a tidy finished joint. Now mount the piece on the lathe and turn the tenons. The good news is these are the easiest tenons of your career – they have to be undersized! That’s how the ratchet parts swing to adjust the angle of the bookstand.
I’ve cut the rear shoulder out of the way. Now chop out the waste between the tenon and the shelf.
The ratchet mechanism parts are also oak, about 1-1/2″ wide by 3/4″ thick. The upper one is about 9-3/4″ long, the lower about 10-1/4″ long. Cut the tenons, then the notches in the lower one. Finally, taper the upper one to engage the notches. The tenons are the full width of the stock. Cut them just as for any 17th-century joinery work, with undercut front shoulders and rear shoulders cut behind the line. These get drawbored, too. But first cut the notches and tapers in them. Lay out the notches half the thickness of the stock, and about 1″ apart. Saw down to a marking gauge line with a tenon saw.
Alternate between the vertical chopping and breaking out the waste.
Now comes the part that requires some thought – you can easily chop the notches in the wrong direction. I always stop and try to visualize how the piece fits into the bookstand then check to see that I remove the stock from the correct side of the saw kerf. To chop these, first use the chisel bevel down to waste out the wood, then flip it over to pare the final surface of the notch more cleanly. Shave a slight bevel on the edge of the notches, too.
The finished joint before trimming the ends of the shelf.
Tapering the upper ratchet part is easy enough, and there are many ways to do it. You can use a hatchet, plane, spokeshave – really, just about any cutting tool. Test-fit the end into the notches to see that it fits all the way down to the notch bottoms.
Test fit in the stile.
Once you have these two pieces cut, you can pin them into the crosspieces. Drive your tapered hardwood pins into the offset holes to secure the parts together. Trim the pins front and back.
Now set one stile on edge on the bench with its mortises facing up. Drop the top rail into its mortise, then the two middle rails and the bottom shelf with its lipped tenon. Because the shelf runs long beyond the stiles, you might need to prop the stile up on some scraps to be able to drive the shelf all the way home in its mortise. Drive the other stile onto the ends of all these pieces that are sticking up in the air.
A very simple assembly, just the top rail and the shelf are critical. The middle rails need to be loose.
I glue the shelf’s joints and pin the top rail. The middle rails should swing freely. I often will wax their joints before assembly. Trim any protruding pins, then apply a finish. I make pegs for holes I’ve bored in the shelf for holding the book open. They’re small diameter holes and the pegs (or pins) are just like those used for securing joinery.