If you don’t want to mix up your own soap finish – or if you just want to give it a try – the Pure Soap Flake Co. offers it pre-mixed in jars for as little as $10.
The product is called Pure Castile Cream Soap, and it is available in 8 oz. to 64 oz. jars. I don’t know its exact water-to-soap ratio, but it is like a mayonnaise consistency and is ready to apply to wood.
The product behaves exactly like the soap finish I make from flakes.
Apply it with a soft cloth. Let it dry. Then buff it a bit. As I’ve mentioned before, a soap finish isn’t durable, but it is easily repaired and renewed with more soap. And no, your furniture won’t foam up if you spill a little water on the finish. It’s a traditional finish in Scandinavia. Non-toxic and pleasant to use and touch.
I’ve had soap finish on my work desk here at Lost Art Press for more than eight years. I love it.
I use colored waxes quite a lot in my finishing, especially the darker colors. I’m partial to Liberon’s Black Bison Paste Wax, but that’s because it is the only brand I’ve ever used.
Colored waxes are a secret weapon when it comes to muting a particularly loud or brash color. They also add a depth to many finishes by adding a second hue to the overall piece.
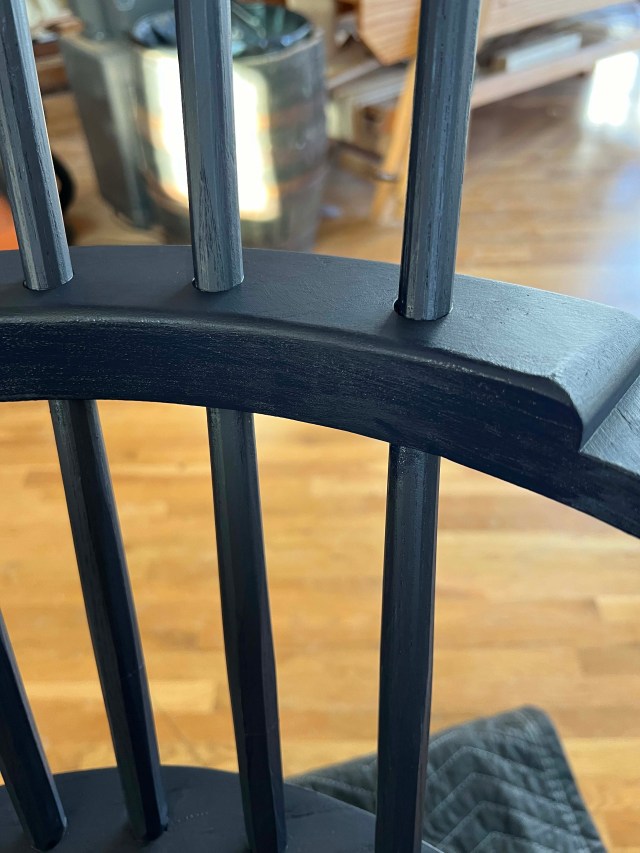
Many antique restorers use black wax to add age to a finish or a repair, and it’s great for that. But that’s not my goal with black wax. I hope the photos here will explain it better than words.
First, ignore the sales copy about the stuff.
“(I)t feeds, polishes and helps to prevent wood drying out…” No, it doesn’t.
“Giving a highly lustrous and hardwearing finish…” It actually gives a low-luster finish. And, like all waxes, isn’t particularly durable.
“Well-known for its quality and pleasant, distinctive aroma…” Uhhh, this stuff smells like a 1950s cleaning solution for septic tanks. It is not pleasant. But the smell dissipates.
Here’s what it really does. It’s a fast-drying sludge. Pick a color. I use “Dark Oak” and “Tudor Oak” and cannot tell the difference. When you use it on raw wood, such as oak, it will darken the oak and collect in the wood’s open pores. When used on raw closed-pore woods, such as pine, it generally looks like a smeary mess (a test board will confirm this).
I typically use it on top of a finish, either shellac or paint. When used over shellac, it will reduce the brashness of the new shellac, and the wax will collect in the pores of the wood, giving the piece a bit of dimension.
I adore the combination of mahogany, shellac and black wax. That’s what I use on virtually all of my campaign pieces.
When used over paint, the black wax gets a little smeary. It will collect in small voids left in the paint. And it will buff off unevenly on the paint. This is a good thing. A bright new paint finish can look like you dipped your furniture in Plasti-Dip. The uneven absorption of the wax mutes the single color.
Application
The stuff dries quickly, so I recommend you work small areas, about 12″ x 12″. Wipe the wax on generously with a rag so you can push it into the pores and small voids (wear protective gloves). Keep wiping the wax until you have a thin, consistent coat. Then immediately begin wiping it off with a clean, coarse rag (I use towels with a Huck weave – basically surgical towels). Keep wiping until you cannot remove any more. Then move on to the next section of the project.
If you botch a section, simply apply more wax. The wax’s solvent will dissolve the hard layer and you can wipe again. Or dab some mineral spirits on a rag and you can rub the surface to remove thin layers of wax until you get the effect you want.
If at any time you hate the finish, flood the surface with mineral spirits and rub hard. Most of the wax will come off.
Test Boards
Making test boards is the only way to ensure you will get the effect you want. I’ve used the wax for decades and still do a test board before I start smearing the stuff on anything.
A tin of this stuff lasts for many years, so don’t be put off by the high price (about $35-$40 here in the U.S.). Don’t be put off by the smell (we call it the “stinky janitor” wax because it smells like some cleaning fluid from my childhood). And don’t be put off by the bison part. I think there’s hardly any bison in the wax.
It’s a photo of a cat, ergo, Katherine (aka the Wax Princess) has more soft wax available. Last weekend, she made up a large batch, and it’s now up for sale in her etsy store.
As you can see, Funky Winkerbean has slept through this announcement. (The wax also doubles as a teddy bear.)
Notes on the finish: This is the finish Chris uses on his chairs. Katherine cooks it up here in the machine room using a waterless process. She then packages it in a tough glass jar with a metal screw-top lid. She applies her hand-designed label to each lid, boxes up the jars and ships them in a durable cardboard mailer. The money she makes from wax helps her make ends meet at college. Instructions for the wax are below.
Instructions for Soft Wax 2.0 Soft Wax 2.0 is a safe finish for bare wood that is incredibly easy to apply and imparts a beautiful low luster to the wood.
The finish is made by cooking raw, organic linseed oil (from the flax plant) and combining it with cosmetics-grade beeswax and a small amount of a citrus-based solvent. The result is that this finish can be applied without special safety equipment, such as a respirator. The only safety caution is to dry the rags out flat you used to apply before throwing them away. (All linseed oil generates heat as it cures, and there is a small but real chance of the rags catching fire if they are bunched up while wet.)
Soft Wax 2.0 is an ideal finish for pieces that will be touched a lot, such as chairs, turned objects and spoons. The finish does not build a film, so the wood feels like wood – not plastic. Because of this, the wax does not provide a strong barrier against water or alcohol. If you use it on countertops or a kitchen table, you will need to touch it up every once in a while. Simply add a little more Soft Wax to a deteriorated finish and the repair is done – no stripping or additional chemicals needed.
Soft Wax 2.0 is not intended to be used over a film finish (such as lacquer, shellac or varnish). It is best used on bare wood. However, you can apply it over a porous finish, such as milk paint.
APPLICATION INSTRUCTIONS (VERY IMPORTANT): Applying Soft Wax 2.0 is so easy if you follow the simple instructions. On bare wood, apply a thin coat of soft wax using a rag, applicator pad, 3M gray pad or steel wool. Allow the finish to soak in about 15 minutes. Then, with a clean rag or towel, wipe the entire surface until it feels dry. Do not leave any excess finish on the surface. If you do leave some behind, the wood will get gummy and sticky.
The finish will be dry enough to use in a couple hours. After a couple weeks, the oil will be fully cured. After that, you can add a second coat (or not). A second coat will add more sheen and a little more protection to the wood.
Soft Wax 2.0 is made in small batches in Kentucky. Each glass jar contains 8 oz. of soft wax, enough for at least two chairs.
If I ever write a book on finishing, I’ll probably call it “Farting Around With Finishes.”
One of the things I like to do on a Sunday afternoon is mess around with dumb ideas. About 100 percent of the time, my results are ugly or unremarkable. But every once in a while I discover something interesting that eludes the rounding error of “about 100 percent.”
One of the things I love about old vernacular pieces are the (rare) unrestored finishes. The best of them have a dark and mellow glow that verges on black. They have a low luster, but it’s nothing like dried linseed oil, which can look flat and starved.
After talking to experts on furniture and finishing, I’ve concluded that many of these finishes are the result of soot from the hearth (consider what coal soot did to the buildings of the U.K.). And the shine? Burnishing from use and the natural oils from the body of the sitter. There also could be waxes. Grease from food. Soil from clothing. Water damage. Children. And on and on.
(The original finish on these pieces could have been anything from nothing/nekkid, to an oil, a linseed-oil paint or a wax. These made-at-home pieces were unlikely to have a fancy film finish applied by the builder, though anything could have happened to the piece in the 20th century.)
Last fall I took a trip to Europe to travel around with Chair Chatters™ Klaus Skrudland and Rudy Everts. We drank a lot of Belgian ale and talked non-stop about chairs for about a week. Near the end of the trip as we were driving back to Munich, I wondered aloud if it would be possible to create a finish that would somewhat mimic old finishes on vernacular pieces (without dangerous chemicals or a 32-step process).
I had a dumb idea. Perhaps the finish could be based on a plant oil that is similar to sebum, the oil and waxes made by our sebaceous glands to keep our skin moisturized. As it turns out, jojoba oil is similar to sebum. (There is synthetic sebum out there, but the sources I have found are too expensive to use as a furniture finish.)
Jojoba is inexpensive, widely available and edible (but not digestible). Like linseed oil, jojoba is a drying oil. It is combustible, and there is a small risk of it auto-igniting if you foolishly bunch up your rags. So take the same precautions as with all drying oils and dispose of the rags as recommended on the oil’s Safety Data Sheet.
So jojoba is indeed a good candidate for a wood finish.
The next hurdle was how to get the hearth smoke into the finish. My first thought was to grind up lump charcoal or simply get some ashes from the fireplace and mix it into the jojoba. My experiments with those sources didn’t go well. The finish felt really gritty.
The solution was to switch to carbon black. Carbon black is essentially soot that is used as a pigment in inks and paints, and to color the rubber in your tires. It’s cheap, and you can get it as an extremely fine and consistent powder.
So what happens when you mix together jojoba oil and carbon black? I started with 1 ounce of jojoba oil and mixed in 1/2 teaspoon of carbon black. I stirred it with a popsicle stick and within a few seconds the carbon black was evenly distributed in the oil.
Then I ragged it on a scrap white oak chair arm that has been hanging around my shop for a year.
Surprisingly, it looked pretty good. The oil gave the wood an orange color, and the carbon acted like a pigment stain – collecting in the wood’s pores and sitting on top of the wood. I let the finish dry for a couple hours then checked it again.
The downside is that the carbon black rubs off on your clothes a bit. After the oil dried to the touch, I rubbed it quite a bit with clean, dry rags. The finish on the wood didn’t get any lighter, but I continued to get some carbon black on the rags. (Though it was less and less the more I rubbed.)
So next, I’m going to reduce the amount of carbon black in the mixture and see what happens. And I’ll try adding a spit coat of shellac to the sample boards to see if it locks in the black color. Third option: cook up some soft wax with jojoba, beeswax and some carbon black.
All this might be a dead end, but I enjoy the process (and I hope that maybe Lucy will get me a lab coat for Christmas – ooooh, and a clipboard).
Applying a linseed oil and wax finish is one of the easiest things to do…
If. You. Follow. Instructions.
Every single problem I have encountered with applying this simple finish can be traced to not following the application instructions. Why is it always user error? Because almost nothing else can go wrong. The finish isn’t particularly sensitive to humidity, temperature or the way you apply it. You can put it on with a rag, steel wool, synthetic woven pad or cheesecloth. There are no brush strokes to overlap or tip off. There are no spray patterns to learn. Heck, the workshop can even be a little dusty.
So what can go wrong with this finish? Well, I’m sorry to say it, but it’s you.
Here are the instructions.
Prepare the raw wood just like you would for any clear finish. Remove excess glue. Make sure all the show surfaces are prepared to the same level of refinement. Break the sharp edges.
Apply a good coat of the linseed oil/wax finish. Saturate the wood, especially the end grain. Get the whole chair, box or shelving unit covered with the stuff. Look for dry spots (especially on end grain and in corners).
Now get a clean rag or towel (we use Huck towels). Rub the entire project until you have absolutely and positively removed all excess from the surface. If there is a greasy film that you can leave a fingerprint in, then you have not removed enough. You should keep rubbing the project until the wood is basically dry on its surface. It will feel a little cool to the touch but there should be no discernible greasy film.
Wait 30 minutes. Get a coffee or a glass of water.
Go back to the project with a clean rag or towel and rub it dry again. Some woods will leach out some of the oil after the first application, and you don’t want that stuff pooling on the wood. Get in the corners. It’s easy to miss a few spots on the first rub-down, so this is your chance to find the excess.
Go away for two hours. When you return, the project can be handled. Sit in your chair. Move the shelves to their final resting place.
Now wait for two or three weeks. Look at the project. Are you happy with the sheen? If so, walk away. Does it look a little dry? Then return to step two and apply another thin coat of the stuff.
Now wait a year. Look at the project. Are you happy with the sheen? You know what to do.
If you haven’t figured it out, the biggest error people make with this finish is they don’t remove the excess finish. They leave a little extra on top, thinking: “That will add extra protection.” Wax/oil finishes don’t work that way. When you leave a little extra, the excess bunches up like a rubbery scab. Or it refuses to fully dry.
This problem is especially acute with casework. The woodworker finishes the interior of the secretary or cabinet then closes up the case – robbing the finish of the air it needs to cure. So the finish never dries. And it smells awful. If you use this finish on the interior of something, you have to leave its doors and drawers open until it cures (which is two to three weeks).
Most projects don’t need the interior to be finished (historically, finishing the inside of a piece was seen as a waste of time and material).
Finally, take the rags or pads and lay them out to dry. Don’t bunch them up – it’s a fire hazard. In Europe, many woodworkers burn the rags. In some parts of the country, they put the rags in plastic bags filled with water. I lay the rags out, and I have never had a problem.
Troubleshooting tip: What if you left too much of the finish on the surface, and it is a sticky mess the next day? Get a solvent such as low odor mineral spirits or a citrus solvent (limonene) and flood the surface. It will dissolve the excess wax and oil, and everything can then be wiped away. Wipe the project until it is dry and you are back to wood. Let the piece dry overnight. Then begin again with step two above.