We are awaiting a revised edition of “The Stick Chair Book,” which should arrive in early September. So we are closing out the remaining copies of the first edition of this book for $24 each (it was $51).
The forthcoming revised edition is about 10 percent smaller. It has the exact same content as the current edition, but I rewrote the text this summer to tighten it up to my satisfaction. Every sentence and almost page of the book has been streamlined as a result. Other changes to the revised edition include a new cover cloth (it will be black, of course) and better interior paper. The first edition of the book was printed during the supply chain crisis, and we were lucky we got any paper for this book.
Most publishers would simply pulp the remaining copies of the first edition. But we decided to offer them at a discount. It’s our hope that some readers who couldn’t afford the $51 price might be able to swing $24. Or perhaps some readers might want to pick up a copy as a gift for someone. Or a book collector might like a sealed first edition.
We have about 200 copies. All are sealed and are in mint condition. These are not factory seconds or returns.
We have a handful of “cosmetic seconds” available of our Type 2 Crucible Dividers. There are minor blemishes caused by the tumbling process, and perhaps a few small spots of rust. All are 100 percent functional and have been reinspected.
We’ve stamped all of them with a No. 2, (indicating a second) which is the biggest blemish or mark on the tools. We’ve included photos of some of the cosmetic marks, and we picked the worst-case ones.
These tools are normally $126. We are selling the blemished ones for $90. That’s about a 29 percent discount.
Bean accepts treats in exchange for this promotional photo.
Katherine cranked up her soft wax machine this week and has put up a batch of it in her etsy store. Katherine is keeping up wax production, even with her job at Rookwood Pottery and the heat, which is sapping us all.
She cooks it up using the raw ingredients of yellow beeswax, raw linseed oil and a little bit of citrus solvent. She then packages it in a tough glass jar with a metal screw-top lid. She applies her hand-designed label to each lid, boxes up the jars and ships them in a durable cardboard mailer. The money she makes from wax helps her make ends meet at her new place in Covington. Instructions for the wax are below. You can watch a video of how to use the wax here.
Instructions for Soft Wax 2.0
Soft Wax 2.0 is a safe finish for bare wood that is incredibly easy to apply and imparts a beautiful low luster to the wood.The finish is made by cooking raw linseed oil (from the flax plant) and combining it with cosmetics-grade beeswax and a small amount of a citrus-based solvent. The result is that this finish can be applied without special safety equipment, such as a respirator. The only safety caution is to dry the rags out flat you used to apply before throwing them away. (All linseed oil generates heat as it cures, and there is a small but real chance of the rags catching fire if they are bunched up while wet.)
Soft Wax 2.0 is an ideal finish for pieces that will be touched a lot, such as chairs, turned objects and spoons. The finish does not build a film, so the wood feels like wood – not plastic. Because of this, the wax does not provide a strong barrier against water or alcohol. If you use it on countertops or a kitchen table, you will need to touch it up every once in a while. (I have it on our kitchen countertops and love it.) Simply add a little more Soft Wax to a deteriorated finish and the repair is done – no stripping or additional chemicals needed.
Soft Wax 2.0 is not intended to be used over a film finish (such as lacquer, shellac or varnish). It is best used on bare wood. However, you can apply it over a porous finish, such as milk paint.
APPLICATION INSTRUCTIONS (VERY IMPORTANT): Applying Soft Wax 2.0 is easy if you follow the simple instructions. On bare wood, apply a thin coat of soft wax using a rag, applicator pad, 3M gray pad or steel wool. Allow the finish to soak in about 15 minutes. Then, with a clean rag or towel, wipe the entire surface until it feels dry. Do not leave any excess finish on the surface. If you do leave some behind, the wood will get gummy and sticky.The finish will be dry enough to use in a couple hours. After a couple weeks, the oil will be fully cured. After that, you can add a second coat (or not). A second coat will add more sheen and a little more protection to the wood.Soft Wax 2.0 is made in small batches in Covington, Kentucky. Each glass jar contains 8 oz. of soft wax, enough for about five chairs.
It’s time for our weekly Open Wire. And it’s also our open day here at the storefront in Covington. As a result, our answers might be a little delayed because we are answering other questions from people in the store.
This week’s open wire is hosted by me, Megan and whoever else starts tapping on my keyboard during our open day.
Here’s how it works: Type your question in the comment field. I will attempt to answer it. It is that simple.
So here we go…. Note that comments for this entry will close about 5 p.m. Eastern. But we will answer *all* of the questions.
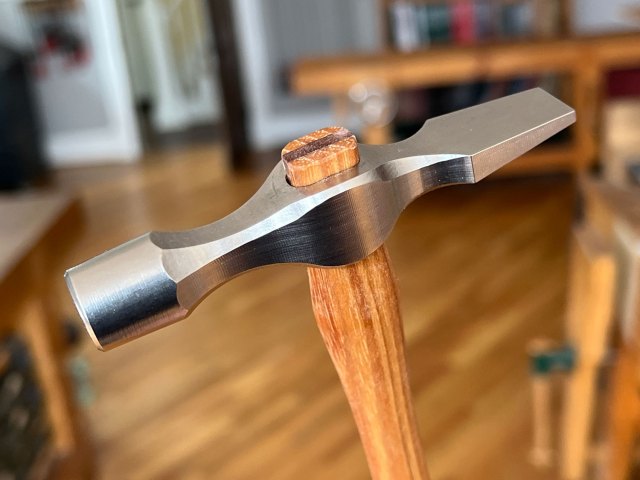
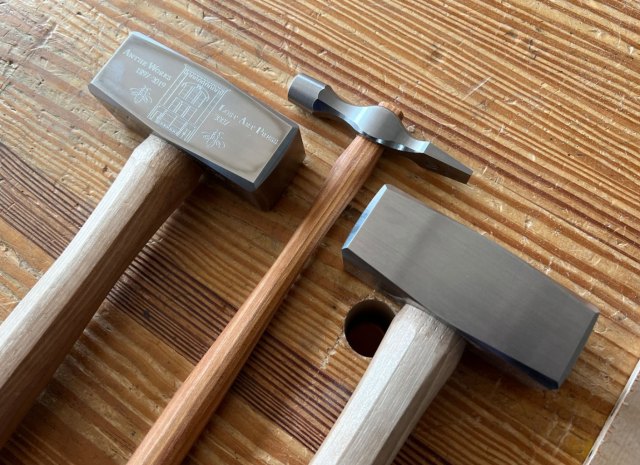
We have our first batch of Warrington hammers in stock here in Covington and ready to ship. The heads are made in Nicholasville, Kentucky. The oiled hickory handles are made in Tennessee. The hammers are hand-assembled – glued and wedged.
They are $97 each. You can place your order here. You can read all about the hammer in our stor, including what the hammer’s cross-peen is used for.
If you are coming to our open day on Saturday morning (July 29), we will have a couple dozen of the Warringtons for sale as well.
The Warrington is our second hammer. It took us a while to get to it because our lump hammer has been so damn popular (did you see that Natalie Portman uses one for climbing?). We love “lumpy” so much that we have made a special edition version that features an engraving of our new headquarters building on it. These special edition hammers are more expensive because the proceeds go to help fix up the Anthe building.
What’s next? A claw hammer. This is a project we have been building up to for a long time. We now have the design of the head complete and are working on the handle.