Megan applying soft wax to one of my elm comb-back chairs.
Sorry we took last weekend off. It was unavoidable.
We are here today and happy to answer your questions about woodworking, our books or Wilco songs.
This week’s open wire is hosted by me and Megan. Here’s how it works: Type your question in the comment field. Brevity is appreciated. We will attempt to answer it. It is that simple.
So here we go…. Note that comments for this entry will close about 5 p.m. Eastern.
Comments are closed for this Open Wire. See you next week.
I grew up around handmade ladderback chairs that were made in the Arkansas Ozarks, but I didn’t think much about them until working as Owen Rein’s editor. Owen lives in Stone County, Arkansas, about three hours from where I grew up.
He was the first person to open my eyes to the simple beauty and mechanical sophistication of the post-and-rung chair.
Compared to Windsor chairs, there’s not much written about post-and-rung chairs. That should come as no surprise because Windsor chairs experienced an amazing renaissance starting in the late 20th century that is still going on today. Ladderback chairmaking, on the other hand, seems to be vanishing. It was a once-thriving craft in many mountain communities. But makers are dying out, and there aren’t as many young people taking up the tools.
And that’s why I’m thrilled to announce I am now editing Andrew Glenn’s book that shines a spotlight on the ladderback chairmakers who are left, and will instruct future generations on how to make these chairs.
“Backwoods Chairmakers” is a fascinating combination of a travelog, personality profiles and a practical shop manual. During the last few years, Andy has traveled all over Appalachia interviewing and documenting the techniques of post-and-rung chairmakers. They aren’t easy to find. Some of them live without electricity or phones.
Andy interviewed dozens of people for the book about the daily life of a chairmaker, which is a difficult way to make a living. Andy spent time in the woods with them. Observed them working. And tried to get a sense of why they chose chairmaking and the post-and-rung form.
The book concludes with two chapters where Andy shows you how to make a post-and-rung side chair and rocking chair using the traditional techniques explored in the book. These chapters, we hope, will inspire new makers to try making these ingenious chairs.
I’m in the middle of working on Andy’s book, and we hope to have it out by the end of 2023. It’s a fascinating read – even if you don’t care a whit about chairmaking. The people who populate “Backwoods Chairmakers” are astonishingly resilient, inventive (a tenon cutter made from a washing machine?) and thoughtful about their craft.
And unlike other authors who write about mountain folk, Andy approaches the topic with an unusual sensitivity. As someone who grew up in Arkansas and now lives in Kentucky, I’m familiar with the stereotypes (and don’t much appreciate them).
Oh, and did I mention the photography is gorgeous? Andy is great behind the lens.
Definitely follow Andy on Instagram if you want to learn more about the book. He is regularly posting amazing photos and details from his travels.
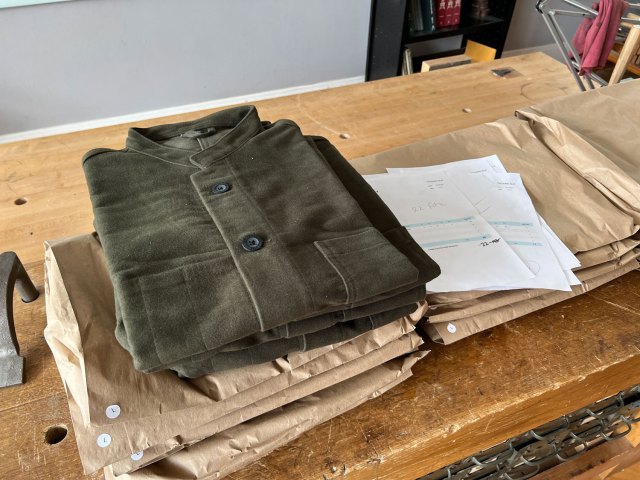
QC of our vests today at our Willard Street location.
We have received our yearly shipment of moleskin vests from Sew Valley, and we have put them up for sale here in our online store.
Because of dramatic price increases in materials and labor, this is likely our last batch of these vests. We’ve had to raise the price a little on this batch, and we simply can’t justify another price increase on a work garment. So if you have put off buying one of these, consider this fair warning.
Me with longer hair and a new vest.
I own the first vest that we made, and I wear it every day during fall, winter and early spring. The British moleskin is impossibly soft, dense and breathable. And it’s 100 percent cotton. Plus, it just gets better every year. Moleskin is insanely durable. My vest is better than an old leather jacket.
The pockets are designed for work. There are two roomy pockets up front that hold a tape measure, rules and a small combination square. The interior pockets hold pencils.
The garment is stitched to last a lifetime by Sew Valley in Cincinnati, with custom-made buttons and a beautiful embroidered patch on the inside.
I’ll be sad if we have to let this product go, but I’ll be happy because we were able to bring it into the world for a time. And I have a vest that will last the rest of my life (and a backup in case mine is ever lost).
When saw sharpener Tom Law died, there were a lot of people who thought: Now what? Who will sharpen our saws and teach others?
Fortunately, there was a new generation of saw makers and sharpeners who have put in the hours to get to the point where sharpening saws is as easy as tying their shoes. But there aren’t many of them. I wouldn’t want them all to go on a cruise ship, which could sink and forever alter the craft.
So one of our goals here at Lost Art Press is to produce a book on saw sharpening that will preserve these skills for future generations. And after looking and listening and lots of sawing, I knew there was one person for the job, Matt Cianci.
Matt is the kind of no-BS saw sharpener that Tom Law was. He is not interested in esoteric angles and metallurgy. He is a time-served sharpener, who has filed thousands of saws and works like an automatic machine when he does it.
Evaluating set without measuring. So simple.
He is interested in making saw sharpening simple – not complex. And for the last eight years, Matt and I have bandied about a book that he should write. The roadblock to the book turned out to be the images. Matt insists that one of the keys to learning to sharpen is seeing well-filed teeth. Once you know what the goal looks like, it’s easy to get there.
Old books on saw sharpening used drawings. Those are helpful, but not as good as seeing the real thing.
So last weekend I drove 13 hours to Rhode Island to work with Matt to get the images just right. And we are determined to keep at it until the book is published.
Watching Matt work is like watching any highly experienced tradesperson do their job. He can asses a saw in seconds, and then he is immediately jointing, setting and filing the teeth with no wasted motion.
Using your finger to guide the re-toothing process.
I know that he can teach you to file your own saws. And I am excited that this book is going to preserve this art for generations to come. We are on track to publish this book in early 2024. Its current title is “Set & File: A Practical Guide to Saw Sharpening.”
The book will cover all the important aspects of sharpening, including finding good saws and sharpening equipment, how to obtain the basic skills for filing, and how to deal with saws with teeth that are nice (but dull), plus how to deal with teeth that have been abused.
Like Matt’s approach to filing, his book will focus on the fundamentals. Filing to get the correct rake, fleam and pitch. After you understand these principles, you will know how to tackle all kinds of saws and all kinds of saw problems.
You probably know that I have another blog (but I promise I am not cheating on you). This one is called a “substack” and is titled “The American Peasant.” It’s about my efforts at writing my next book, but it is also a place where I shank the crap we are force fed. And I use bad words.
On Friday, the substack reached 10,000 total subscribers. Is that good? Don’t know. Plus we have almost 2,000 paid subscribers (I don’t think I’m supposed to tell you these numbers, but oh well).
So I did a thing that is probably not economically wise. I took the 10 most popular posts that I wrote for paid subscribers and made them free. So you can now check in on what the heck I’m doing at substack, which I keep misspelling as “substache.”
If anything, here’s some questionable Sunday-morning reading to go with your coffee. If you want to subscribe, click here (they make me type that). About one-third of the posts are free, with the rest behind a paywall. I’ve also included one juicy/warning blurb from each entry.
Perfection Can Suck It. “You don’t need me to tell you that a good portion of the woodworking you see on the internet is bullshit. One-hundred percent certified Grade-A Extruded Garden Gnome Meat.”
The Price of a Chair & a Life. “How do you thank someone who saves your life? I thought about it for a long time, and I cannot think of anything else I make that is more personal than a chair. It is a reflection of the human body, and it has parts with many of the same names: feet, legs, seat, arms, hands and back.”
Why Would Anyone Write a Book? “But finally, I discovered why I keep writing books. The reason is this: I’d write them even if they never got published. I’d buy a used mimeograph machine, and after getting stupidly high on the blue ink, I’d print out a few copies and hawk them at the local woodworking club. I’d secretly press them into the hands of woodworkers perusing the sharpening section at Woodcraft.”
The Jig Economy is a Scam. “I carry the skills and knowledge wherever I want to go without packing a container full of wacky jigs and micrometers and spring-loaded marfy-garts. And I have a lot more money in my pocket for beer and schnitzel that didn’t go to the Anodized Aluminum and Star Knob Guys.”
A Reverence for <Bleep>. “You could be the next <insert woodworking celebrity here>,” they said, “if you would just show real reverence for the craft. You know, respect for its traditions and history.” “You mean, I should stop making jokes about farts and open sores?” I replied.
The Spell is Complete. “I thought I was going to cry a bit. But then I hiccupped and peed my pants instead.”
Write Stressed; Edit Naked. “I promise that none of this stuff will be revealed to you when you are in your underwear in a motel room in South Dakota – trying to just write shit down. There you’ll find only water stains in the bathroom that look like Jesus and weird deer freezers filled with alien vegetables.”
What’s a Modern Peasant to do? “On the drive back to Kentucky I ran the numbers in my head. Rural land in Kentucky is about $8,000 an acre. I’d probably need about five to 10 acres to do this project right. The cost of the timber-frame structure plus some improvements would be another $8,000. I’d need a second similar structure to sleep and cook in. “Yes, I thought, I could afford this.”
The Religion is Nature; The Philosophy is Geometry. “Dude, it’s all woodworking, and it’s all awesome. If you make stuff from wood with your feet or with a laser, you are solid in my book. All the tools and ways of working are valid as long as you aren’t feeding small children into the hopper of your meat-powered scratch awl.”