One of the tools we use about 50 times a day is the “Super Woobie.” It’s basically a microfiber towel that has been absolutely saturated with oil. With it, I wipe down all my tools before putting them away, plus I use it as I work to keep pitch and dust from accumulating on tools.
We’ve experimented with a lot of different rags through the years. And yes, they all work fine. But our favorite – hands-down – are the Norton dry-tack cloths. They hold a lot of oil and dispense just enough when you wipe. You can buy these from a variety of woodworking suppliers.
We decided to ask our Super Woobies to do two jobs: prevent rust and remind us of the value of our work. So we have contracted with a local embroidery firm to stitch “Don’t Despair: Nothing Without Labour” onto one corner, plus the image of a friendly bee – the long-time symbol of woodworkers and other trades.
And we are packaging the woobie in a quality 3mil plastic bag with a zipper. The bag is ideal for the initial oil soaking of your woobie and for storing or transporting it. We don’t like to use plastic packaging, but this is one case where it is ideal.
The Super Woobie will ship dry and ready for the oil of your choice. You can use almost any oil. We like jojoba and camellia oil. Other people like 3-in-1 light machine oil or mineral oil. They all work fine, and yes you can mix them.
We hope to have these up for sale in a month. Right now, Megan and I are prepping the Norton towels for the embroidery shop. I don’t have a retail price yet.
I know this product will cause some eye-rolling in some corners of the internet. And if you’re the kind of person who uses your socks from your 6th-grade gym class to wipe your tools (using only oil harvested from your own body – to save money), then this isn’t for you. I wish you happy wiping.
But for those who like nice things – and nice things imbued with meaning – you might want one.
When it comes to making chairs or any other complex piece of furniture, it’s easy to become paralyzed by the advice of others, even when the advice is well-meaning. It is possible to be well-meaning and all-clueless.
When you hear the following rules or dictums or whatever, just blow a silent and internal raspberry back at the speaker.
A SIngle-board Seat is Best
This is just stupid, meaningless run-for the hills crap. For years I was paralyzed by the difficulty of finding wood that is 16” or 20” wide so I could make single-board seats. While a single-board seat might be more attractive if the chair is unpainted, it’s not inherently superior to a glued-up seat.
Single-board seats are usually flat-sawn and therefore more likely to cup dramatically over time. But more importantly, their “holiness” tends to dissuade beginners from making a chair.
Here are the facts:
Seats made from two or three boards are common in the furniture record
You can easily reinforce the seat’s edge joints with floating tenons, splines, pocket screws or dowels
Or you can just use a simple glue joint – just like when gluing up a tabletop
Yes, you can put mortises for the legs and sticks through a joint line. It’s not ideal, but the seat will last a good long time. Don’t let this stop you from making a chair.
An Odd Number of Back Sticks is not Odd
One of my favorite chair designs that I make has seven long back sticks. When I post photos of this chair, I usually get hate mail. It usually goes: “That middle stick is going to hurt the sitter’s spine. Chairs should only have an even number of sticks.”
Wow. This must have been written somewhere in an early woodworking textbook and become law. The furniture record is clear on this point: You can have either an odd- or even-number of sticks and the chair will be just fine.
Why? There are two main reasons. One: Many chairs are designed so that the sitter never encounters the back sticks significantly. On all of my lowback chairs, for example, the backrest cradles the shoulders and the spine never touches the back sticks. Also, the armbow of a chair can push the lumbar spine forward, arching the sitter’s back so only a tiny bit of the spine touches the backrest.
But also: Sitters are not symmetrical sitters. When you slide into a chair, your spine is likely to shift left or right from the centerline of the chair. It won’t encounter the center stick. I have made dozens of chairs with a center stick and have never had a problem or a complaint from a customer.
The Human Body is not a Chair Shape
This is important. It is easy to think that a chair should simply be a negative image of the shape of the sitter. That way, the entire body would be supported and cradled by the chair. And this sort of chair shape would be ergonomically perfect.
Yes it would be perfect – perfect torture.
There is a reason that bean-bag chairs are made mostly for children who do not yet have back problems. These chairs provide an equal level of support everywhere. And that’s bad. The body doesn’t need support everywhere, just like I don’t want to be touched *everywhere* by someone I love (shin-shi shin-shi in the ear?).
Making comfortable chairs requires you to touch the sitter in certain places and not others. (If you are married, then you can just nod your head.) The lumbar spine, yes. The thighs, no. The neck, no. The shoulders, yes. Elbows? On special occasions. The little area around your tailbone? Of course.
I love to sit in chairs and then ask: Where exactly is this chair touching me? The answer is sometimes a surprise. And then I try to figure out how the chair’s angles work with these points of contact to make a comfortable (or terrible) chair.
But most of all, make a chair. Even if it’s a bad chair. If you make a bad chair you can figure out what went wrong and then the next one will be better. If you don’t make a chair, then there’s nothing to fix, nothing to improve on. You can’t fix or improve upon nothing.
(And here is where we end lesson four on Zen Buddhism.)
I never planned on trying to drag a bunch of readers into my Stick Chair Lair, but it sure looks that way in our store. We now have four titles devoted to these chairs, plus plans, a sliding bevel, a calculator for designing your own chairs, a bevel-setting tool and a card scraper specially ground for these chairs.
This wasn’t by design, I promise you. Heck we don’t have financial forecasts or a strategic long-range map for the editorial future of Lost Art Press. (Except this: We are going to bring back turned ashtrays.)
Stick chairs have been a long-running obsession of mine since 1997 or so when I first began reading John Brown’s column in Good Woodworking magazine. I started making these chairs in 2003, and I haven’t stopped since.
John Brown in his workshop in 1991. Definitely not a nerd. (Image courtesy of JB’s family.)
If you think these chairs are ugly (a common reaction – until you see enough of them), then here is a short explanation as to why I always seem to have one in progress on my workbench.
I love stick chairs because they are deeply rooted in traditional culture, and yet there are almost no hard rules about what they should look like or how they should be made.
In contrast, for years I built American Arts & Crafts furniture, which has a hierarchy of makers, techniques, finishes and forms. Yes, there are some outliers (Limbert, for one), but otherwise there are well-defined rules about what makes a “good” piece from a “blah” one. And those rules aren’t entirely about aesthetics.
With stick chairs, almost anything goes. Want to make a chair that has five legs, 11 sticks made from branches in your yard and a piece of carved driftwood for the comb? OK! And hey, you wouldn’t be the first person to do that. For me, these chairs represent almost complete design freedom – freedom to explore different materials, angles and dimensions, and even to create new forms (see the “Sticktionary” chapter in my book for a sample).
With this freedom comes responsibility. Though you can build whatever you like, your chair can also be ridiculed for poor proportions or its lack of a cohesive vision. And again, you wouldn’t be the first to make an awkward chair. A fair number of old stick chairs are butt-ugly. (Though many of the surviving chairs are beautiful.)
One of my recent chairs, more Welsh than anything, really. But still not Welsh.
We all have a few ugly chairs inside of our hands, so it’s important to get those shambling thickets out through our fingers so we can develop chairs that offer grace, movement and comfort. The good news here is that stick chairs are insanely quick and easy to build compared to most other forms of chairs. So your journey won’t be long.
The joinery is made with drill bits for the most part (I use mostly cheap spade bits). You don’t need a lot of specialty tools to build them (mostly a jack plane and a block plane), and you can use whatever wood that’s on hand. Yes, kiln-dried wood from the lumberyard is fine – you just have to be a little picky about choosing straight grain.
And once you’ve made one chair, you’ll find the next one will come easier and faster. In the early days it took me a couple weeks to build a chair. Now it’s less than three days. Because they are so fast to build, I can explore lots of new forms and details. I have yet to build the same chair twice (though I have tried a couple times).
As a result, the work is never boring or repetitive, even after almost 19 years of building these teenage swans.
Oh, I almost forgot to mention the last little benefit of building these chairs. Making them will open up a huge world of staked furniture for you. The skills for making stick chairs directly translate to making staked tables, stools, workbenches or really anything with angled legs.
So how do you get started?
I’d begin with John Brown’s classic “Welsh Stick Chairs.” It’s a short book, filled with fire and brimstone, history and handwork. You can read it in one sitting. It will give you a taste for the different chair forms, those both funky and sublime. And you’ll get a full dose of John Brown’s cranky and iconoclastic way of working. His writing led me to the realization that I could build these chairs out of any damn wood that I pleased.
The second book I’d read is “The Welsh Stick Chair: A Visual Record” by Tim and Betsan Bowen. This is the only book we sell that we do not publish – that’s how important it is to me. This gorgeous book will show you what the stick chair form is capable of achieving in terms of beauty. The Bowens are highly knowledgeable dealers who have seen more of these chairs than anyone I know. The text is brief and fascinating. If you aren’t in love with these chairs by the end of this book, you probably shouldn’t delve any further.
And the third book? Well that depends on how you like to learn. “Good Work: The Chairmaking Life of John Brown” by Christopher Williams is a deep dive into JB’s life as a chairmaker. It is one part biography – Chris worked with John Brown for about a decade building these chairs; he knows them inside and out. It is one part philosophy – the book contains John Brown’s best writing on chairmaking, none of which has been published in the U.S. And it is one part how-to. Chris demonstrates how John Brown built a stick chair, but he teaches it the way that Chris was taught. No plans. No exact dimensions or angles. Instead, each chair is a voyage of discovery, combining the wood on hand with a set of well-explained skills so you can build a chair of your own making.
If you are a woodworker who prefers explicit plans, then “The Stick Chair Book” might be a better choice. The book has complete plans for five stick chairs (two Irish, two Welsh and one Scottish). Plus detailed chapters on how to perform all the operations with a basic set of hand tools and a band saw. And chapters on finishing, wood selection, design and the like. Of all the books above, it’s most like a traditional woodworking text (with animal jokes).
After that, you are good to build a chair. Honestly. If I can build a stick chair, then dang-near anybody can build a good stick chair. Heck, you might even be able to build a great one.
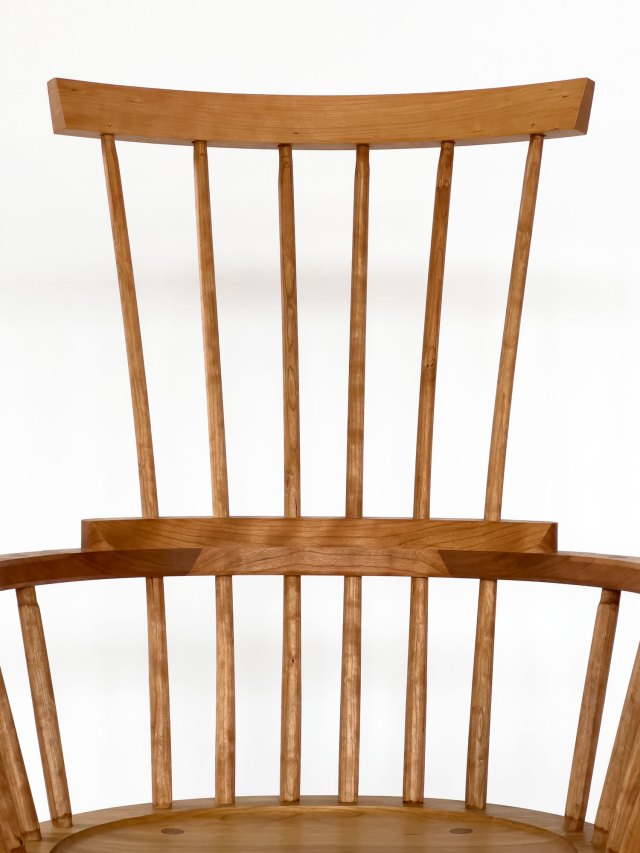
This 15-stick comb-back armchair is inspired by the famous Scottish Darvel chairs; it is one of the most technically difficult chairs I make. This particular example is set up as a chair for dining or working at a desk, with a fairly upright back at 13° off the seat.
The chair has a poplar seat. The undercarriage, arm and comb are oak. The sticks are ash. The seat is 17-1/2” from the floor, just slightly less than modern chairs. Overall, the chair is 41-1/4” tall and 27-1/2” wide.
The seat is lightly saddled and tilts back about 1” from front to back, which increases its comfort.
The chair is finished with a light green acrylic that is hard-wearing. All the chair’s joints are assembled with hide glue, so it can be repaired easily by future generations. Plus all the joints have been glued, wedged and/or pegged for durability.
This chair is being sold via a random drawing. The chair is $1,400 plus domestic shipping. (I’m sorry but the chair cannot be shipped outside the U.S.) If you wish to buy the chair, send an email to fitz@lostartpress.com before 5 p.m. (Eastern) on Saturday, Jan. 22. In the email please use the subject line “Chair Sale” and include your:
First name and last name
U.S. shipping address
Daytime phone number (this is for the trucking quote only)
After all the emails have arrived on Jan. 22, we will pick a winner that evening via a random drawing.
If you are the “winner,” the chair can be picked up at our storefront for free. Or we can ship it to you via common carrier. The crate is included in the price of the chair. Shipping a chair usually costs between $150 and $250, depending on your location.
— Christopher Schwarz
P.S. This chair is the same design as the one on the cover of “The Stick Chair Book.” Yes, you may now call me “Shameless Plug Schwarz.”
When you acquire a good tool, such as a block plane, and it really, really works, the tendency is to buy all its friends. After I bought my first No. 5 (about 1996-97), I fell in love with handplanes. To be precise, I loved all the handplanes. Every single handplane ever made or collected or drawn up in some patent document.
Most weekends I’d hit the antique markets with whatever dollars I could scrounge to buy handplanes. What kind of handplanes? All of them. At one time I owned at least 10 smoothing planes, five block planes, six shoulder planes and Justus-Traut-knows-how-many rabbet planes.
This was the start of a dangerous pattern you’ll see throughout this list, which is when I would try to buy my way into a new skill. I thought: If I bought a plow plane, I would be able to make frame-and-panel joints. But that’s not how the craft works.
If I could go back in time, I’d tell myself to buy one No. 5, one No. 3 and one block plane. Then buy additional planes only when I needed them – and after a lot of research.
Reading a Little About Finishing & Sharpening
When I started woodworking, I knew nothing about finishing or sharpening. And so I finished the pieces I made and sharpened the tools I owned in peace and satisfaction. But then one day I started to read about finishing and sharpening, and I realized I had been doing everything wrong.
So I did what the experts said to do, and I became miserable. I refused to put this finish over that finish (the book said it wouldn’t work). I bought some Japanese waterstones. And I entered a long and tortured phase where my finishes and my tools’ edges sucked. I was experimenting too much with this finishing/sharpening system or some other system. I was trying to obey a lot of gurus simultaneously.
To get out of this misery, I had to read a lot more about finishing and sharpening. And I came to the conclusion that I teach today: Learn one system. Stick with it for a long time. Refuse to change until you have mastered that system.
And always refuse to read articles that say “never” and “always.”
Five Planers; Six Table Saws
When it comes to machines and critical hand tools (dovetail saws, block planes, smoothing planes, layout tools), I spent entirely far too much money upgrading my equipment incrementally.
I started out with crap equipment – a plastic table saw and sheet-metal thickness planer, for example. And then I sold the used equipment (it wasn’t worth much) to upgrade to a slightly better table saw and planer. And so on until I ended up where I am today.
It was a dumb and expensive journey for someone who was planning on making furniture for a living all along. I should have just plunked down the $1,200 for a cabinet saw and $800 for a 15” planer in 1996. Instead, I’ve spent at least $7,000 on table saws and $8,000 on planers since then. And I’ve had the agony of buying, selling and setting up all this equipment.
Yes, there’s a chance that you’ll buy a nice $3,000 table saw and then be swayed by the Bare Bosom Goddess of Golf. But that $3,000 table saw can be sold for almost that same amount. Cheap tools, on the other hand, depreciate quickly and to nothing.
Using a Cutting List
Don’t trust someone else’s cutting list. Not from me, Norm Abram or even Jesus the carpenter. Even if the cutting list is accurate (and it’s probably not), you shouldn’t cut all the pieces out to the specified sizes and start building. Things change as you build a project. And the sizes of your parts will change slightly, too.
Make your own cutting list based on a construction drawing. And only cut pieces to final width and length when you absolutely have to.
Cutting lists are dirty liars.
Buying Lumber Sight Unseen
Every time I have bought lumber before laying eyes on it, I have been swindled. The first time this happened was when I ordered 100 board feet of cherry from a reputable supplier to make a bookcase that needed about 40 board feet.
I picked the wood up, and it was so sappy and twisted that I barely squeezed the bookcase out of the 100 board feet. Yes, I complained to the supplier. They laughed in my face and said that sap and twisting was not a defect, and that the lumber met grade. I didn’t buy from them for five years after that – not until they hired a new customer rep.
Reading Tool Catalogs on Friday Night
After I finish work on Friday, I like to drink a beer and relax for a bit before making supper. Sometimes I have two beers. And sometimes I read tool catalogs with that beer in hand. And sometimes I order stupid tools that I don’t need but look pretty cool and now I read nonfiction on Friday evenings.
Don’t drink and shop for tools. That is the only explanation I have for owning an Incra Rule.
Believing the Jig Lie
This is a corollary to the above rule. Tool catalogs are great at explaining how jigs can solve your joinery problems. Can’t cut perfect miters/dovetails/spline joints? This jig does it with ease. You will be a master in no time. Promise.
Here’s what I learned: Cutting miters is a skill. Learning to set up, use and then remember again how to use a jig to cut miters is also a skill. Both skills take about the same amount of time to learn.
Yes, there are some jigs that can speed you along if you need to do something 134 times in a week (such as making a dovetailed drawer). But those jigs are rare and are usually needed only by production or industrial shops.
Most woodworking skills are mastered after a few tries, and then you will forget about owning the jig.
Buying Sets of Tools
Sets of chisels, router bits, carving tools, templates and so on are usually a waste of money. Buying a set seems like a good idea – and you sometimes save a little money compared to buying all the tools separately. But it’s usually a lie.
I use three chisels for 99 percent of my work. Six router bits. Three moulding planes. One sawblade. So buy one good chisel/gouge/router bit/moulding plane – one that you really need. Then, when you absolutely positively can’t work without an additional bit or blade, buy another. Reluctantly. And buy the best you can afford.
Buying the Hardware at the End
I can’t tell you how many times I made this mistake. I built a project and afterward bought the hardware for it. Then had to remake the drawers or doors to suit the hardware.
The hardware typically makes fundamental changes to your cutting lists and drawings. Buy the hardware before you cut the wood.
Being Poly-Guru-ous
When I was learning woodworking, I had four teachers, plus the books and magazines I was reading. So I got pulled in a lot of directions. All of the teachers produced good work, but they all had strong ideas about how to go about it.
And so most days I felt like I was a Muslim-Buddhist-Pentcostal-Atheist. There was no consistent instruction in my life. And so it took me a lot of error and error to sort things out. In time, I gained the confidence to go my own way. But it took a lot longer because I had so many masters whispering (or yelling) in my ear.
Pick one person to teach you joinery. Or sharpening. Or finishing. Stick with that person until you have mastered the basics and can start exploring joinery, sharpening and finishing on your own.
Oh, and if you own that little Powermatic 12-1/2” lunchbox planer I sold off in 1998, I’m sorry. I hope you now use it for something it is powerful enough to handle – such as slicing deli meats.