Thanks for the questions! Comments are now closed.
I’m at the shop today, waiting for yesterday’s paint to dry (it’s linseed oil paint, so I’ll be waiting a few days beyond today, too…but I won’t have to apply more than the one coat!). So, I’m ready to answer your woodworking-, paint-, cat- and early modern literature-related questions. Chris is on vacation…so while he might chime in, I hope he does not.
Type your queries in the comment field below, and I will do my best to answer them. (If any are about chairs, I will likely be reading from the Book(s) of Schwarz to answer…so maybe check there for yourself first?) Comments will close at around 5 p.m.
– Fitz
p.s. Unlike Chris, I do not like to get up early…so you may not see any answers from me until well after this post goes live.
Good morning Megan,
What particular brand and colour of linseed oil paint is that?
Cheers,
Mattias
Hi Mattias! It’s Allback, in Old Red.
Good morning Fitz
Do you know of a book or type study of Windsor chairs? I have one that was my grandparents and could be 100 years old. I brought it from our farm in Lorain county Ohio to West Virginia. I have not been able to find it searching the Internet.
Thanks,
Dennis
The best education on windsors and their typology is in the books by Nancy Goyne Evans. Check your library. They are not inexpensive.
Nancy Goyne Evans’ book “American Windsor Chairs” packed with history, biographical info and above all hundreds of photos of the old chairs. I have a copy in excellent condition that I can part with at a reasonable price , if interested my email is getkickajob@gmail.com
Do you use a parts cart or an ad hoc table made of sawhorses or just any horizontal free surface to hold parts for a class as you are milling them? If it is a cart, where does it live in an orderly shop when not in use?
We have a heavy duty rolling cart (plastic) that we bought at Harbor Freight.
https://images.app.goo.gl/ZRKCLv484tod77JN6
Brian Boggs Fine Woodworking article shows a nice design for a cart.
https://www.finewoodworking.com/2022/10/31/build-a-versatile-shop-cart?oly_enc_id=0673B6179345D6E
I bought a set of the design curves. Do you recommend I apply a finish (which one) or leave them as they are. Thanks!
No need. You’ll likely want to be able to make tick marks on them in pencil to mark start/stop points and the like.
I wanted to take a minute and thank you and Chris for what you do. You two have been great inspirations and instructors to a beginning woodworker like myself. I’ve built sets of stacking saw benches, Dutch Tool chests, and have now gone down the rabbit hole of chair building. This journey would never have started, or likely lasted, without the influence of you two… Thank you.
Do I go with an old Stanely #45 Plow plane in good shape with lots of parts or another quality brand that is new for about the same money either a lot for me.
Hmmm…. I might be the wrong person to ask about this. I’m fond of a warranty, so to speak. If you buy new from a reputable maker, if anything goes wrong, they’ll fix it. But if the vintage one is in great shape… I’ll bet it’s nicer looking. (So that didn’t help at all!)
Rolf, i have numerous Plow planes and the Stanley 45 and Record 495 are multi-function do it all planes, which they can do but because they do so much learning how to set them is complicated and a pain. Typically, I find myself just using a plow for making rabbets, grooves, and decorative beading. I highly recommend choosing a Stanley or Record 50 plow. Get a nice ventage one off ebay Britain. Make sure it includes all the cutters. Will still be cheaper than buying new and once you sharpen the blades works great
What causes cup rings or water marks on furniture?
I built a cherry bookcase finished with shellac and wax…. It got cup rings when someone left a sweaty drink on it.
Nothing else I’ve built has fallen victim, but also nothing else is finished with shellac. Is shellac the culprit?
Lots of things…but most likely, it’s trapped moisture. Is it possible the ring is in the wax? Try wiping it with mineral spirits – if that works, then simply re-apply wax.
Shellac is a film finish, so as long as it’s in perfect shape, it should be impervious…but nothing is ever perfect. I made a ring disappear from old shellac following Joshua Klein’s method shown here: https://www.finewoodworking.com/forum/shellac-white-rings (the hand sanitizer approach).
Hi Megan, sorry to post a chair question, I have not seen an answer in the video about the Gibson chair. So either me or Chris missed the part where the Arm gets pinned to one of the long sticks. I noticed the pin in the money shots of the chair at the end and also in the pictures of the post where Chris sold both the chairs from the video. Is this traditionally done on all the chairs? And can you describe a little more on how it’s done?
Thanks in advance!
You can peg the arm to the post. Or not. I do it with a mini Miller dowel.
I’ve not seen it on an old one. It is something I feel compelled to do
FWIW from some random guy who just built one Gibson chair, I didn’t use pins. If I grab the back of the arm and pull up and down it budges a little. In normal use it’s completely solid. When people lower themselves into or push themselves up from the chair, their hands are between the two front sticks so that’s where all the force goes.
My friend is making a wooden towel rack to utilize in their bathroom. Any suggestions on finish?
How likely is your friend to inspect the finish and apply another coat as needed? If the answer is “not at all likely,” probably polyurethane (which I do not like…too plastic-y) among easy-to-get and relatively easy-to-use finishes. Or lacquer or marine varnish. But these are all a pain to repair if/when repair is needed – gotta sand it back and reapply.
I’d maybe use a couple coats shop-made wiping varnish (it’s what I used on my bathroom pieces): https://blog.lostartpress.com/2020/01/23/our-shop-finish-recipe/ – it’s easy to apply, and I’ve been able to touch up a few places where it got scratched.
But I don’t know a lot about finishing – I pretty much stick to three these days: paint, oil/wax and shellac.
Thanks Fitz, I’ll pass this along.
Hi! I’ve been sharpening lately using a honing guide as suggested on ‘Sharp’. I love the accuracy. However, the grip for the thin chisels on the lower part of the guide doesn’t seem to be completely square or flat, even in the more expensive guides (Veritas in this case). I’ve tried pushing extra hard on the side that makes less contact, but still the result is skewed… any advice? Thanks so much, greetings from Netherlands.
Is this the new Veritas side clamp honing guide? It’s supposed to securely hold chisels as small as 1/8″, but I haven’t tried it. Is there possibly a drop of paint in the ways that needs filing/removing? That’s a common problem with the cheap Eclipse clones…but I can’t imagine the Veritas having that issue. Without seeing the problem, I’m not sure of a fix. But I’ll be Lee Valley customer service would help you out.
I have the Veritas side clamp guide and my cheap chisels tend to skew. I’ve looked closely and it appears that it is because the lands on the chisels are not identical on each side and this affects how they fit into the angles sides of the Veritas guide – they just won’t sit straight when the guide is tightened onto the chisel.
Sometimes pressing harder is the culprit. I’ve found that a lighter touch allows better control. Your hands are still part of the equation and with too much effort they can thwart the control offered by a honing jig.
Hi, Megan, thank you for being available once again to answer all of these questions. (I read every one every week for the vast knowledge you all possess! Quite a treasure trove.) My question is: Chris’s plans for the placement of Crucible holdfasts, based on an historical pattern, he states in the instructions, is 16″ apart along the length of the benchtop. Since the reach of the beak is 7″, why not 14″ apart? That would of course mean that the whole length of the top would be reachable by a holdfast from either direction. I must be misunderstanding. (The instructions also don’t state how wide the top in the diagram on the instruction sheet is but I’d guess it’s probably 20″-22″, after measuring the proportions in the diagram with dividers.)
There’s a bit more about them here: https://blog.lostartpress.com/where-to-locate-your-holdfast-holes/
But I think the answer is that the holdfasts don’t need to reach each other/the benchtop;they need to reach the workpiece or appliance they’re holding, which are moveable.
Hi, Megan, yes, that link is to the document to which I was referring. I was not thinking of having the holdfasts reach as to their providing maximum coverage of the benchtop and thus maximum flexibility of where you put the workpieces (or appliance). And I realize that the fewer the holes, the less dust falling underneath the bench (where workpieces or tools might be). Anyway, just was curious. Thanks for the answer! Regards, Garret
Hi Garret,
When I built my bench, I used as a starting point the holdfast pattern in The Anarchist’s Workbench, which is essentially the same as the one mentioned here, except it has the holes on 15” centres rather than 16”.
What I did before breaking out the big drill and committing, was to make a set of 1” rounders from coloured cardboard that I attached to the bench top with double-sided tape in order to test various permutations of the pattern. With a couple of pieces of scrap to represent the reach of the holdfasts, that gave me a pretty good idea, plus it helped make sure my pattern would miss the legs and the hardware and cavity for the wagon vise I (non-anarchistically … or not? disobey me!) I had installed.
During the process I was quite enamoured of the idea of 13-1/2” centres, rather than 15”, precisely because of the reach of the holdfasts, but in the end went with the latter, because I could not get the 13-1/2” ones to fit symmetrically – something I am (insert judgement choice) enough to care about … just like some people clock their screws (which on the other hand I usually don’t) – because I was unable on the day of drilling to think outside of a certain mental box I had created for myself.
The next day, I came back down into my shop and immediately saw what the solution should have been to make 13-1/2” work. Cue slapping of forehead and uttering of choice language.
Would it have been better on 13-1/2” centres? No real idea, because those holes are 15” apart, and won’t move, so that’s what I’ve worked with since, but in any case I have not yet come up against a situation where I just couldn’t solve the work holding puzzle, so basically they turned out to be fine.
But as I said: mock’em up! Put down 1” rounders and play around with dummy holdfast arms and see what it looks and feels and makes you think like!
Cheers,
Mattias
Have you ever used soft wax over an old finish? I was thinking of putting it over a fairly worn mcm finish but don’t really want it to get gummy if the oils don’t penetrate at all. I also don’t want to strip and refinish what isn’t terrible but just needs a bit of blending the worn/unworn parts. If not do you have any kind of recommendation for something else, maybe wipe on a little Maloof finish instead? Thanks!
I have not. I’d try it in an inconspicuous place and see what happens – easy to wipe off if it doesn’t work. Is it a clear finish? If so, it’s possible the oil/wax will get into any exposed wood (i.e. the finish is completely gone) and help to hide the damage. But you might be better off trying a colored paste wax, says Bob Flexner in “Understanding Wood Finishing,” if you need to match a color.
Odds are fairly good that the finish is lacquer, which melts into itself, so you might be able to repair it (again, I’d direct you to The Book of Flexner for instruction)
One thing you might try is “padding lacquer” of which most brands I am familiar with are shellac in a lacquer thinner solvent. Lightly dampen a cloth with it and wipe parallel to the grain light passes.
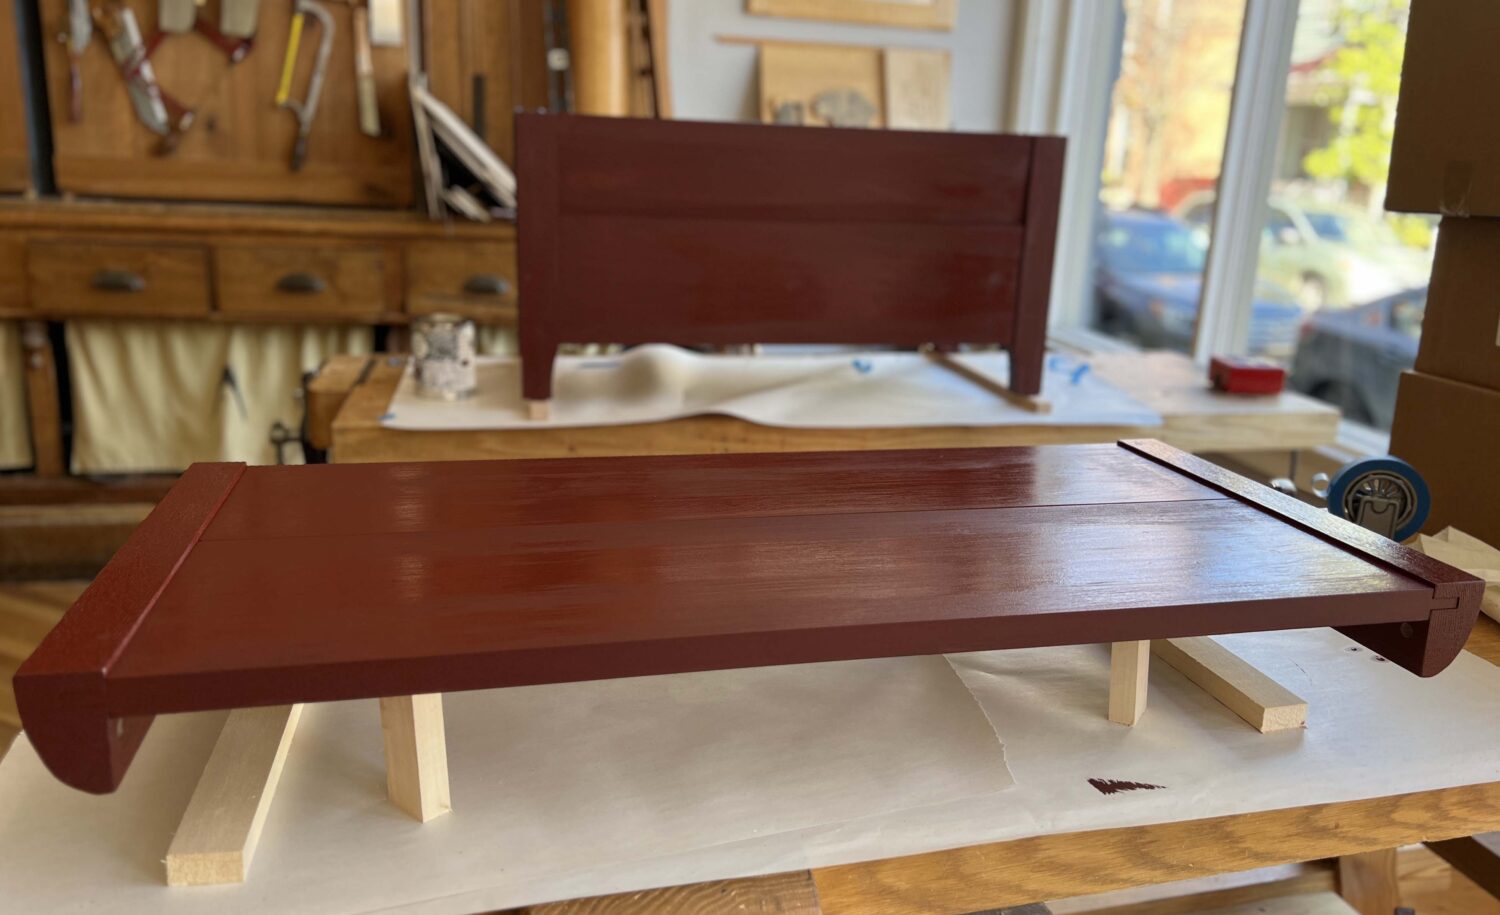
Just finished painting a stick/side chair in maple. I was using it to try different rake and splays so it ended up with four sets of plugged leg mortises and needed to be painted. I used Allback Holkham green. First time with linseed oil paint. Wow, so much faster than milk paint! I gave it a coat of Allback linseed oil a few days before I applied the paint. Went well, way darker than I expected. Way thicker than I expected as well and the brush strokes were very noticeable and did not level out at all.
I checked back with the Comb-back in Green you previously posted ant the same paint on that chair was noticeably thinner. Did you thin the paint with linseed oil or mineral spirits? Perhaps the elm and oaks stronger grain just shows through better than the maple? Waiting (a week it looks like) and sanding and burnishing like Galbert’s milk paint techniques? Hmmmmm. Any help on getting a thinner brush free look with the Allback would be greatly appreciated. It is definitely replacing milk paint for me
After some experimentation, we’ve found that thinning it about 10 percent with odorless mineral spirits helps it to lay out flat. (But I feel dirty adding the mineral spirits…). And really, I think the key is to sweet-talk your hardware/paint store to shake it up for you (handing them a little $ helps, too!). It needs to be thoroughly mixed.
Thanks so much. Mineral spirits….dizzy and dirty. I’m using the small glass jar so shake, shake, shake I guess. I was pleasantly surprised when the entire chair only used 10 to 15 percent of the tiny jar! Being repetitive, but thanks again. This Saturday Open Wire is a great resource.
Any chance of book authors (like Whitney Miller) showing up to the open house for some book signings? Any special guests showing up? How did you do with the tool collections for Jerome Bias’ class?
I don’t know if any out-of-town authors or special guest are planning to attend – if we hear anything, we’ll let you know. And we are now well-supplied for tools for Jerome’s class – y’all are so generous. Thank you!
I just bought some odorless mineral spirits and it’s white. Is that the way all of it is? It’s made by Klean Strip.
Thanks,
The Klean Strip in the green and blue can is milky; the orange and blue one isn’t. I don’t know this to be true, but my guess is that the green one is at least a little more environmentally friendly. I haven’t tried mixing that one into linseed oil paint, I’m afraid, so if that’s the concern… my best suggestion is to thoroughly mix the paint, decant a little into a separate container and see what happens to the color with the addition of the milky stuff. Then let me know!
Not for milk paint but to mix with blo and poly for a wiping varnish. Seems to dry clear.
Thanks,
Hey bndsley, I’ve been down that road with wiping varnish and did use it on a project. It did not seem to have any effect on the outcome but it definitely handles different. First, it (the milky stuff) doesn’t seem to have as much thinning power and second, it sort of separates from the mist quickly. The leftovers are unusable after a day or so. I will not use it again for anything other than cleaning brushes.
My understanding is that to make it more environmentally friendly, water (yes) is added and emulsified to simply dilute the amount of petroleum distillate. I could not get any varnish supplier to say they would recommend to use it with their product.
Here is some good information https://www.popularwoodworking.com/editors-blog/say-green-say-give-facts/
I would like to read the article, but PopWood won’t let me in any longer.
The LAP team seems very (insanely) busy. When do you make time for reading?
Asking for a friend whose rate of acquisition exceeds rate of consumption….
Thank you.
I can’t speak for Chris on this, but I have to read…can’t go to sleep at night without a chapter or two down. And I don’t sleep much; I guess that frees up some time.
Thank you
Good morning, and thanks once again Megan & Chris for doing this.
I’m wrapping up assembly on a Little Free Library made from red oak, with cedar for the roof and bits of other hardwood as trim. (My wife requested the LFL for her birthday, and chose the look & design.) We’ll be painting the inside, but my wife would like the exterior to show the wood itself. I’m thinking marine varnish is the way to go (readily accessible here near the Chesapeake) but is there a different finish you’d recommend? Obviously, this is going to live outside. Thanks!
I think marine varnish (from a chandlery, not the home center) is the way to go for this one. It’s the most protective finish other than paint.
Thank you!
A milk paint question for Megan or experts in the crowd.
I’m using a real milk paint product following traditional methods on a newly completed chair-
First coat of red had a bonding agent per instructions followed by second coat of red. Standard dry times and then two coats of green. All was well -put a coat of 1:1:1 varnish, blo and mineral spirits.
When wiping the varnish off it took too much of the green away. On the seat only (pine) and I don’t like the look. It’s a green chair with a 80% red seat.
I’m being specific so you can choose to answer briefly.
My plan is to allow the varnish to cure- sand the seat only with 220- apply a couple coats of dewaxed shellac. Follow that with more of the green and a binding agent- this time I’ll do three+ coats.
So the obvious problem is …milk paint over an oil finish. But I’m hoping that with proper sanding and shellac and paint bonder it should work well.?!
I guess a vote of confidence for the plan …or an authoritative thrashing with an expert reason to do another way would be ideal.
I hope this is clear enough to reply.
Dave
I do not know enough about milk paint to instill any confidence for your plan. But, I do know that milk paint sticks to dewaxed shellac…so it should work. You said “standard drying time”…according to whom? The one dictum burned into my head from Pete Galbert’s instruction is “Thou Shalt let it dry…fully… at least overnight.” (https://www.petergalbert.com/blog/2018/5/26/milk-paint-10-commandments)
Thank you- I’ll give it a go with the confidence of a fitz- level backing!! Also thanks for the Galbert link.
One dream I have is building a set of sleigh beds for my family – and lately I wonder if it is a realistic dream. The design seems to demand a lot: a bed would need to stand up to a ton of abuse, be attractive, and also have knockdown joinery so it can move to a subsequent home. This is probably why the antique beds from my grandparents’ farm had machined hardware — and/or glued joints that prevented the beds from moving when we sold the farm. Are there any designs or approaches you might recommend for using hand tools to build a knockdown sleigh bed?
The side rails can be connected to the footboard and headboard with bed bolts, then you get to have the fun of shopping for the perfect antique bed bolt covers! (Or you can buy new ones, of course.)
As to the sleigh bed itself, Chris Becksvoort had a nice one (that sounds slightly less fussy than others I’ve seen) in Fine Woodworking: https://www.finewoodworking.com/issue/1997/06/issue-124
I am starting a Shaker table project. The plans are for a table 29″ wide and 16″ deep. It’s the one from Chris’s PWW (https://www.popularwoodworking.com/article/white-water-shaker-table/). I would like to extend the table to 45″ but keep the depth unchanged. Will this table sag in the middle and do I need to beef things up, and if so, where?
Nah. The aprons will keep the top flat with no problem.
The top is fully supported by the wide aprons, so I think you’ll be fine at 45″ as far as sagging. (But if you want to add more support just for fun or future reference, I suppose you could put a crosspiece to the right and left of the drawer, dovetailed into the top of the front and back rails…but overkill in this case)
Good morning, Megan – thanks as always for taking the time on these!
Do you foresee another ATC class in Covington in the latter part of the year?
Also, any tips or advice on introducing a resident cat to a new cat or kitten? Olivia and Toby have me inspired to try finding a friend for my cat.
I do foresee an ATC class in Covington in the second half of the year (stay tuned…until the Feb release of those classes).
As far as introducing cats… I’m quite sure Olivia would prefer Toby disappear (but she’s attacking him now instead of my ankles, so yay). But there’s been no blood or fur flying, and they take turns being the aggressor, so I think it’s a frenemies situation. I’m hoping the cold weather (I keep my house at 60° in the winter during the day) will bring them closer together. But mine is not (yet) a rousing success story.
But here’s the method I followed: https://icatcare.org/advice/introducing-an-adult-cat-to-your-cat/
Thank you!
I will be finishing a table top in cherry made up of about six boards which I arranged based on the grain pattern. I am concerned that they will have significantly different color when finished. While I understand cherry ages and the boards will likely have less contrast over time is there a finish I can use to minimize the difference early on that won’t obscure the beauty of the wood as it ages?
The key to color matching is to use boards from the same flitch — sequential if possible.
One way to minimize color differences in the short run is applying a dye before the finish. Or a glaze over the finish. The added corporate tends to harmonize things.
At times I have used toner (color suspended in a spray can finish) to bring a light board more in line with a dark board.
All these approaches are time consuming. Usually I apply finish, am horrified by the result, let it be and I’m about a year it looks fine.
What Is the Airspeed Velocity of an Unladen Swallow?
Is it carrying a coconut?
Just completed my 4th stick chair, and 1st in white oak finished with soft wax made to the Stick Chair Book recipe.
I’m thinking about applying black bison tudor oak wax in addition.
Does the soft wax need to fully cure before applying the black bison wax?
How long until the smell of the black bison dissipates? It is nowhere near as pleasant as the soft wax!
You can apply the bison wax the next day. And the bison wax takes about a week for its smell to disappear
Finish question – I’m heading to the lumber yard with The American Trestle Table article in hand. Oak or ash likely so it’s hard as hell.
https://www.popularwoodworking.com/article/american-trestle-table/
This table will see all manner of hard, daily abuse. This is fine, but I wanna be able to renew it (from the expected destruction) without stripping/sanding/etc.
Renewable finish thoughts? Oil, oil/varnish, soap, shellac, sorcery?
We (finally) sanded the failed lacquer off Chris’s a few months ago; it had looked pretty bad from almost the day he brought it home, thanks to a nail polish remover incident. Now it has a soft wax finish (buffed out with buffing pads for an ROS, as you’ll see in the Anarchist’s Gift Guide, which starts tomorrow on the blog). It looks awesome. Will it need upkeep? Yes – but it’s safe to use and easy to do – simply add another coat and buff it off.
Thanks! I’ve done some wax + ROS buffing and gotten great results. I’ll test this on some scrap. Really, I will test it on scrap, promise.
Good morning,
I’m not much of a woodworker but I do like to read about the history, tools, and design of the various aspects of woodworking (those carved sigils in American Peasant are especially cool): are there any LAP that spring to mind that have a good amount of that kind of thing?
Thanks in advance, appreciate everything LAP does. Excited to see the new place when it opens!
I think the Hayward vols 1-4 are a great read from a woodworking history POV, though also full of practical advice, of course. For straight-up reading enjoyment though, probably my favorites of ours are “Honest Labour,” “Calvin Cobb,” “The Handcrafted Life of Dick Proenekke” and Nancy Hiller’s “Shop Tails” and “Making Things Work” – though those aren’t heavy on pre 20th-century history. Also, “Hands Employed Aright” about Maine’s Jonanthan Fisher – that’s a good older history one!
Hello Fitz and thanks for sharing your smarts. I read and learn each week. I have beginners question. My eyes are not that young anymore so i have trouble seeing knife lines. I have seen where you have darkened them with pencil and have tried that but it seems like i work to what i see and that is the pencil line. After lots and lots of practice i can get a straight cut. ( thanks to your old how to cut straight video) SO, is working to pencil line acceptable or am i just fooling myself by not striving for knife line perfection.
Lots of people work to a pencil line – as long as you know how thick the line is, and where to cut on it, no problem! (And that’s pretty much what I do with the .5mm pencil line in a knife line; I cut away half of it.)
The thing I’m slowly learning about knife lines and my aging eyes is that the knife line wants to be deep so I can use it for registering the next tool (typically a chisel), and that a deep knife line helps make the double pencil line that Wearing talks about. I make a knife line and then go over it lightly with a 2mm lead or carpenter’s pencil such that I color the two edges with a gap between. Then I try to remove only one of the pencil lines with the saw.
Thanks as always. Two quick ones, if possible:
How essential do you consider drawbore pins?
Out of curiosity, what margin of error do you personally account for when sawing to a line?
They are not essential in most of my work…but they are awfully useful if you do, say a lot of drawbored joints…might have kept Chris out of trouble last week had he used one to test a joint 😉 (https://www.instagram.com/p/CzPCMk3un6I/) I use one in my parallel guide for my bench at home…so at least always know where it is if I need it!
As far as sawing, it depends. With cutting to rough size? maybe 1/8″ to 1/4″? For joinery, none.
Good morning,
I have a quick question about storage of the Piggly no Wiggly glue.
Does it need to be refrigerated like the old brown glue?
Thank you
It is shelf stable, but it will last longer if you keep it in the fridge. Just like OBG.
Is it worth adding a butterfly key over a large knot in a tabletop or should I just do epoxy? Do you only add when splits are present?
I’d be inclined to leave it alone until/unless the knot is loose, then I’d probably use CA glue on it. If I wanted to add a butterfly, I’d do it underneath. But to be honest…if a split started, I’d be more likely to simply slap a mending plate across it underneath…
Where do y’all buy your Allback linseed oil paint? Lee Valley sells it but I get regional block when I try to purchase it from WA.
Huh. Try Sage Restoration: https://sagerestoration.com/collections/pure-linseed-oil-paint.
I just received and read my copy of “Grandpa’s Workshop” – it’s as wonderful as the many blog posts led me to expect it to be. And I laughed as I went to shelve it – the detail of orienting the spine text in the European fashion is a nice touch! Surprising at first, but not unexpected from LAP. Thanks.
Good morning, Fitz – first, thank you to you, Chris, and the LAP crew for the volume of help and insight you’ve provided me over the years through your writing! LAP process question for you: if I’d like a “Sharpen This” sticker for my book and a signed plate from Chris for my Anarchist’s Workbench, may I make the request in the same letter and same SASE?
I’m setting to work on the milling of the lumber for my benchtop soon. Just got a pile of old I-bar clamps that should do the trick for glue-up!
Thank you again for everything,
-JP
Of course – just stick a note inside to tell me you want both, please!
I have a general hand plane, blade sharpening question, sorry if basic. When should I “curve” the edges of the blade, so as to not have gouges at the edges? All the time? Maybe a better question is when would I need it flat and not beveled/curves at the edges?
Many Thanks!
Kevin
I have cambered blades on all my bench planes (heavier radius on the jack, less on the jointer, slight, almost non-visible-to-a-straightedge curve on my smoother). I’m sure others will disagree with that approach.
Thanks for the input, I am fairly new at this and just trying to get sharpening right, but of course started with a straight edge and was forlorn at the gouges coming out in the wood.
Megan,
Any update on the DTC book?
I am trying cut nails for the first time, and had some questions.
When using cut (tremont nails), do you normally drill clearance holes or larger pilot holes in the top board (pine)? I have issues with the wedging action breaking out a chunk of the end grain. You mention this in passing in a fww article from a few years ago.
Is this the exception or the rule in 3/4 pine case sides (eg on a DTC)?
PS: I am really enjoying the book case project on the WW guild. Excellent work as always!
Soon…very soon.
I don’t usually need clearance holes with cut nails (just pilots of the correct size)…but that close to the end, especially if using the home center T&G boards, yes, a clearance hole in the top board might be necessary to avoid punching out a little to the side. However, if that happens, plane it flush and no one will notice. The nail head will keep the board in place, so it’s not a problem.
And thank you!
What version of Sketchup would you recommend for the hobbyist woodworker?
I’m going to have to wait for someone else weigh in here; I haven’t used it much since I left my last job…and that’s coming up on 6 years – I’m sure it’s changed a lot since then
Hi Dave,
We use SketchUp PRO, but that’s because we have to for our workflow and communication process. I’d start with the Free program (which kinda blows). If you like that method of modeling, I’d upgrade to SketchUp Go.
Hi Chris, Megan,
I have some quarter saw oak that I cut to rough length and moisture content by my pinless moisture meter has remained in the same mid to high 30% range for 18 months. Have you ever seen this happen with wood?
More detail. I bough some kiln dried quarter sawn with oak that is essentially 2×8’s in dimensions from a reputable lumber store I shop at frequently. When I got it home, I measured it with my pinless moisture meter. Most of it was mid to high 30 percentages. Though annoying, I decided to keep it rather than return it and cross cut it to rough length and push off the project. Every six months I’ve measured MC on a number of the pieces and wrote the date and MC on the wood. After 18 months, most of it has gotten down to the low teens MC which is where wood ends up in my shop. A few pieces that were rough cut to length (ca 2 to 3 foot long) has remain unchanged. I’m puzzled. I’m probably a year away from using it and by that point it will have been 2-1/2 years since I purchased this eight quarter stock. I will likely try and not use these atypical pieces but if I need them, I will use them.
Many thanks for the help.
Sincerely,
Joe
I will await Chris on this one (since he’s obviously not fully on vacation…), as I really don’t know, but it is curious!
Paul Sellers has a discussion here that I found informative on drying/acclimating wood.
https://paulsellers.com/2023/11/drying-down-or-drying-up/
I almost never do this, but I need someone to translate and summarize that post. I can’t follow it.
Hi Joe,
Something is stopping the moisture from leaving the boards efficiently. Are the ends painted? Lumberyards do that to help identify species. The paint slows the migration of moisture from the boards (most moisture leaves through the end grain, which is why it takes so much time).
Or the environment is slowing it down. Airflow, relative humidity in the room etc.
Also, wood is weird. And if it’s white oak, it can take a long time to dry.
Good afternoon, have I missed an update on the shop/warehouse cat(s) for the Anthe building? I know that the building fought you all quite a bit and this may have slowed the acquisition of said mousers. Any update?
Chris just posted on Instagram that we’re not going to be able to move our offices to the third-floor anytime soon. So no lobbying for a cat there until I’m there to take care of it more often!
I’m working on making the Gibson chair based on the video series that was recently released. Foolishly, I am starting by looking at the cutlist. I will rewatch the whole video series probably before doing any more cutting (I had to crosscut some to fit the wood in my car) but I have a couple basic questions:
What are the back layers? Maybe additional parts of the arms or something?
For the two arm posts, there are two sets of notes that are contradictory, as far as I can tell???
Anyway, would appreciate clarification but will defer to the video.
If you wouldn’t mind asking again next week… Chris is far more familiar with that project that am I
The “back layers” are the three pieces of wood that you glue together to make the backrest.
For the arm posts, TOE means tenon, one end. So there is a 3/4″ tenon on one end and a 1″ tenon on the other end.
There is an error on the note for the long sticks. It should say TBE (tenon both ends), not TOE.
I just got a set of your design curves in the mail, a couple of days back. For the life of me I don’t know why I didn’t buy them when they were new. But I’ve been fiddling with some designs and adaptations since they arrived, and I like them very much.
Do I need a question? Perhaps that was it . . . Do your cats like it when you read to them? I was guessing Chaucer. Or Stephen King.
They are fond of T.S. Eliot’s “Old Possum’s Book of Practical Cats,” but Toby prefers it when I sing to him (he likes Dar Williams songs)
I just saw her play, back in June! At the Cabot, in Beverly.
When mine get too contrary with each other, I sing, and they run in opposite directions. “I Will Always Love You” works every time. The Whitney version. They like Dolly.
You may want to defer to Chris but as this is a question of aesthetics I expect your opinion to be equally useful.
I am building a pair of staked backstools (Anarchist Design Book chapter 16) and was laying out the crest rails when I realized I was recreating the prototype.
Was the change to the tighter radius of the steam bent crest rail based on aesthetics? Do you find the prototype substantially less attractive? Or in some other way less desirable?
Is Bean your cat that has three legs? Is so, do you know what happened to him? We have four black cats. They look a lot like yours. We love them.
Bean (yes, three legs) now lives with his “mom,” Katherine. Now that she’s a college grad and living in her own apartment, she – understandably – wanted her cat with her! We miss him in the shop, of course.