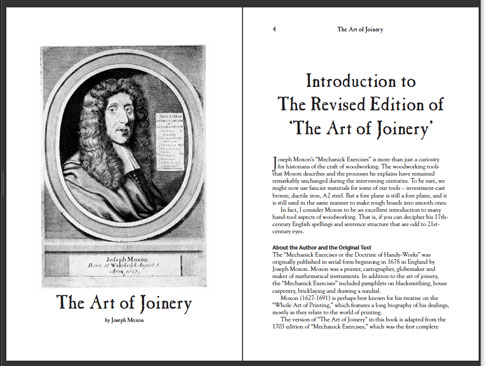
As our supplies of Joseph Moxon’s “The Art of Joinery” began to diminish this year we had to decide if we were going to reprint the book or simply let it disappear like the previous editions of this landmark woodworking text.
Reprinting a book is expensive and it would probably take us 10 years to recoup our investment on a second press run. So we decided to take a third path: a downloadable e-book.
So for the last two months I’ve been revising and expanding our 2008 edition into something that you will find useful to have on your computer.
This 147-page electronic book is in pdf format, so you can read it with Adobe’s free Acrobat Reader program. You can search the entire text by keyword. And you can jump to any of the sections in the book using embedded bookmarks.
If you already own the printed version of “The Art of Joinery,” do you need this digital edition? Probably not – unless you are intensely curious about early woodworking practices (like we are). Here’s what you’ll find in this revised and expanded digital edition:
• The complete text from Lost Art Press’s original “Art of Joinery” book, including the lightly edited original text (we eliminated run-on sentences and replaced the “long s” character with a modern Roman “s”). The text has also been revised to fix typos, plus it reflects new information we’ve learned since 2007, including details on Moxon’s workbench.
• New images from the same time period. It’s been widely reported that Moxon’s plates were taken from André Félibien’s “Principes de L’architecture…” (1676). We reproduced nine full-page plates from Félibien’s book so you can compare for yourself. We have also included five tool illustrations adapted from Randle Holme’s “Academy of Armory” (1688). While we don’t possess rights to the original images, we had five of them reproduced in detail by an artist and present them here so you can see what Holme calls a Tennant saw.
• The 1703 text from “The Art of Joinery” in a very close original form. This includes the odd spellings, run-on sentences, the long “s” character and the other peculiarities of 17th-century English. We reset the text in Times New Roman and kept it as close to the original as we could. The only thing that’s not reproduced are the italics Moxon included.
You can order this instant download now from the Lost Art Press web site for $7. After your checkout process is completed, you will be taken to a special page where you can download the file with a single click. You’ll also receive a confirmation e-mail with a specially coded link to the file.
The file is about 5 megabytes, so we don’t recommend it for dial-up customers.
If you have any technical problems, you can send an e-mail to sharon@lostartpress.com, who will make sure you get your download in a timely manner.
— Christopher Schwarz