Last month we built a bunch of Irish stick chairs with Rex Krueger, James Wright and Eoin Reardon, and they have begun posting videos about the process.
Here is Rex’s new video on the adventure. It gives a great overview of our week – including the tacos and pizza.
James Wright – Wood by Wright – has posted a few great videos that show how we built the chairs using a variety of methods, including a frame saw and a band saw.
Here’s the main video from James. He also gathered up all his reels here. After the chair build ended, Rex and James headed out to Homestead Heritage (my favorite tool store). Then James and Eoin Reardon went on a literal odyssey across the Eastern United States to see tools and hand-tool woodworking.
Here we have one of my seven-stick comb-back chairs set up for lounging by the fire. It is finished with earth pigments, purified linseed oil and soft wax. This is the chair form shown on the cover of “The Stick Chair Book: 2nd Revised Edition.”
I’m selling this chair for $1,900 via a random drawing; details are below. That price includes crating and shipping to anywhere in the continental U.S. But first, some details on the chair.
This chair is ideal for relaxing by a fire. The back sticks tilt at 20°, with the seat tilted an additional 5°. The seat is 16-5/8” off the floor at the pommel, but I am happy to cut that down for shorter sitters.
Like all my chairs, this one is assembled with animal glue, which allows for easy repairs in the (far away) future. All joints are glued and wedged with local hickory for strength.
The chair’s finish is one I developed so the chair will immediately look at home among antiques or in an older home. The chair is colored with earth pigments – soot from the fire and red dirt from Ercolano, Italy. Before the pigment bonds with the wood, I gently wipe away some of the pigment on the seat, arm and combs. This is to suggest some age on the chair, but it is not intended to fool anyone. It’s just too subtle.
After the pigment and oil has polymerized, I coat the chair in soft wax to provide some sheen and some protection. The finish is entirely non-toxic.
Like all my chairs, the parts are shaped and fitted using hand tools. That means the surfaces are smooth where they contact the body and a bit textured on the underside from the hand tools. This is how these chairs were made, it’s how they have always looked and it would be odd to sand the secondary surfaces to a mirror.
How to Buy the Chair
I’m selling this chair for $1,900 via a random drawing. That price includes everything – shipping and crating to anywhere in the lower 48. If you wish to buy the chair, send an email to lapdrawing@lostartpress.com before 3 p.m. (Eastern) on Friday, December 12. Please use the subject line: “Stick chair.” In the email please include your:
U.S. shipping address
Daytime phone number (this is for the trucking quote only)
If you are the “winner” the chair will be shipped to your door. The price includes the crate and all shipping charges. There are no additional charges. Alternatively, the chair can be picked up at our storefront. (I’m sorry but the chair cannot be shipped outside the U.S.)
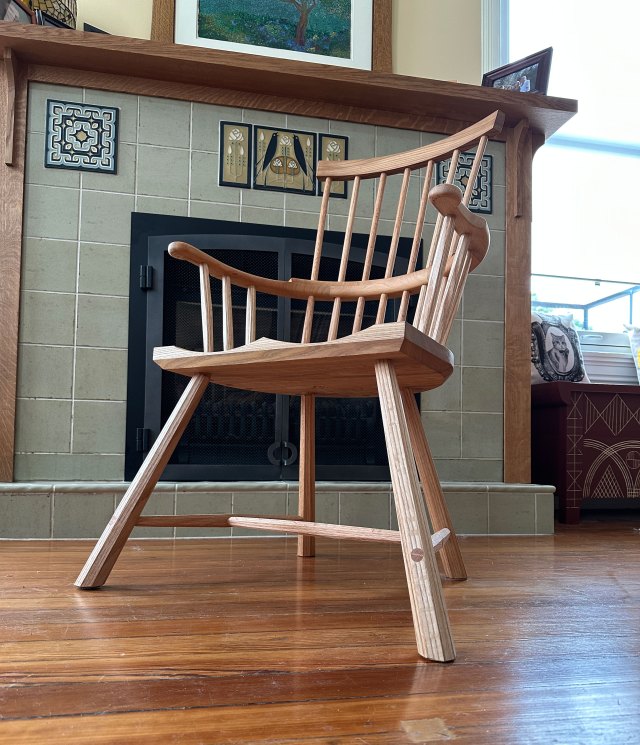
This low-slung Irish armchair is the first chair I’ve finished in soot, dirt and oil – a finish that gives the chair a deep brown-black-red color that you find on old stick chairs.
The chair is made entirely of elm (both red elm and American elm) and is one of the most comfortable chairs I make. The back is tilted at 20°, and the chair’s backrest cradles your shoulders to allow hours of comfortable sitting.
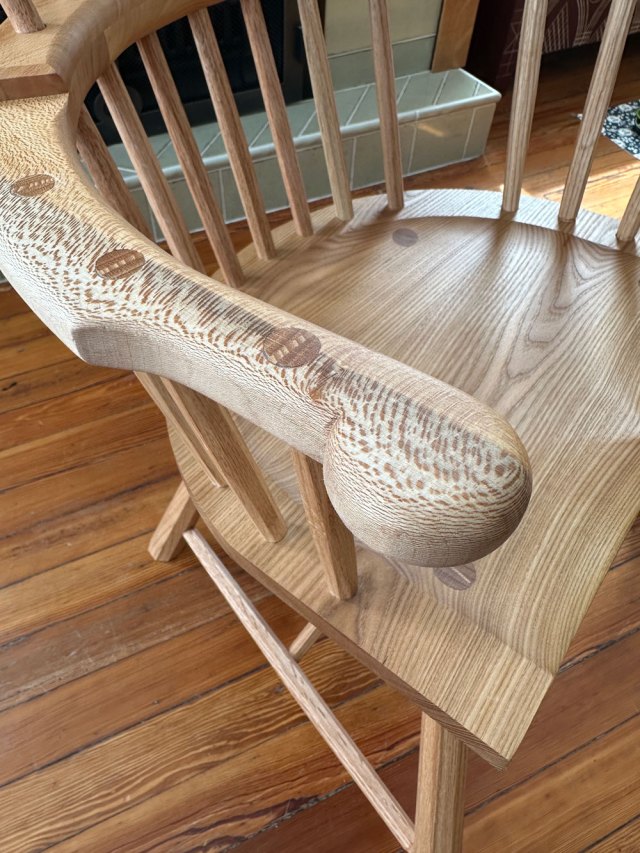
Up close, the finish shows the wood’s grain.
The finish is a combination of natural, non-toxic ingredients: soot (carbon black), red dirt from Ercolano, Italy) and purified linseed oil. The finish is low-luster, and it is designed to look better the more it is used. It is topcoated with our Soft Wax 2.0, and will wear gently over time. I developed this finish to create chairs that look correct in a home filled with antiques.
Like all stick chairs, this one bears imperfections that mark how it was made. The leg angles are not exact because they were drilled by hand and without guides. The arms and all the sticks were shaped entirely by hand with spokeshaves, planes and rasps.
The chair has a variety of textures, from the smooth backrest to the faceted sticks.
The entire chair is assembled with animal glue, which is reversible should your descendants ever need to repair it.
The seat height is 16-1/2”, which is intentionally low for lounging. The overall height of the chair is a compact 30”.
How to Buy the Chair
I’m selling this chair for $1,800 via a random drawing. The price includes shipping and crating to anywhere in the lower 48. If you wish to buy the chair, send an email to lapdrawing@lostartpress.com before 3 p.m. (Eastern) on Wednesday, November 12. Please use the subject line: “Irish chair.” In the email please include your:
U.S. shipping address
Daytime phone number (this is for the trucking quote only)
If you are the “winner” the chair will be shipped to your door. The price includes the crate and all shipping charges. There are no additional charges. Alternatively, the chair can be picked up at our storefront. (I’m sorry but the chair cannot be shipped outside the U.S.)
This seven-stick comb-back is Katherine’s first apprenticeship chair, which we built together while teaching a class last week. It’s set up for lounging, with back sticks that rake 20° back and a seat tilt for lounging.
Like all stick chairs, this one bears imperfections that mark how it was made. The leg angles are not exact because they were drilled by hand and without guides. Two mortises in the hands have small cosmetic gaps around the hands when the bit wandered as I drilled. (Yes it was me. Katherine was the spotter.)
All in all, it’s an excellent chair in the way it sits and looks. But it’s not manufactured perfection.
The chair has a red elm seat that is pierced with red oak legs and sticks. We drove the legs and sticks into the seat so hard that the oak’s facets cut into the elm. This is why stick chairs last.
The arm is quartersawn sycamore. Like elm, it’s unlikely to split, but it has a little flash of ray flake in the hands. And the comb is elm – because that’s what we had at the end of the day. The wedges are straight-grained hickory, which we drove like nails to hold the chair together.
The entire chair is assembled with animal glue, which is reversible should your descendants ever need to repair it. And the chair is finished with soft wax, which we make here in Covington. Both of us have signed the chair.
The seat height is 17”, which we are happy to cut down for you before shipping. The overall height of the chair is 39-3/8”.
Half of the chair’s proceeds will go to Katherine. Being an apprentice isn’t easy.
How to Buy the Chair
I’m selling this chair for $1,800 via a random drawing. The price includes shipping and crating to anywhere in the lower 48. If you wish to buy the chair, send an email to lapdrawing@lostartpress.com before 3 p.m. (Eastern) on Monday, September 29. Please use the subject line: “apprentice chair.” In the email please include your:
U.S. shipping address
Daytime phone number (this is for the trucking quote only)
If you are the “winner” the chair will be shipped to your door. The price includes the crate and all shipping charges. There are no additional charges. Alternatively, the chair can be picked up at our storefront. (I’m sorry but the chair cannot be shipped outside the U.S.)
In their efforts to make chairmaking more accessible, Alexander Brothers in Virginia now offers steambent arms and armbows that will work with all the armchairs in “The Stick Chair Book” (a free download) and the Hobbit chair in The Stick Chair Journal No. 2.
You can get the bent components in red oak or cherry. And you can buy them individually or as a set. I recently purchased a couple armbows from them (at full retail, natch), and their work is as good as I could do. Read more and purchase the parts here.
Note: We do not get any royalty or compensation or consideration from Alexander Brothers. Like them, we are just trying to remove the barriers to chairmaking.
So if you have a big old comb-back chair on your wish list, but you don’t have a steambox, your work just got a lot easier.
Thanks here to Shea and all the people at Alexander Brothers. Good people.
— Christopher Schwarz
One of the chair designs that uses this armbow and comb.