While cleaning out the shop a couple weeks ago we stumbled on a plastic-wrapped parcel of tools that were owned by the maintenance men from our old building. When they were “released on their own recognizance” by management, they gave us their old tools, including a lot of good Snap-On stuff and the gizmos wrapped in plastic that I fished from our rolling tool cabinet.
They were spring-loaded nailsets and centerpunches, like the ones made by Spring Tools. They look like a metal earthworm with an industrial Slinky for a body. These things are used to set nails. You place the tip of the tool on your nail’s head, pull the spring back and let go. A small anvil in the spring strikes the head of the tool and drives the nail flush.
Senior Editor Robert W. Lang joked that using those tools was akin to showing up on a jobsite in a sundress.
Because I don’t much care for televised sports, strip clubs or shooting animals, my manhood is already in trouble. Some might call me the Liberace of the Ozarks. So I quietly put the tools in my box. Until today.
I was setting a bunch of cut nails on a box I’m building and unwrapped the plastic parcel. I took out one of the spring-loaded tools and gave it a try. Well holy Laura Ashley, the tool leaped off the nail and put a huge divot in the wood (luckily it’s on the bottom).
So I took a file out and shaped the steel head of the tool until it was flat and rectangular, like the heads of my cut nails. Then the tool worked much better. I’m not yet sure, however, if it’s faster than the old hammer-powered method.
Perhaps it’s like learning to walk in heels. Not that I know anything about that.
Editor’s note: Here’s another great installment from hand-tool woodworker Dean Jansa. This one guides you through the process of moulding and assembling and ogree bracket foot.
The same chest that has the molding shown in “Sticking a Moulding” will have ogee bracket feet. Just like making a molding the first step is laying out the profile of the ogee on the edge of the stock.
Here’s a quick side-step: You’ll note the stock I’m using is made up of the primary wood laminated to a piece of pine. Not all period pieces used this laminated foot. If you choose to copy a piece without such a lamination, just ignore the pine in the photos.
The benefit of the lamination is the added strength it lends to the otherwise fragile “ankle” of the foot. That is, the area where the ogee sweeps inward. As you will see, without the lamination, this part of the foot can end up very thin after the ogee profile is cut with the hollows and rounds.
As with moulding, start with a single piece of stock long enough to cut all the feet for the chest. I’ll need six “foot parts” total. A pair will be mitered together for each front corner, and a single foot for the rear, for a total of six.
Lay out the desired profile on the end of the stock.
Remove as much waste as you can with a drawknife from the convex portion of the top of the foot. This is much faster than using a hollow to do all the work.
Clean up the profile with a hollow after removing the waste.
Next I create the concave portion of the ogee. I use a plow plane to remove waste from the concave portion of the stock, approximating the curve with a series of steps. The narrower the blade you use, the closer you can approximate the curve. But I find it is a balance, as too narrow a blade takes more time as you have many little steps to cut. Too wide and you are left with a lot of material to remove with the round plane. Your experience will be your guide. (Remember Riemann Sums from calculus days? Here’s a real world example!)
I work from the furthest point away from the bottom edge toward the bottom edge as my wooden plow has its depth stop on the left side of the groove it cuts. If you work with a metal plow you may want to work from the bottom edge toward the top of the foot as many metal plows have their depth stops on the right side of the groove they cut.
After the steps are cut, remove the edges of the steps with a chisel or gouge. In fact you can rough out the entire concave portion with gouges if you’d like. In maple I find it easier to use the plow to remove the bulk of the waste.
Here the majority of the concave portion is complete.
A little more round plane work gets you to the complete molding, ready to be cut into individual parts of the feet.
Mark the outline of the foot on the rear of the profiled stock and cut it with a turning saw.
The rear feet are easy, no miters. The layout above shows the side profile of the ogee, but I will not cut out that profile, rather I just cut the rear-facing portion of the foot square. A little rasp work, and a rear foot is ready for a pine brace and glue blocks.
The front feet are mitered. I choose to cut and fit the miters before I cut out the profile of the foot.
Fitting the miter first has its benefits and risks. The benefit: The foot profile will be full sized. If you cut the profile first you may have to remove some material when fitting the miter, making the feet slightly different sizes. The risk: You have to be careful not to damage the sharp edge left on the mitered edge while cutting out and shaping the foot profile. The benefit outweighs the risk for me, so I choose to fit the miters first and am vigilant while cutting and shaping the profiles.
There are options for cutting the profiles as well. Here I am cutting the profile with a turning saw.
But if you look the foot below you’ll see evidence of a different method. Note the saw kerfs along the profile, most evident in the pine backing. Cutting the bulk of the waste with a hand saw and removing the rest with chisels and or gouges leaves such marks.
Having fit the miters and cut out the profile all that is left is the glue up. There are several methods seen in period work. Most common is to glue the miter and reinforce the foot with glue block with their grain running vertical. Here is a pine mock-up of the feet I’m working on, with vertical glue blocks and no lamination.
Now you can see why one may want to laminate the foot stock. Note how thin the foot is where the ogee sweeps inward. Add to this the crossgrain of the glue blocks and the result is a cracked foot at the thin point.
One solution to the crossgrain issue is to stack glue blocks so the grain is running the same direction as the feet. In the photo of the period piece above you can see the stacked glue blocks on the rear foot. This was a common feature of the Williamsburg area from the Scott Shop. Here are the stacked glue blocks on the front feet for my chest:
I’ll add on last small glue block when I complete all the feet. The chest really is supported by the glue blocks. Again, refer to the period piece above, you can see the glue blocks extend slightly below the bottom of the feet.
And here you have it – an ogee bracket foot ready to attach to the case.
I’ve been clinching a lot of nails these last few weeks while building some utilitarian boxes. So I’ve been digging into the literature to investigate the best way to do it.
Clinching (sometimes spelled “clenching”) is when you drive a nail that passes through both thicknesses of wood you are fastening. The tip of this nail sticks out about 1/4” and is bent over and driven into the wood.
Clinching adds remarkable strength to a joint. A 1948 study by the U.S. Forest Products Laboratory concluded that clinching can increase the holding power of a nail between 45 percent and 464 percent – depending on a variety of factors, including the species of wood and its moisture content. (For the complete super-geeky report, click here.)
Also interesting: The study concluded that bending the tip across the grain increased the holding power by 20 percent compared to a nail clinched along the grain.
But how do you best clinch a nail? There is more than one effective method.
Four Ways & A Trick
Here’s how the machines do it: They fire a nail in at an angle and there’s a steel plate waiting for the tip when it emerges. When the nail hits the steel it bends over into the wood – essentially it ricochets like a bullet or pool ball.
I’ve never tried this with a pneumatic nail gun, but it sounds like fun on a Friday afternoon.
For the hand clinchers, there are at least two common techniques. The first one is to drive the nail through the work. Rest a steel plate, anvil or a second heavy hammerhead on the nail’s head. Then tap the tip of the nail with your hammer. It will curl over. Then you can drive the drooping tip back into the wood.
The second technique is similar to the machine process. You drive the nail through the work and against a waiting “bucking iron,” which curls the tip and forces it back into the wood. (For a nice illustration of these two methods, click here.)There’s one more technique I’ll sometimes use when I’m being really, ahem, retentive. I’ll drive the nail through. Then I’ll use needlenose pliers to bend the tip to the angle I want. Then I’ll drive it into the work. This results in a tidy appearance. I admit it’s a bit much.
When I have a lot of clinching to do, I’ve found that a cast iron table saw wing can be your best friend with flat work – doors, lids and the like. Lay the cast wing on your bench and then you have a nice big area to support your work as you merrily clinch away. And no, the clinching does not mar, crack or otherwise defile the wing.
There is one disadvantage to clinching. It can alarm your children. After I finished a lid I showed the 30 or so clinched nails to my youngest.
“Ewww,” Katy said. “Dad, does this wood have termites?”
Editor’s note: Dean Jansa is a dyed-in-the-wool traditional hand-tool woodworker who helped ignite many of the ideas behind my book on workbenches. At our request, Jansa gracious agreed to let us post some of his hand-tool tutorials he prepared for a Google Group. This first tutorial coves some of the basic strokes when sticking a moulding by hand.
— Christopher Schwarz
I was making a simple molding for a chest I am working on and thought I’d document the process. If you want to watch someone who really knows what they are doing I recommend Don McConnell’s DVD “Traditional Molding Techniques: The Basics.”
I’ve followed the same steps he outlines in the DVD, but Don does a better job of describing the steps than I probably will.
The first step, after deciding on the profile, is to lay the profile out on the edge of the stock and cut a series of steps with a fillister that will later guide the hollows and rounds. Note: It appears that I am cutting the steps on the edge of a large piece of stock. I’m not. That rough board is just used as a makeshift fence to turn my entire benchtop into a long sticking board.
It is a good idea to build your bench as long as you can. My bench is just a bit longer than 8’, and I stick the molding on a piece as long as I can fit on my bench. When creating moldings by hand there will be natural variations in the profile along its length. If you stick the profile as one long piece you can then wrap the moulding around the entire case and have profile match at the corners. The profiles, over the short distance needed to cut the miter, will match. So build a long bench!
Here you can see the resulting steps left by the fillister. There’s no need to worry about a little tear-out, the hollows and rounds will remove more stock and they are pitched higher than my fillister, which reduces tearing).
Next I cut the concave portion with a round plane.
Then the convex portion with a hollow plane.
Finally, cut the last bit of profile on the top of the molding with a hollow. (I didn’t take a photo, sorry.) Here is the resulting molding.
Finally, wrap the moulding around the case. First cut the front molding from the middle of the long board, then cut the sides from the pieces cut from the left and right of the front molding. Here it is on the case.
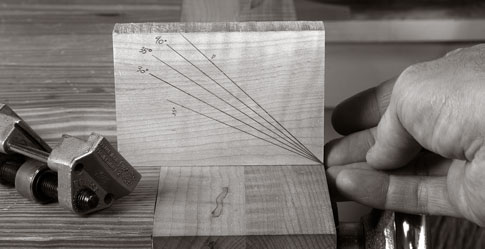
As mentioned in my last post, I set my tools at the proper angle in my honing guides by sighting the tools against a little block of wood that is marked with the various angles I use.
As I prepared to sharpen my smoothing plane iron this morning, I took some photos so you could see how I do this quickly, accurately and without getting sliced open like a hog’s jugular.
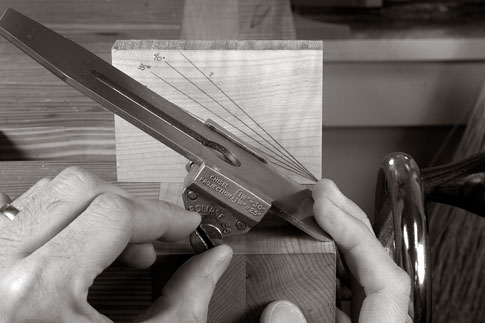
First, a word about honing guides. In addition to the small Kell honing guide I use for chisels, I use an Eclipse 36 guide for plane irons. The Eclipse 36 was the DNA for the $10 to $15 Taiwanese honing guides in every catalog today. But like a photocopy, the Taiwanese versions aren’t as sharp as the original.
In general, the paint on the Taiwanese guides is too thick and pools where you don’t want it to (especially in the dovetailed ways that are designed to hold chisels). Plus, the copies don’t hold tools as firmly because things just don’t line up like they do on the Eclipse.
As I’ve seen hundreds of honing guides in my 13 years at Popular Woodworking; and my opinion on this is as firm as my love for Belgian ales.
Here’s the part where you hate me. It appears the Eclipse 36 is no longer made. (If I’m wrong here, give me a shout.) I bought mine from Highland Hardware, but that catalog no longer carries it. All my other searches for a U.S. supplier have turned up naught.
If you’re a little cracked (like me), then I recommend you search eBay’s United Kingdom site. They turn up there frequently, even guides that are new in the box.
Setting the Tool in the Guide
The first step is to position your little block of wood perfectly flush to the end of your bench. Use your fingertips – this will get you within a thousandth of an inch.
Now secure the tool in the guide but clamp its jaws loosely on the tool. You want to be able to shift the guide forward and back on the tool with finger pressure. But you don’t want the guide to fall off.
Place the guide on your benchtop and roll the edge up to the end of your bench. Place the fingers of your right hand on top of the tool and press down. Move the edge of the tool to the end of the benchtop as shown in the photo. I have never cut myself through three (now four) presidential administrations.
With your left hand, push the honing guide forward (or back) until the tool lines up with the angled line on your block. For plane irons, I grind the bevel at 25° and sharpen a 35° secondary bevel. So I’m lining up the tool with the 35° line.
Now take your left hand and tighten the guide enough to lock your setting. Then use a screwdriver to really lock the sucker down. Then get to sharpening.


 I’ve been clinching a lot of nails these last few weeks while building some utilitarian boxes. So I’ve been digging into the literature to investigate the best way to do it.
 There’s one more technique I’ll sometimes use when I’m being really, ahem, retentive. I’ll drive the nail through. Then I’ll use needlenose pliers to bend the tip to the angle I want. Then I’ll drive it into the work. This results in a tidy appearance. I admit it’s a bit much.