With the release of our 1:4 Dovetail Template, which is now in the shop alongside our slightly older 1:6 & 1:8 combo Dovetail Template, I’ve received a few emails from folks lamenting there’s no way on our site to tell the difference both in how they look and how the resulting dovetails perform.
The second is easily answered: they perform the same – or close enough. Each of those three angles – and just about anything in that general vicinity, will outlast you – even if relatively poorly cut. Just look at pre-industrial drawers if you don’t believe me; on drawers that are still working just fine after more than a century, some of the dovetails look as if they were gnawed out by a beaver.
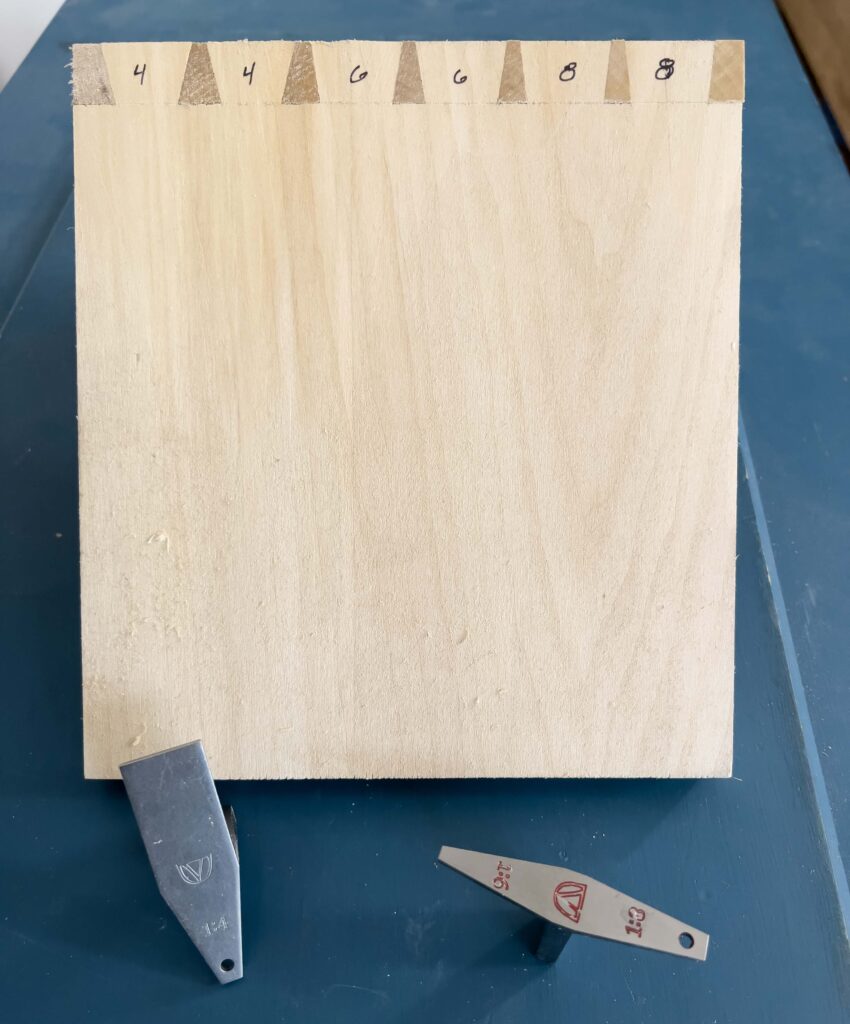
The first is fairly easily – if not particularly elegantly – answered, too. Above is a corner of joints, two each per angle, that I hurriedly cut using some scraps from the burn bin. Note that there isn’t a whole lot of difference between the look of the 1:6 (9.5°) and 1:8 (around 7°) joints. I prefer the 1:6, simply because it’s what I first cut, and have done so pretty much ever since; my wrist now has that angle ingrained. So while it felt weird to cut the 1:4 (around 14°) and 1:8, it’s certainly doable. If you can mark the line, you can saw a line.
But I also think it’s kinda funny that we sometimes fret over those angles. Do you always cut exactly on your lines? I don’t – not for the first half of the joint (in my world, that’s usually tails). The second half of the joint must (ideally) perfectly match the first half, no matter what the angle. So if my wrist tilts to, say 10° or 8° instead of 9.5° on one side of a tail, oh well. (That said, to me, the 1:4 looks a bit hefty…’cause I’m such a delicate flower.)
Anyway, above, you can see the difference in the template angles we offer. Both templates are in stock as of the moment I published this (and if we run out, I’ll order more!). Click here for the 1:6/1:8 (my favorite), and here for the 1:4 (Chris’s favorite).
– Fitz
p.s. Why doesn’t the 1:4 offer, say, 1:5 on the other end? The square end of the tool allows you to also use it as a saddle square (and to not get turned around by two similar-looking angles).
I’ve always used 14 degree dovetail angles. The 1:4 is 14.04 degrees. Will you offer one of those in the future?
(I’ve already ordered the 1:4)
“Do you always cut exactly on your lines?” This is a really good point, as I think most people transfer tails (in your case) by scribing lines directly to the joining piece. I take a different approach for sliding dovetails, which I use often for shelves and joining legs to a carcass/table/bench. In that case, I always adjust the final 1″ of tail to perfectly reflect the angle of choice. That way I can scribe angles from a dovetail template or a bevel gauge.
When I was first learning about do dovetails i read something about having to use one angle for softwoods and one angle for hardwoods and I was so worried about it I put off even attempting it for a year or two. I didn’t even know what hardwood or softwood was. I don’t know this feels pretty hard?
As far as we’ve been able to determine from the record, that’s a 20th-century thing. Just cut ’em – even bad ones will stay together!
Oh i agree. I have a dresser that my parents bought at a garage sale in the 40s, so its at least 80-90 something years old and it has the beaver chewed dovetails that have held up several moves across the state and who knows where else. I think whoever made it used an old 5 point rip saw. But its older than Ikea.
That was always one of 5he “rules.” It make you wonder — what do you use when you join a hardwood to a softwood?
Oh – that’ll definitely explode, no matter the angle.
I’m losing sleep over what angle to cut in hardwood veneer plywood. I’m sure it must be 1:8 for the veneer layer and 1:6 for the soft and gooey center.
How did you get the red in the engraved numbers? Is there an easy way?
Just a coat of paint (pretty sure it was faux milk paint, from General Finishes?), then rubbed it off the top.
Enamel paint pens work great too. Easy to remove the excess with a little acetone.
I’ve also seen grease pens used for a less permanent method.
Cool. Variable pitched dovetails. I get why you are doing it. Gives me ideas for a future project if I want a sense of motion.
I have never used a fixed gauge. First, I use a bevel gauge and adjust it with three adjacent lines so that I can see both the spacing and the combined angle. When my feng shui drops into place, I know I have the right angle. Second, I like to draw my pencil lines long so that I don’t saw away the lines as I work (have something to aim along).
While I agree with the generalisation that dovetail angles need not be determined by the type of wood, I am cautious about cutting the tails in thin (say, 6 mm) softwood using a 1:4 bevel as the outer corners of the tail are more prone to damage by shear forces during assembly. However, if it does happen it just needs a deft hand with a dab of adhesive to make good.
Thank you for posting this. It is helpful. And thank you for the encouragement that cutting dovetails doesn’t have to be perfect. It takes most of the intimidation out of cutting them.