This is an excerpt from “The Woodworker: The Charles H. Hayward Years: Volume II” published by Lost Art Press.
Although the five-panelled door described in this article may interest only a small section of our readers, the construction is applicable to most other panelled doors. With small doors, such as are used in cabinets and cupboards, stub tenons would be employed, that is to say the tenons would not be taken right through the stiles
Before commencing work on a door such as that shown in Fig. 1, the careful worker will prepare a “rod,” (Fig. 2). This comprises a clean, unwarped board on which are set out vertical and cross sections of the door in full size. A rod is very useful since the work can be laid on it and the various dimensions quickly marked off.
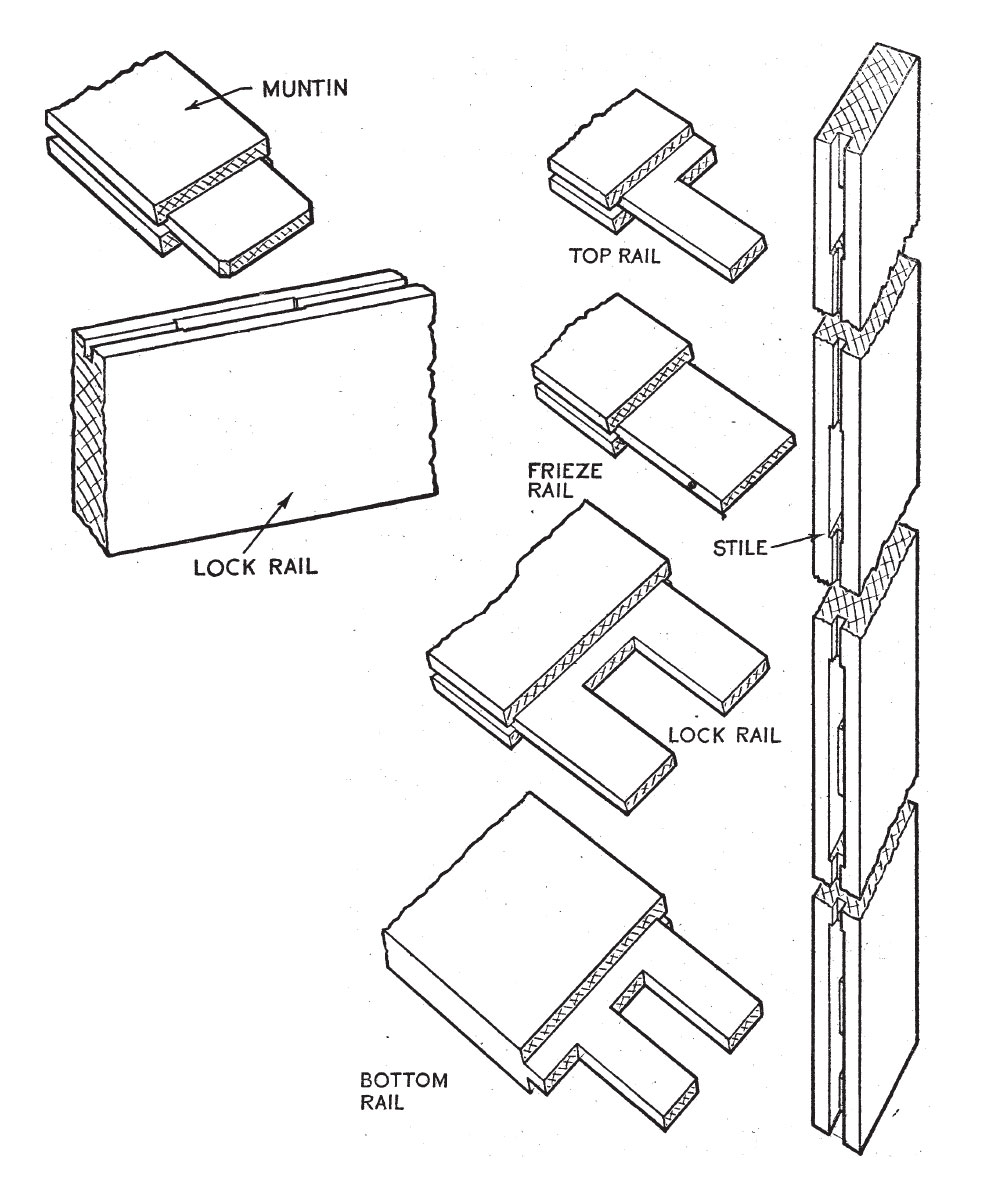
Stiles. In preparing the stuff for the stiles, it is imperative that the edges should be square and the faces out of winding. If only one stile or rail is slightly twisted it will cause the whole door to wind—a defect that cannot be easily rectified. Assuming that the stuff has been trued up and the face sides and face edges marked, lay one of the stiles face downwards on the rod and strike up the sight lines for the rails on the face edge, the lines being made with a pencil. The stile is then rested with its face edge upwards and the mortises marked with pencil lines, allowing 1∕2 in. where necessary for the plough grooves.

These lines are now squared over to the back edge where further lines are squared across on either side of the mortises for the wedges. For hardwood, 1∕4 in. wedges will suffice, but for a softwood the wedges should be 3∕8 in. It is as well to arrange that the face-edge marks of the members of the frame should be towards the inside of the frame since this will enable the frame to be put together without having to mark the various joints. Having set out one stile, pair the other with it, placing the face edge marks upwards and the face side marks to the outside. It is as well to clamp the stiles together with G clamps while they are being marked out so that they will not shift. The lines marked on the first stile can be squared across the second stile and the setting out completed.
At this stage, lay each muntin in turn on a stile and mark the shoulders, the marking being done with the knife. The shoulder lines should be made a little full so that when the door is put together the shoulders will be hard up against the rails.
Rails. The middle rail is laid on the width rod and the sight lines of the stiles and muntins are marked and squared across, the shoulder lines for the tenons being knifed. This done, the mortises are set out, allowing 1∕2 in. for the plough grooves. The proportions of the tenons are indicated in Fig. 3. The other three rails are clamped together with the lock rail and the lines squared across, the shoulder lines being squared all round. In setting out the top and bottom rails, it should be arranged that the face edge marks will be towards the inside of the frame when assembled. A mortise gauge is now set to a chisel having a width approximating 1∕3 the thickness of the stuff, and the mortises and tenons gauged.

Care should be taken not to allow the gauge lines to go beyond the sight lines, otherwise they will show when the door is put together. The widths of the tenons should be gauged and the haunches marked with the knife.
Cutting the Tenons. It would seem that the work can be made easier by cutting out the haunches before sawing the tenons, since by so doing the saw cuts are made through a smaller width than otherwise would be the case. It will be apparent that if the haunches of the top and bottom rails are cut first, the side gauge lines will be cut away. This is of no great consequence to a skilled worker who will be able to cut the tenons having the end gauge lines and those on one edge to guide him, but the inexperienced worker will find it necessary to start sawing the tenons by making oblique cuts on either side and finally finishing each cut by sawing level. He will therefore need the gauge lines on both edges.
For one who is not accustomed to cutting tenons, it is as well to saw down for the tenons before cutting away for the haunches. The whole success of the job is dependent on cutting the tenons parallel with the face sides. If one is out, it is almost sure to put the frame in winding. As the mortises will be chopped out from both edges, in the case of the stiles, there should be little chance of their being out of parallel.

Testing the Joints. When the joints have been made, individual joints should be tested for levelness with a straightedge as shown in Fig. 4. It will also be found if any of the shoulders require easing. The frame can then be knocked together in the following order. First the muntins are fitted in the rails and these are stood on end and a stile is knocked on. The frame is then inverted and the other stile fitted. A test for winding can now be made and any faults corrected.
Fitting the Panels. Some workers prefer to cut the panels 1∕8 in. narrow in their length and breadth, but it is only necessary to make this allowance in the widths.
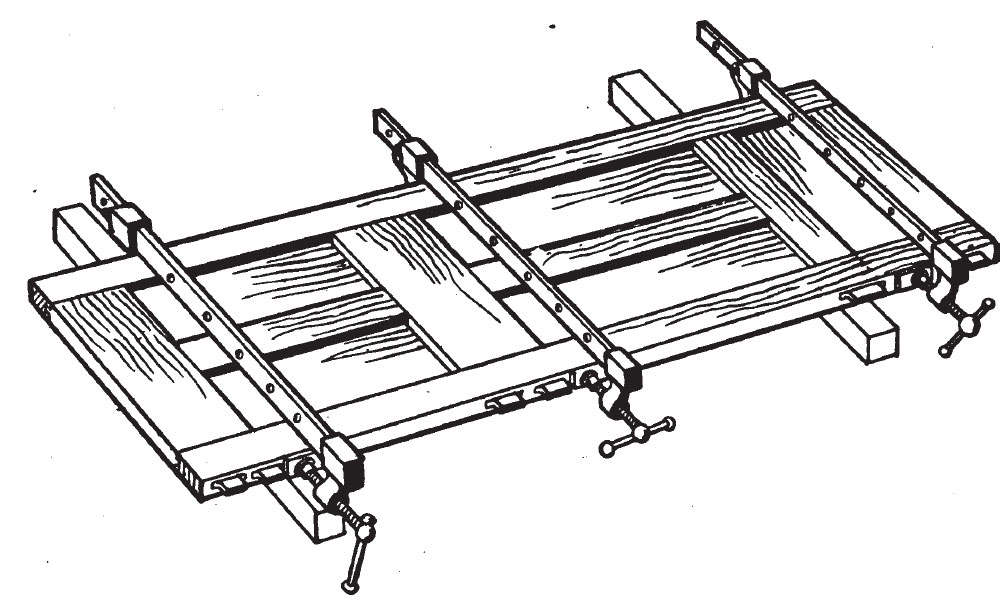
In gluing up, the muntins should be first clamped to the rails commencing with the lock rail. The stiles are then knocked on and clamps applied as shown in Fig. 5, the clamps being positioned as close to the tenons as possible. The wedges should be cut so that they pinch harder on the inside.

By so doing, the stiles will tend to move from the outside towards the shoulders when they shrink. The wedges of the frieze and bottom rail tenons should be driven in harder on one side than the other so that the muntins pinch the rails.

Mouldings. Typical door mouldings are shown in Fig. 6. The lower “planted in” moulding is fixed by bradding to the frame. If the mouldings are attached to the panels they will tend to draw away from the frame when the panels shrink. In order that the mouldings should make a good fit against the panels and frames, it is a good plan to clean up the square faces of the mouldings so that the corner angle is a shade greater than a right angle. This will ensure the mouldings coming hard up against the panels and frame.
— MB

thanks for posting this! it is unfortunately just a little past timely for me. I’m building a door right now and can attest to why the top and bottom rails are mortised in, as opposed to using bridle joints 🙂 i guess there’s always epoxy…