The following is excerpted from the third edition of “Make a Chair from a Tree,” by Jennie Alexander.
This third edition of Alexander’s “MACFAT” is the culmination of a lifetime’s work on post-and-rung chairs, covering in detail every step of the green-wood chairmaking process – from splitting and riving parts to making graceful cuts with a drawknife and spokeshave, to brace-and-bit boring for the solid joinery, to hickory-bark seat weaving.
With the help of Larry Barrett, one of her devoted students, she worked on this new version of the book until just weeks before her 2018 death. Larry polished Jennie’s final manuscript, then built a chair in Jennie’s shop using her techniques and tools as we took many of the photographs for this book. Nathaniel Krause (another of Jennie’s devoted students), wove the hickory seat for this book. Longtime friend and collaborator Peter Follansbee helped to edit the text into the intensely technical (but easy to understand) and personal (but not maudlin) words that ended up in this third edition.
The simple post-and-rung chair we suggest presents differing structures and aesthetics below and above the seat. The seat divides two worlds. Above the seat, all curves; below, sticks. Beneath we see a structure of horizontal, straight rungs cornered by four straight, vertical posts. The straight-line geometric understructure gets our bottom out of the mud and takes the weight off our feet. Above the seat we find flared and curved back posts and slats of different lengths, inclined in different planes, that embrace the thoracic (top) and lumbar (middle) spine. Over the years I have cooked up some dimensions and shapes for the slats that I find comfortable, and these are described below.
Make the Slats
Making slats calls for a combination of craft and patience. Your first attempt may be only practice. If you work the larger top slat first, and something goes wrong, you can salvage it as the smaller bottom slat.
In Chapter 5 you rived two or more rough slat blanks from the log, each slightly pie-shaped in cross section and about 1/2″ thick, by 4-1/2″ to 5″ wide, and 18″ long. They have straight, long fibers with their ray plane running straight down within the blank from top to bottom. Reject any with fiber irregularity. Slats will have a stressful career.
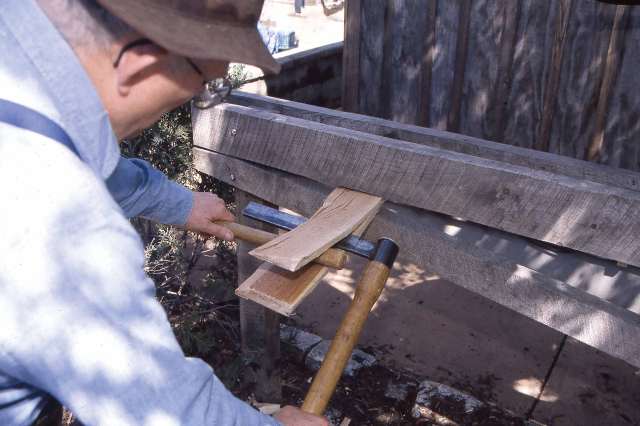
Examine the end of the rough slat. The rays should be easily visible. The thickness of the finished slat must be parallel to the visible rays, or at least as close as possible. Keep this in mind as you begin to reduce the rough blank to final thickness. Use a sharp drawknife to clean up both sides of the riven blank. Working the riven slat blanks down, you can easily remove material from the high spots. The relatively broad surfaces of the slats are an ideal place for a drawknife with a slightly curved, rather than flat blade. Both ends of the drawknife’s blade come up out of the wood, avoiding splitting cuts. As the slat gets thinner, it might flex under the knife. For additional support at the shaving horse, prop a 1″ x 3″ or 1″ x 4″ under the crossbar and set the slat on that.

First, flatten one side of the rough slat so it will not rock on the support. Then drawknife the other side down to about 3/16″ thick. To avoid tear-out, at some point you will likely need to switch from the drawknife to a spokeshave. Spokeshave the slat to exact thickness. Slide the slat up and down between your thumb and forefinger to gauge the thickness. As the blank nears completion, bend it slightly over your knee or flex it under the shaving horse’s crossbar. Thick areas will resist bending and thin areas will bend abruptly. Continue until each slat has a consistent thickness everywhere. Test the final slat thickness by inserting its corners into the slat mortises. Keep the post mortises’ edges fresh and true. You worked carefully to get them. Because you can’t insert the slat blanks completely into the mortises, a slightly too-thick slat is OK at this point.

(Measurements are approximate.)
Slat Length
In Chapter 9 we briefly introduced adjustable test slats made using lengths of flexible plastic, held together with binder clips so that they could be adjusted in length to give a preview of what the chair would look like. Now that the chair is assembled, re-insert and re-adjust these test slats to determine the final length of the actual slats.

The slats’ backward curves are one of the chair’s most dramatic and comforting elements. It is tempting to make slats too long and curve back too much. Remember the slats’ first task is to meet and support the curved back. Excessive aesthetics abandon back support. One way to avoid this is to make sure the slats slide easily into their mortises without a “reverse” bend. When the actual slats are inserted into the chair each one must flow smoothly into its mortise. These test slats provide the correct overall length for the actual slats. The height of each test slat equals the mortise height. They can now be used to mark the initial layout lines on the slat blanks.

Lay out the top slat first. Align the test slats in line with the slat blank’s long fibers. Shift the test slat on the slat blank to find the most pleasing location. Then lightly trace around the ends of the test slat. Using a pencil, transfer the top and bottom of each slat tenon to the slat blank.
Connect the top and bottom of the two tenons with a straightedge and light pencil lines. Find the mid-point of the slat length and strike a perpendicular line at this midpoint. You are now ready to create a symmetrical slat design extending from the midpoint back to the tenons on each side.
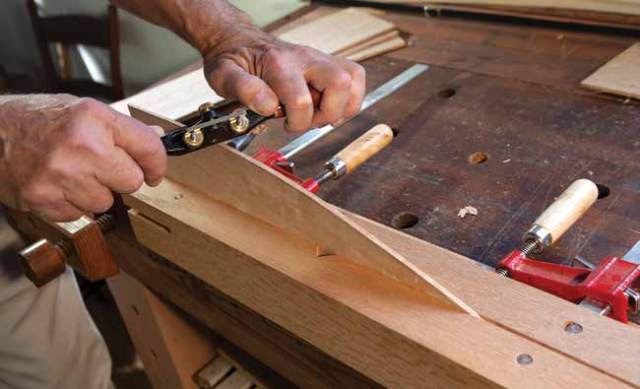
open wide enough to hold a slat in this orientation. Otherwise
use a vise, a clamp or double bench clamp, as shown here.
Many variations can be found in vernacular chairs. I find smooth curves from one end to the other to be most pleasing, and that is what is described here. At the midpoint, make a mark 1/2″ below the lower parallel line for both the top and bottom slat, and make another mark above the upper parallel line, 7/8″ for the top slat and 5/8″ for the bottom slat.
Bend a flexible batten so that it touches the mortise entry points at each end and touches the marks at the midpoint. Trace the batten onto the slat blank. You may need a third hand to do this.
Lock the slat in a face vise or double bench clamp. Shave it to shape with drawknife and spokeshave. Do not round the top and bottom edges. The slats will enter the mortise with square edges. Then the exposed edges will be rounded after assembly.
When you are done with the top slat, proceed in the same manner with the bottom slat.

hook helps to hold the slat for this task.
Next, without attempting to bend either slat, insert each slat into the slat mortises, one end at a time. You must be able to insert each slat to its complete depth. Some minor spokeshave work will likely be needed, both in final thickness (thin the back) and in slat height at the point of entry. A thin slat, though flexible, needs considerable bending in order to pop it into the post mortises. There are several ways of getting the slats to bend. The simplest is to put them in the steam box just like you did the back posts. One concern with this method is the slat will absorb enough moisture to swell in thickness and be a difficult fit in the mortises. We’ve used this method, but care must be taken to prevent damage. Forcing a slightly too-thick slat into the mortises can damage or even split the mortised post.
It’s the heat that makes the wood pliable; the steam is just a delivery system for getting the heat into the wood’s fibers. You can try the slats in the kiln until they are hot enough to be pliable. That can be even more perilous than the steaming method. Not hot enough and they won’t bend, too hot and they scorch, or worse, burn.

We struck on a compromise approach. Wrap a towel around the slat, between the tenons. Ladle boiling water over the towel, allowing it to sit a while so the wood absorbs the moisture (and heat). Try to keep the tenons dry. Get the towel wet all over; keep it wet and hot.
Unwrap the slat and limber it by bending it under the crossbar of your shaving horse, or across your knee. If it still feels stiff, repeat the towel and boiling water step.

thick spot. Work the whole length of the slat.
Once it’s flexible enough, install it in the chair. All this pushing and shoving and overbending of the slat can cause damage to the slat mortises, particularly because the mortises are close to the flat surface of the post. To prevent splitting the mortise open, apply a clamp to the post at each mortise location before inserting the slats. Straddle the chair backward. Insert one end of the slat all the way into its mortise. Press the middle of the slat outward while pulling the other tenoned end in; you’re over-bending the slat to be able to slip it into place. When you line up the second tenon and its mortise, then pull the middle back toward you to drive the second tenoned end into the mortise. When it goes well, it’s a very exciting moment. Then do the next slat.

of adjusting the slat by pulling it in.
Once slats are inserted, stand behind the chair and observe the slats carefully. You should see regular, smooth curves that complement each other. Variation in slat thickness will cause slat kinks. Sit in a temporary seat and lean back carefully. Do the slats support your back? While the slats are still warm you will be able to remove them and make adjustments if needed. You might need to re-soak them with the towel to get them out. Then re-heat and re-insert.

I see no need for glue. Slats are the thinnest parts of the chair, and most subject to abuse. If one breaks, it will be easier to remove and replace if the slats are not glued.
Pegs
If you sit in the chair before the slats are pegged, the slats can give way, pop out of the chair, and you will be on the floor. Slats must be pegged to make sure they stay in place. I have used single pegs in the slats, but I think two is best. Two pegs will keep the slat from pivoting as you lean on it.

here, just be sure to stay away from the edges of the slats (vertically
in the post) and the ends of the slats (near the inside edge of the post).
The distance between the peg hole and the end of the slat is crucial. I’ve heard it called the “relish.” You need as much relish as possible to avoid splitting the end of the slat. I find locating the pegs as close to the inside edge of the post to work best. This will keep the peg holes as far as possible from the slat’s end. Large pegs are unsightly. I now make pegs that are 3/16″ in diameter and locate them 1/4″ from the inside edge of the post.
riving, split in half, and half again and so on.
I make long, very slightly tapered pegs and bore the peg holes completely through the post. Before boring the peg holes, you may want to pull the posts together again with a twisted cord so the tenons do not move while boring the peg holes. Use a 3/16″ brad-point drill bit. When boring all the way through the post, be careful to block up the back of the post to prevent tear-out.

tape is the depth stop.
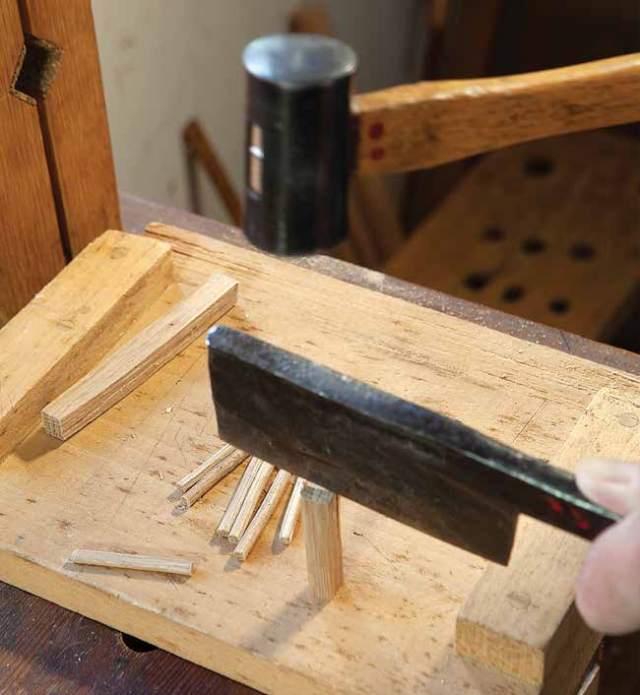
Pegs are not home dowels – rive them from straight-grain hardwood. I use white oak or hickory if I have it. I shave octagonal pegs with the drawknife and shaving horse.

Another option is to bore blind holes and make pegs using a dowel plate. Using an eggbeater drill, carefully bore the peg holes. You can add tape to the bit to function as a depth stop. Then drive the rough-split peg stock through a dowel plate to size it to match the drilled hole.

To install the pegs, apply a thin coat of glue. For through-pegs, tap cautiously until they fill both entrance and exit holes. For blind holes, listen to the sound as you drive the peg. It will deaden as the peg bottoms out in the hole.
If some glue remains on the post surface, let it dry thoroughly and then flick it off with a knife. Do not attempt to dilute and wipe off. Then carefully trim the pegs with a flush-cutting saw. Do not mar the post. A paring chisel finishes the task. If necessary, finish with a spokeshave or scraper.
Finishing the Slats
You have left the exposed top and bottom edges of the slat square until now. Leave the edges square where they exit the post mortises, but spokeshave all edges; front and back, top and bottom, into a comfortable curve. The chair will most often be picked up under one of the slats. These edges will be most comfortable if simply rounded. The front edges of the tops may be very slightly chamfered and then rounded to make the chair appear even lighter and more attractive.

During my years of teaching I have found that slats were the most common failure. Usually it was top slats versus slouchers. Often, the rush to finish up contributed. In your shop there is always another day. Rushing to complete invites failure. Beds also have their benefits.
I really enjoyed this book and the matching video. I had opportunity to make this chair in a class and it’s great.
In addition to the method described in the book, I read an IG post by Brendan Gaffney about the author’s approach with charts and tables. Does anyone know if this info is available anywhere?
Thank you.
-Greg