
versions on the muntins and top rail. Paint adds even more fun.
The following is excerpted from Peter Follansbee’s “Joiner’s Work.”
Forget what you think about 17th-century New England furniture. It’s neither dark nor boring. Instead, it’s a riot of geometric carvings and bright colors – all built upon simple constructions that use rabbets, nails and mortise-and-tenon joints.
Peter Follansbee has spent his adult life researching this beguiling time period to understand the simple tools and straightforward processes used to build the historical pieces featured in this book. “Joiner’s Work” represents the culmination of decades of serious research and shop experimentation. But it’s no dry treatise. Follansbee’s wit – honed by 20 years of demonstrating at Plimoth Plantation – suffuses every page. It’s a fascinating trip to the early days of joinery on the North American continent that’s filled with lessons for woodworkers of all persuasions.
There’s a large body of carved designs I have learned from studying surviving oak furniture from Devon, England, and Ipswich, Mass. These designs are chiefly found on chests and boxes, although they also appear on some chairs and other works. With a few exceptions, the layout for these designs is mostly freehand. It’s a bit daunting at first, but once you learn the vocabulary (my word for the various elements, or parts, of the patterns) of this work you’ll be able to combine the elements in so many different ways that you will be able to fill most any space you are facing. The second overlapping lunette design is part of this group, but by far the most common element is what I have come to call the S-scroll, a term I learned from the scholars and curators who trained me in furniture history. Art historians like to give these things names so they can talk about them, but I am always careful to point out that we have no idea what the makers and users of this oak furniture called these patterns.
The S-scroll amounts to a rounded rectangle with a reverse curve band that creates two diagonal areas. These are then filled with leaves and other designs. Let’s cut a pair of S-scrolls.

Mark out a rectangular space, about 3″ high by 6″ long with no centerline – nothing other than the margins. Now take a gouge similar to a #7 Swiss made, 1″ wide. Strike it at each corner of this rectangle so that the gouge is connecting the horizontal and vertical margins, effectively rounding off the corners of the rectangle.

Now with a narrower, more deeply curved gouge, incise a circle just inside one bottom corner and diagonally opposite that at the upper corner on the other end. It usually takes three strikes of the gouge to create a full circle. Make sure to leave enough wood between the rounded corner and the circle; if the circle is too close to the corner, it can become weak and the wood will break out between them, ruining the pattern.

this pattern. Don’t worry, I’ve seen period carvings that I would burn. The eye is forgiving, said
Jennie Alexander when I was learning chairmaking.
Using the V-tool, cut a pair of curving S-shaped lines that connect one circle to the other. This is new territory – it’s a freehand cut, but don’t let it scare you. I’ve seen period examples that are all over the map – some exquisite, some horrific. One more thing: It’s another venue for two consecutive thoughts. The V-tool lines don’t connect circle-to-circle and margin-to-margin, but margin-to-circle, and circle-to-margin. I think of it as “outside to inside” and “inside to outside.” In the beginning it will help you to mark the line you want to cut. Pencil, chalk, your call. I used to avoid marking it, but have found it helps beginners.

circle you just chopped. It can get fragile if it’s too close.
The pattern begins by bending away from the margin/circle at first, then rises up to cross an imaginary centerline, and bends again as it comes toward its goal in the opposite corner. You don’t want the line to head straight for the corners and circles; that can result in a design that’s too skimpy on the inside.
Once you’ve cut the V-tool lines, the rest of the pattern is quite simple. Using a deeply curved gouge, outline the first leaf, the one that flows from the circle.

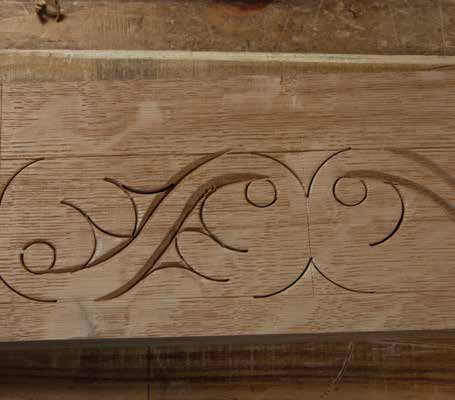
Then chop outlines for additional leaves with the #7 gouge. The number of leaves depends on the scale of your S-scroll: one, two, three or more. I angle these so the second leaf axis is a diagonal line from the margin. Then the last incised outline is a half-leaf that connects to the horizontal margins. All of this is long-winded; the pictures help make it clear.


circle, and then remove what background you can. Take a small chop where each leaf lays beside its neighbor.
After incising the pattern, all that remains is to remove the background with the #5 gouge. Facets are actually just what I want in the background work – a dead-flat background looks too machine-made to my eye.
The details can be varied, from shaping and beveling the bands, texture punching the background, accent punches and/or gouge-chops on the solid surfaces.

Once you can cut an S-scroll, you can use them in designing patterns. They can run in a long single row, alternating curves upward and downward, or in a double row, with alternating pairs on wider stock.

They can “stand up” and alternate, a version that I usually use on a tall box front.

Chest panels and chair backs often have two vertical S-scrolls. There is a staggeringly wide array of design possibilities with this motif.
I really look forward to seeing/reading all of Peter Follansbee’s work: his joinery & his carving, his research, his books, his blog, his substack … everything.