
This is an excerpt from “Making and Mastering Wood Planes” by David Fink.
Chapter 1 contains information on resawing the plane blank into the two cheeks and the midsection. It also shows how to determine which would become the front, back, top, and bottom of the blank, and how to mark these parts out with a cabinetmaker’s triangle.
Following are the remaining techniques for making hand planes. Also included is a list of the tools needed for these procedures.
Tools and Supplies Needed
• Six-inch combination square
• Protractor
• Pencil
• Block plane
• Practice stock: straight-grained hardwood, about 18 inches long, 3/4 inch thick, and 3 inches wide
• Dowels (5/16 x 2 inches)
• Brad-point drill bit (5/16 inch)
• Drill press or power hand drill
• Dovetail saw or razor saw
• Chisel (1/2 inch)
• Clamping cauls: two pieces of 3/4-inch particleboard or plywood about 12 inches long and 3 inches wide
• Router with a 1/2-inch guide bushing and 3/8-inch bit
Optional Tools and Materials
• Double sticky tape—thin type for carpet
• Plug cutter (5/16 inch)
• Sanding drum (3-inch diameter)
Preparing the Glue Surfaces
The plane blank has been resawn into the two cheeks and the midsection, and the front, back, top, and bottom have been marked. The next step is to smooth and flatten the adjacent surfaces of the cheeks and the midsection that eventually will be glued back together. With experience, hand tools quickly do the job: a plane can be used to smooth the surfaces or a scraper can be used to remove defects like raised lines left by a chips in the planer knives. Avoid hand-sanding because the outer margins tend to get rounded, which only accentuates the glue lines. Another option is to leave the surfaces as they are off the machine; the glue lines may be apparent once the plane is assembled, but it should hold together securely.
Laying Out and Sawing the Front and Back Blocks
Determine the position of the throat opening on the midsection and lay out the angles that when sawn will create the front and back blocks. A strong word of caution: The layout and cuts occur on the midsection; be sure to separate it from the cheeks before proceeding. The plane blank is ruined if the cheeks are sawn mistakenly.
The throat opening will be slightly more than halfway along the bottom of the mid-section, closer to the front end than the back. (If you feel stranded without precise measurements, a throat opening located five-ninths of the total length will do. To determine this, multiply the length of the blank times five, divide this number by nine, and measure that result from the back end of the blank.)The exact location is not critical, but why should the throat plate be in this area? One of the most demanding planing tasks is preparing boards for edge-joining. It requires precise control of the plane. The planing stroke begins at a stand still and ends with the plane in motion. With the throat opening forward of center, less of the sole of the plane is resting on the board when the blade begins its cut, but the plane is easy to control because it is motionless. Because of the throat opening placement, when the blade finishes its cut more of the sole will be in contact with the board, which helps you balance the plane while it is in motion.
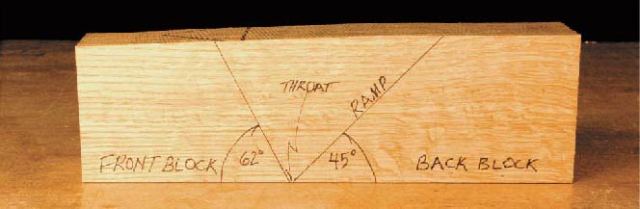
From the point of the throat opening, lay out a 45-degree line angled back toward the rear of the plane. This defines the back block and the ramp that the plane iron will eventually rest upon. From the point of the throat opening, move forward about 1/16 inch and draw a line angling to the front of the plane at 62 degrees. The center block is now divided into three sections: the back block, the triangular center section, which becomes scrap, and the front block, forming both the front of the throat opening and the front portion of the plane (4–2).

The front block is angled at 62 degrees for several reasons. It’s about the steepest slope that gives sufficient clearance for shavings to exit between the front block and the cross-pin while allowing enough space for most people’s fingers to remove an occasional jammed shaving (4–3). If it were much steeper, the space between the cross-pin and front block would be so tight that if shavings collected and jammed there, removal would be an irritating task requiring a pencil point or needle-nose pliers.

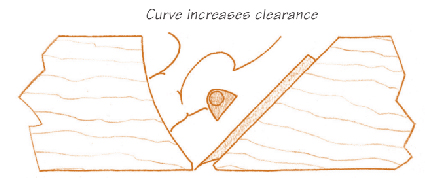
The angle can be made lower, but that may interfere with the shaping of shorter planes. Also, as the bottom of the plane wears, the throat opening widens; the lower the angle of the front block, the faster the widening occurs. One of our goals and one of the advantages of making your own plane is that the plane can have a very narrow throat opening (4–4); it pays to maintain this narrow opening as long as possible. Alternatively, the front block can be cut with a curve, keeping the angle steep at the throat opening and sweeping away in the vicinity of the cross-pin (4–5). This is a good solution. Still, I prefer a straight cut for the first plane because you can practice truing that cut before advancing to the critical job of truing the ramp of the back block, using the same techniques.
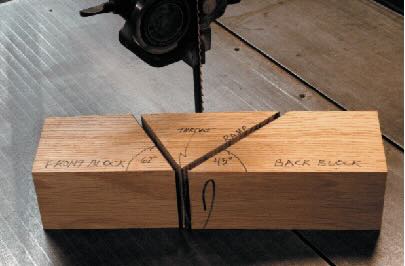
Prepare the band saw for making the cuts along the angled lines by precisely squaring the blade to the table. The band saw may not seem the natural choice for this task over the table saw, but in actuality neither machine will make the cuts accurately enough. Making these angled cuts on short, thick stock feels dangerous with a table saw, and requires some setup time. I prefer to use the more benign band saw, carefully making the cuts freehand, and cleaning up the sawn surface to perfection with a block plane. Saw to the waste side of the lines—within the triangular area. Make the 45-degree cut first and don’t be concerned if the saw kerf nicks a bit of the 62-degree line (4–6). Save the triangular scrap.
Now clean up the cuts to produce smooth, square, and straight surfaces on both the front and back blocks. Use the block plane to do this. In experienced hands the task is completed in one or two minutes for each block. A complete novice may require half an hour for the first block and five or ten minutes for the second. This is time very well spent, for in the process you will have touched on almost all the skills needed for just about every other type of planing task. It is a challenging way to start off—trial by fire, if you will—but persevere and there will be great rewards.

of the plane.
Cleaning Up the Cuts – Adjusting the Block Plane
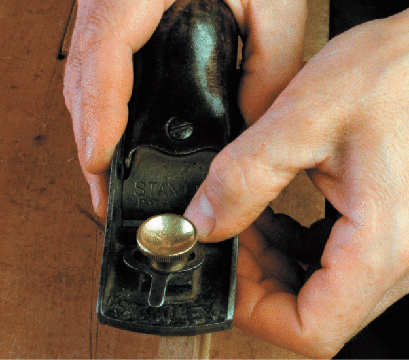
The block plane must be tuned up and effectively sharpened for the work to proceed smoothly (see Chapters 2 and 3). Set the blade for a very fine cut with the blade protruding evenly across its width. Back off the blade until it does not protrude through the bottom. View the cutting edge from the back of the plane with the plane turned upside down. As you slowly bring the blade forward, see if the cutting edge is skewed in relation to the bottom of the plane; it should appear parallel (4–7). To make adjustments, pivot the blade, bringing one corner up and the other down, using the plane’s lateral adjuster. For some inexpensive block planes that lack adjusting mechanisms, the blade is brought forward and adjusted laterally by gently tapping the back of it with a two- to three-ounce hammer, and it is backed up by tapping the back edge of the plane itself (see Making an Adjusting Hammer on pages 102 and 103). The plane must be properly tensioned for this to work well (see Chapter 2). You will probably find it more precise to adjust the plane with a hammer even if it has a mechanical lateral adjuster.

When the blade is nearly protruding, let your sense of touch guide the adjustments. Gently caress both sides of the throat opening with the pad of the thumb while bringing the blade forward (4–8). Both corners of the blade should simultaneously become barely discernible. If not, make lateral adjustments until the same amount of slight drag is felt on the thumb at both corners. If the throat opening is very fine, you will be very close to the final setting. If the throat is wide, the blade will most likely need to come out a bit further yet. That is because the pad of the thumb dips into the larger opening and can feel the blade before it actually extends beyond the bottom of the plane.
Final Adjustments
Begin a stroke on the practice stock. If the blade thunks against the wood and you feel yourself tensing to shove it through, stop: the blade is out too far. Though it is difficult to suppress the urge, there is no need to continue; the only likely result is damage to the planed surface, be it a serious dig or planing it out of true. Back the blade up and try again.
Ideally, the first stroke should either produce no shavings or take the smallest bit, requiring little if any effort to slide the plane across the wood. The shaving should be so thin that it falls apart and is almost dusty. This is because the jointed surface of the wood is not smooth, but slightly scalloped by the action of the jointer cutters; the blade hits the high points of each scallop and misses the low. Always adjust the depth of cut in this fashion, progressing from no shaving to a very thin shaving to the final setting. In this way, you will eliminate accidental digs and the frustrations of dealing with them.
To produce a shaving of equal thickness across its width requires setting the lateral adjustment of the blade exactly. The blade edge must be perfectly parallel to the bottom of the plane. This is crucial; if not done properly, it is very difficult to adequately true or polish a surface. When the blade takes a deeper bite from one side of a surface, either each subsequent pass dips it lower and lower or that corner of the blade may leave a prominent dig.
To check the lateral blade setting, take two shavings, first utilizing only the left side of the blade, and then only the right. The plane is held flat on the practice stock but offset to the left, and then the right, rather than planing right down the middle of the stock (4–9 and 4–10). Compare the thickness of the two shavings and be sensitive to the amount of resistance you feel; it takes more effort to produce a thicker shaving. You may find that one side takes a small bite and the other side produces nothing. Adjust the blade in the direction of the lesser cut and try again, until the resistance feels identical when planing with either corner of the blade. It may also be necessary to readjust the depth of cut.

The shavings are of the proper thickness when they lose their “woodiness” or stiffness; instead they feel fluffy and soft when bunched together, like a cotton ball (4–11). Practice your stroke (see below) until continuous shavings can be consistently made from one end of the practice stock to the other. If the board gets out of true from the initial efforts, true it with the jointer; otherwise, it’s difficult to produce a continuous, thin shaving.

With only a little experience, peeking at the throat opening and stroking your thumb across it will reveal almost all that is needed to know to set the blade properly. Practice stock becomes unnecessary. It takes just a few minor adjustments as you begin planing to set the blade; this is done without a second thought and with no time lost.
I just listened to David Finck’s daughter play on YouTube from the link in the above article. Tears came to my eyes as the incredible mastery of her instrument was displayed. I bought the book, not because I need to learn how to make a plane (I’ve made several) but because I might learn something new, as well as to support your efforts and his. Thank you.
FYI the link at the top of this article is broken.
I’ve always been fascinated by making at much of my toolkit as possible, especially planes, so this is a really interesting and timely article for me.