
In a 1937 Chips from the Chisel column, which is also featured in “Honest Labour: The Charles H. Hayward Years,” Hayward wrote, “The influence of mind upon mind is extraordinary.” The idea being there’s often room for improvement. (You can read the entire column here.)
Recently, one of Chris’s chairmaking students, Lo blue, sent us another way to drill sticks for chairs.
So now we want to know: What else have you thought of, tried out and improved upon?
To that end, we’re asking any LAP readers who have built projects from our books to share your ideas for improving the design, construction or finishing of a project. We will feature some of our favorite submissions in our new series, Mind Upon Mind. Those featured will receive a $50 Lost Art Press gift card from us.
To submit:
- Include written steps or a summary of your improvement. Write it in a style you, as a reader, would find helpful and easy to understand. But don’t fret too much. We’ll edit it to make you look good, promise.
- Include photos to help illustrate your improvement. You don’t need special equipment to do this. Just good lighting and your phone should be OK.
- Include your name as you’d like it to appear in print and any links you’d like to share with readers, such as your personal website or Instagram account.
- Email your submissions to kara@lostartpress.com.
As a great example of the above, here’s Lo’s recent submission, showing a different way to drill sticks for a chair, as detailed in “The Stick Chair Book: Revised Edition.”
— Kara Gebhart Uhl
Drilling Short and Long Sticks Lo Style
Well, after drilling the sticks for my armchair at the Lost Art Press workshop with a laser, I wondered – do I really need one? What I didn’t like about using it was how long it seemed to set up the whole ordeal. For each stick you have to move the tripod and laser, line it up, then go back to the chair, line it up and drill on. Also I just don’t want to buy more “things” (I don’t have much storage space in my shared shop). So I set out to come up with another method that so far has worked without fail on two chairs. I’ve never explained a process before but I’ll give it my best shot and hopefully it makes sense.
Things You Need
- BBQ skewer or small dowel
- Different colored pens
- That sticky poster-hanging stuff that’s in the random items section in the grocery store
Marking Your Skewer

The spindle decks of my chairs so far have been 2” wide, so I mark a centerline and go over an inch on both sides. The different colors really do help here. That way, when you’re aiming down, you can match up your measurements. I spaced them 1/8” apart.
Set Up Your Axis
(Maybe that’s what it’s called? I’m not really sure, but hopefully you get what I mean with the photo …)

Snap some lines so you set up your skewer just right, lining up the driver’s side stick with the passenger side stick.

Yep, just like that.
For the back sticks, you can just line up the skewer by eye so it sits right on the 2” marking.

For this one, that meant it had to be angled.
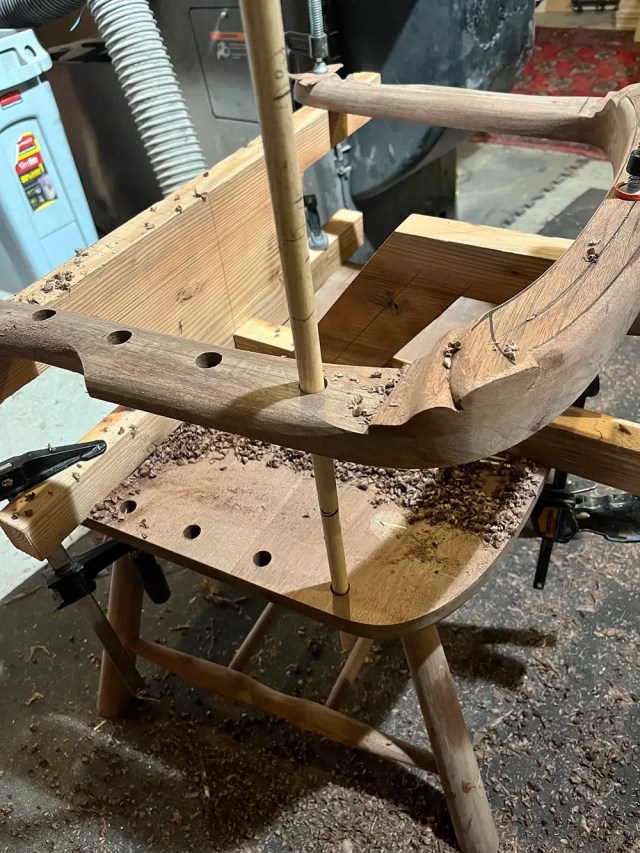
Now, put that sticky stuff on the middle of your skewer jig and get ready to drill.

It was a bit of a challenge to photograph the fine lines of the skewer, but you can just barely see two dashes on the left here. Now, line up your drill very cleanly between the two matching dashes.

Here, for instance, you can see I’m angled a wee bit too far back.

Here, I’m almost a quarter of an inch too far to the right.
Once you line up the dashes between your armbow, drill your top hole and move your skewer to the next stick position. Drill your spindle deck hole. If you’re kinda nervous (like me) you can check with an undersized dowel to see if yah buggered up your drilling …
Well, I didn’t screw it up, great, move on to the next.
And well, that’s it. Personally, moving a skewer from one hole to the next is a lot faster and less stressful than setting up a laser.

Here are all my sticks lined up, pretty darn straight …
Maybe you’re wondering … “But did it work when you put the armbow on?” Yes, I had zero resistance while gluing up, significantly less than when I used the laser.

But … as per usual, I was sure to f%$# something up in this process.
Idiot …

Oooopsy … I drilled into the leg. 🙁
I didn’t get too worked up about it. It’s wood, it can be repaired. When I was at school for luthiery, there was a repair guy who did a lecture and I’ll never forget something he said. Something like, “I don’t repair something to make it look like it never happened, when I’m done, they’ll know it was repaired but repaired well and with care.”
I just plugged a piece of cherry in my little accident.

Here is the final chair.
About the damn ugliest thing I’ve ever made. Good god, I hope to never make anything again that inspires words like “Regal!, Master, I’ve done well in the stock market now I just like to smoke cigars! Conquer!”


I hate it.
Very nice!
Love the twist ending |-D
The chair is so goofy and fun! I would absolutely put it out on the front porch.
Thanks for the technique, by the way!
The spirit of Dunbar lives! I made 5 chairs with Mike Dunbar between 1996 and 2003. The first class had 6 students and the last 16 with an instructor’s assistant. There was a continuously increasing number of tricks named after the person who dreamed them up, a perfect example of a quality engineer’s dream; continuous process improvement (making a chair is a process).
I nominate “Lo’s Lineup” for the first in the stick chair hall of fame.
Esther
Bravo for innovative and simpler. Please keep ’em coming!
I didn’t understand at all what was happening, but really want to bc I agree with his philosophy and think his results look great! Video please?
Likwise.
Seconded. Whatever this seems ingenious but I’m not making heads nor tails of it. I’m sure a video would make it instantly clear!
I like that chair, it gives me a couple of ideas for one of my own. Nice carving detail on the crest.
I really like the “Mind upon mind” concept.
I think your chair turned out great, a little fancy for my tastes and abilities, but solid craftsmanship throughout. I’m always on the lookout for tips & tricks to add to my chair specific armamentarium. Thank you.
I like that chair, it gives me a couple of ideas for one of my own. Nice carving detail on the crest.
I really like the “Mind upon mind” concept.
Great tip! Thanks!
Fantastic Lo. Very cool technique. Congrats and keep on!
I don’t know if this will help or confuse. My interpretation is the process is very much like using winding sticks. You are sighting down the drill and arm bow to see the colored bands on the skewer. The goal is to keep two same color bands in view the whole time. The sticky stuff keeps the stick in place while you go to town on the drill. The visual triangle from your eye to colored bands really aids in bisecting the triangle (read line up the holes) with the drill.
Part of the process that is assumed is body mechanics where you position yourself to limit movement like locking your arms, elbows and drill in place and move your core. Or whatever works for you since different body types require different strategies.
Hope this helps (and I didn’t miss entirely)!
Hmm, thought I was replying to Alex Jennings. Oh well.
It took me a while but then the light bulb came on.